
In a previous post, I walked through setting up the “off-array” Pure1 VM Analytics Collector. I did skip over some steps that some might prefer I didnt. So here is a more detailed walkthrough of the process.
- Creating an Ubuntu VM
- Install Docker CE
- Create a collector in Pure1
- Install the collector
IGNORE THIS. It is now a simple OVA:
https://www.codyhosterman.com/2019/10/vm-analytics-collector-now-an-ova/
Creating the VM
First download the ISO:
http://releases.ubuntu.com/16.04.5/ubuntu-16.04.5-server-amd64.iso
WinSCP the ISO to a datastore on an ESXi host. Now create a new VM:
Create a new VM:
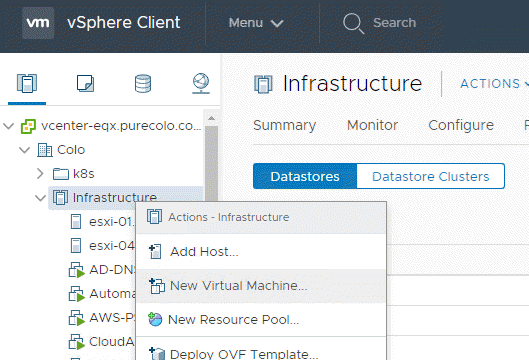
Choose new VM: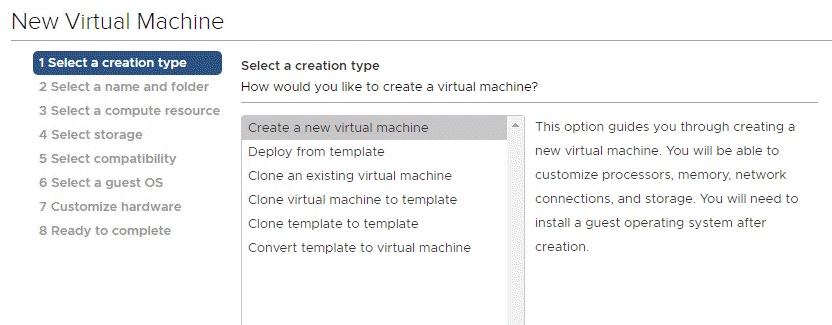
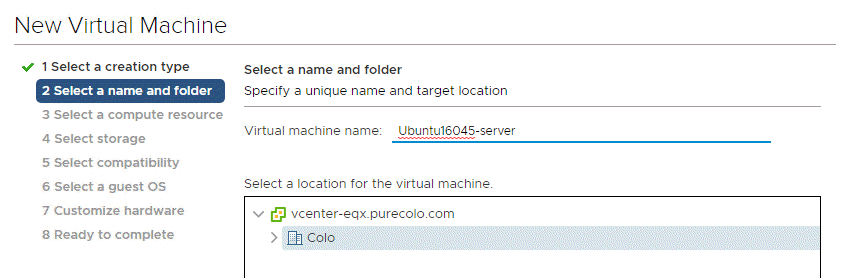
Give it a name:
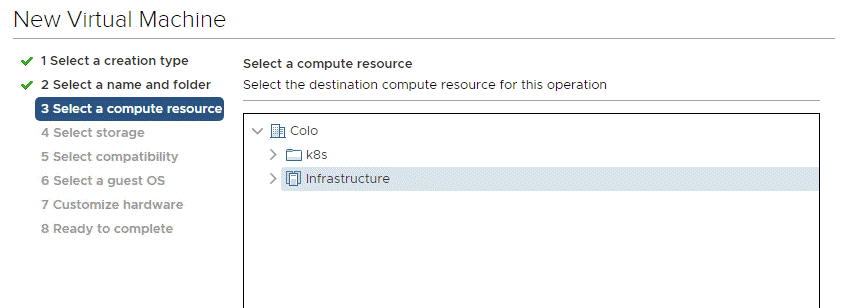
Chose your cluster:
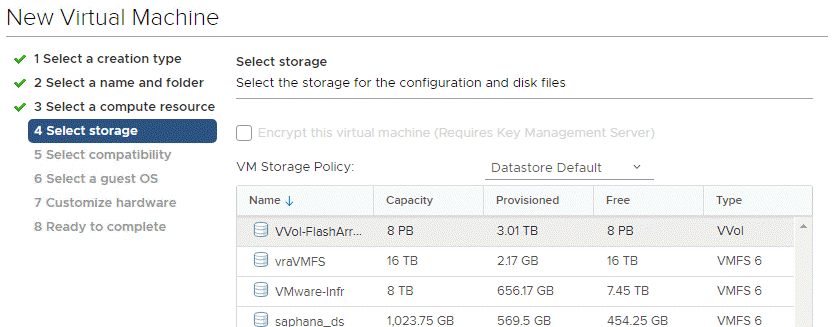
Choose a datastore:
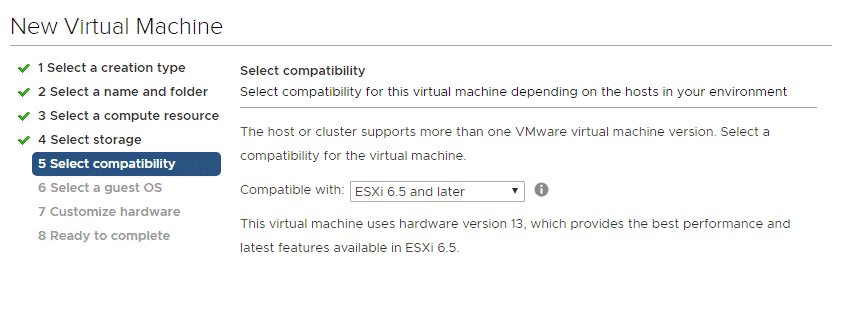
Choose a VM hardware version (generally go with the latest supported):
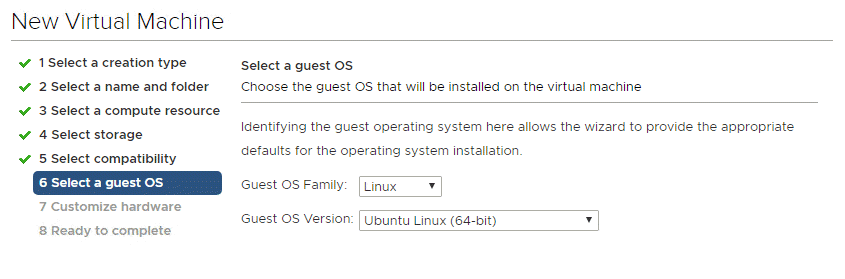
Choose Linux as the guest type then Ubuntu Linux 64-bit
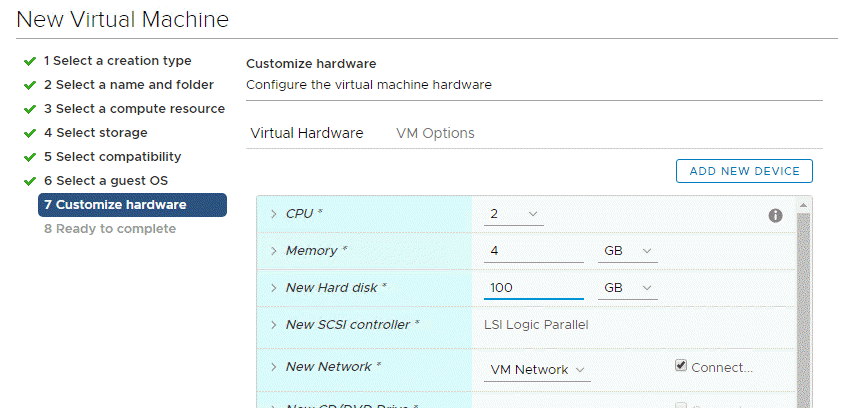
Give the VM at least 2 vCPUs and at least 2 GB of memory (I gave it 4). I also gave it 100 GB of disk space, but you can go with a lot less if needed (default of 16 GB should be plenty).
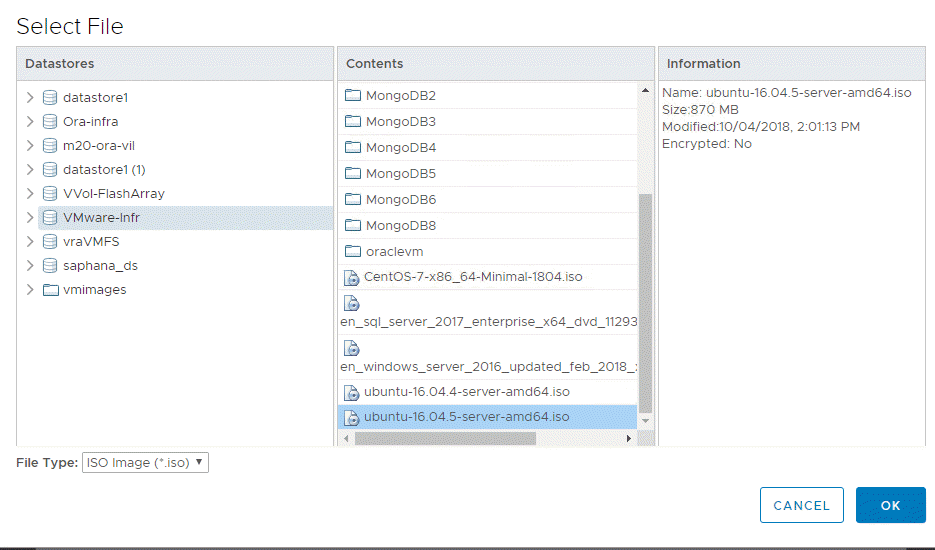
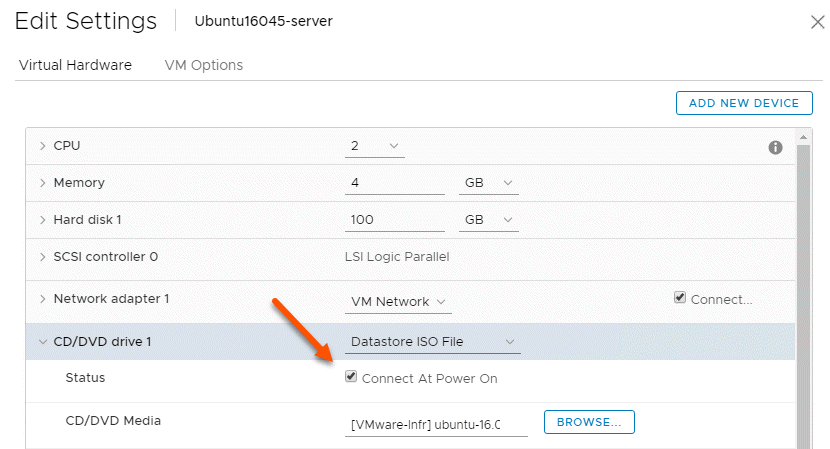
Choose New CD/DVD Drive and then datastore ISO File:
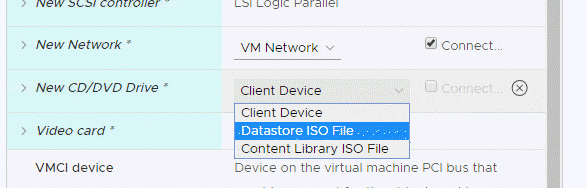
Navigate to wherever you put the Ubuntu ISO and choose it:
When selected, make sure the Connect box is checked.

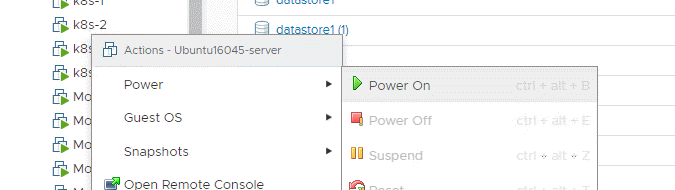
Finish the wizard and then power-on the VM:
Installing Ubuntu
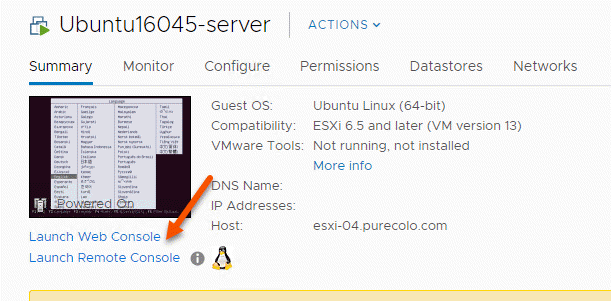
First launch the console of the VM. The web console or the remote console is fine. Your call.
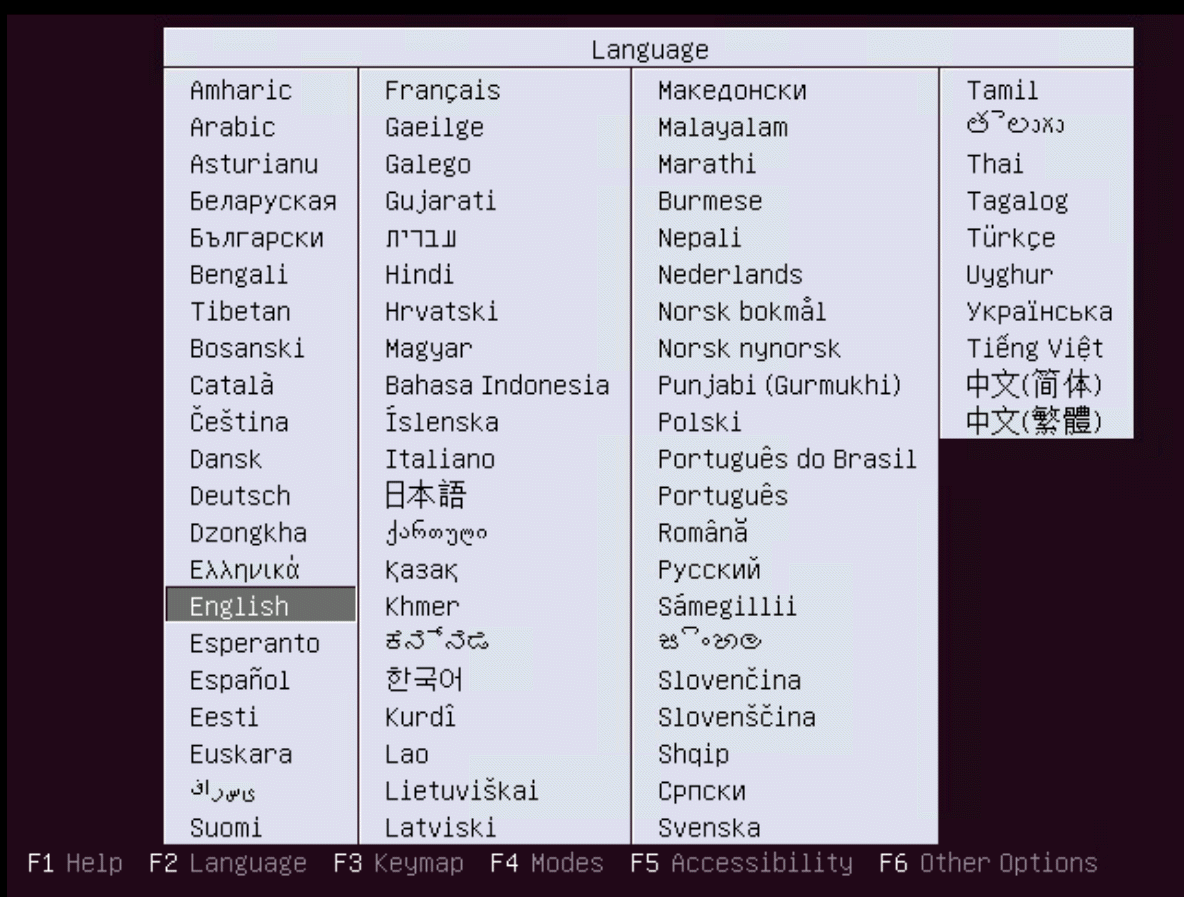
Choose your language. Note if this does not appear, that means you forgot to check the Connect button. If you did. Shut the VM down, go to edit settings, CD/ROM and then check the Connect at Power-On Option and then boot it back up.
Choose the language and press enter
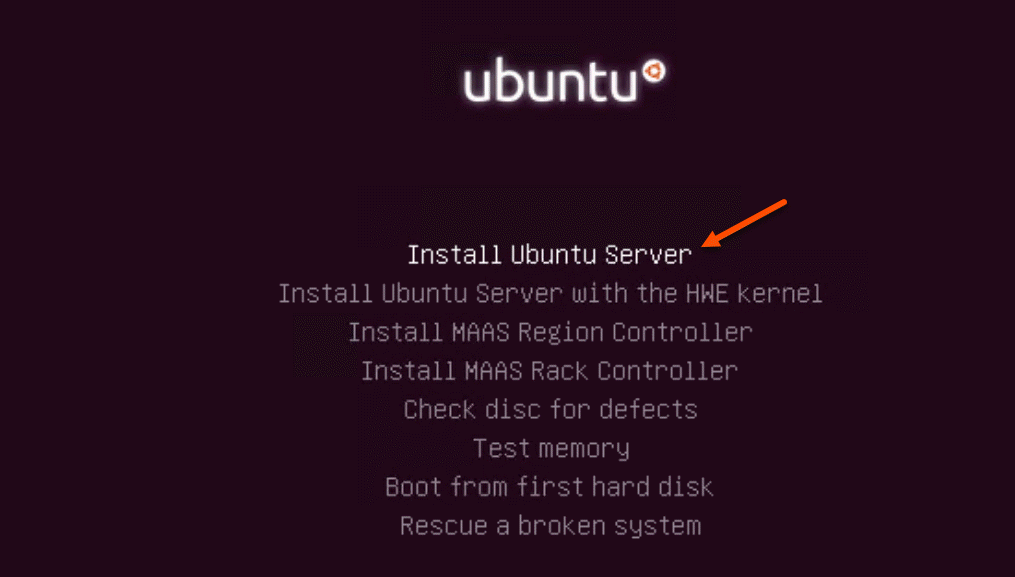
Then make sure “Install Ubuntu Server” is highlighted and then press enter.
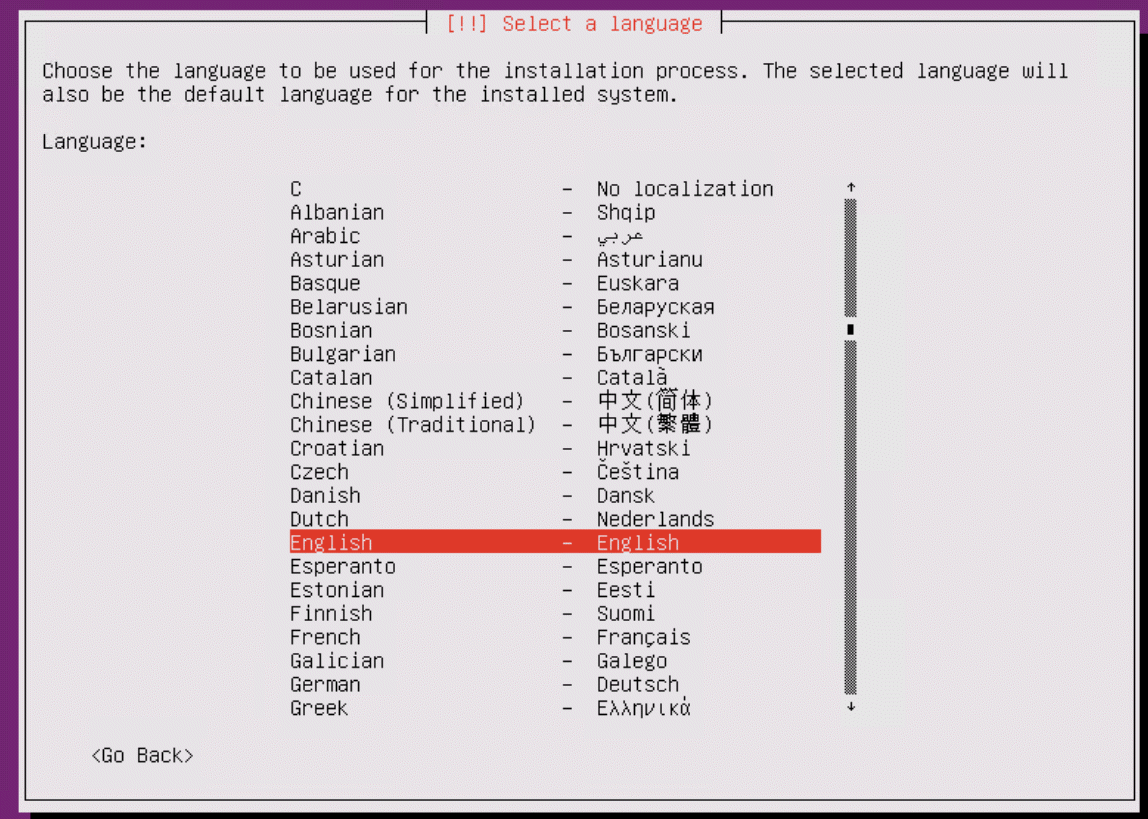
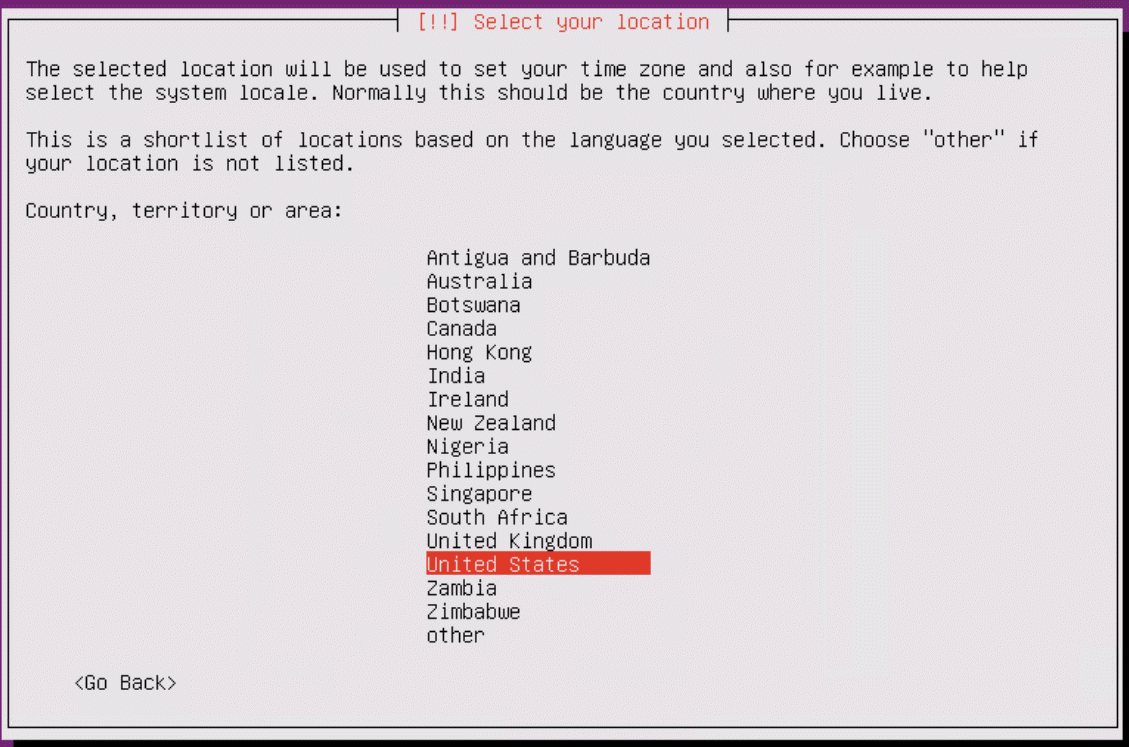
Then choose your language then country for the install process and press enter:
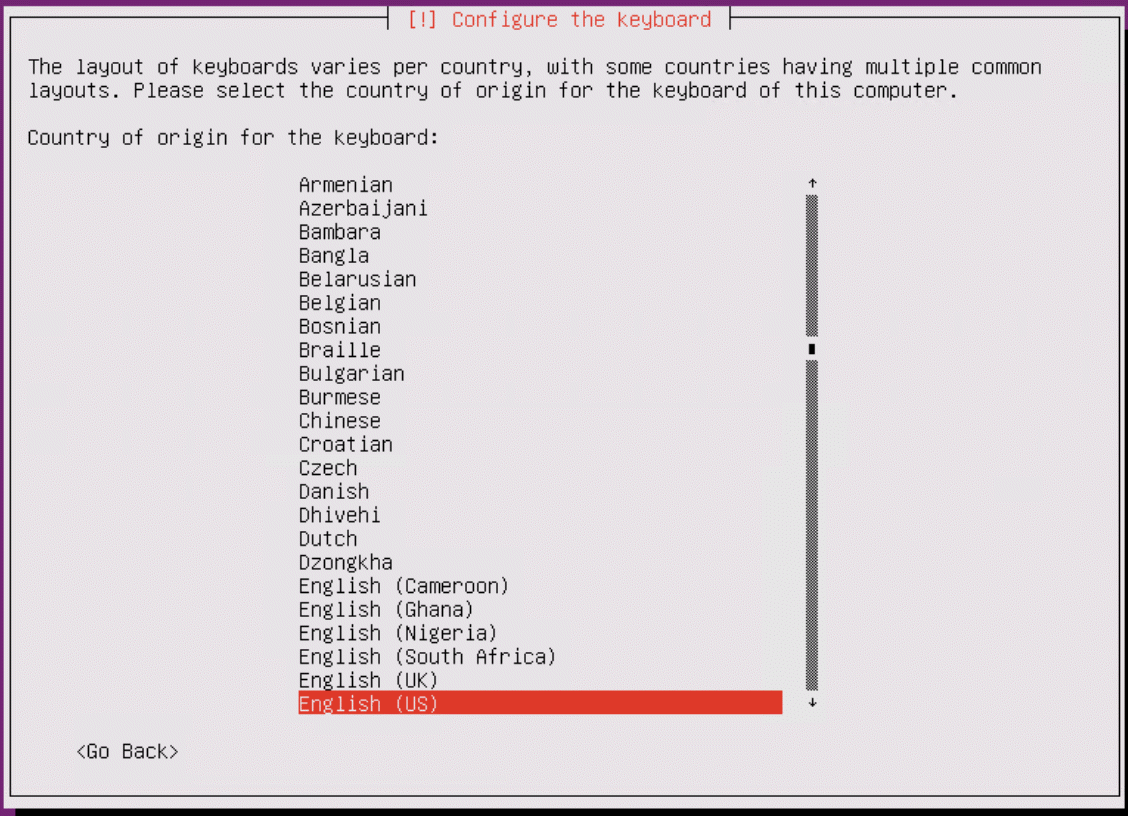
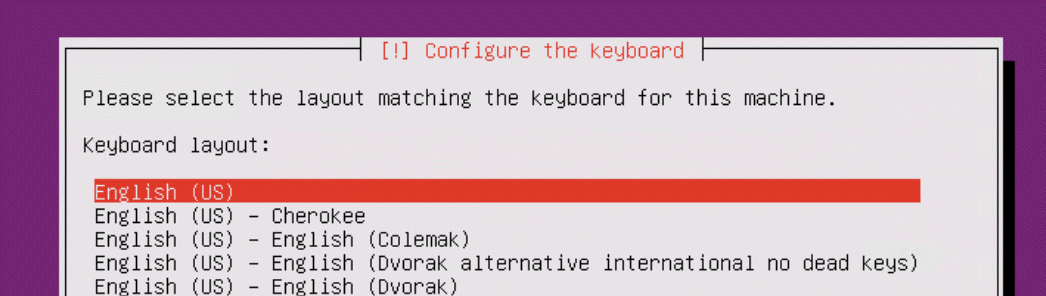
Next do not auto-discover keyboard and keep No selected and move on. Choose the type of keyboard and press enter to continue.

Press enter to continue and Ubuntu will look for a DHCP address. If it does not find one, then you must enter one in manually.
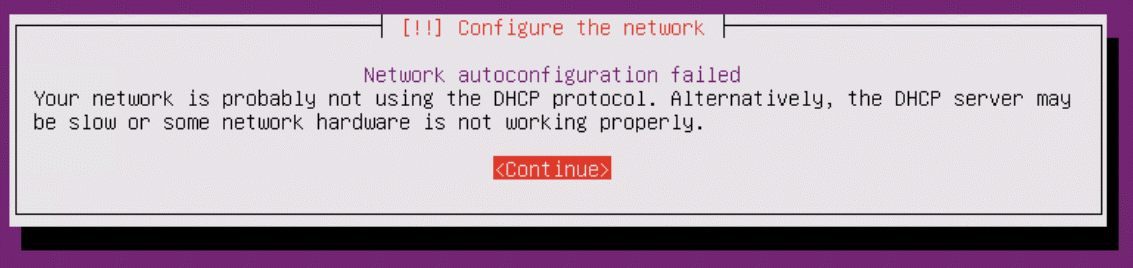
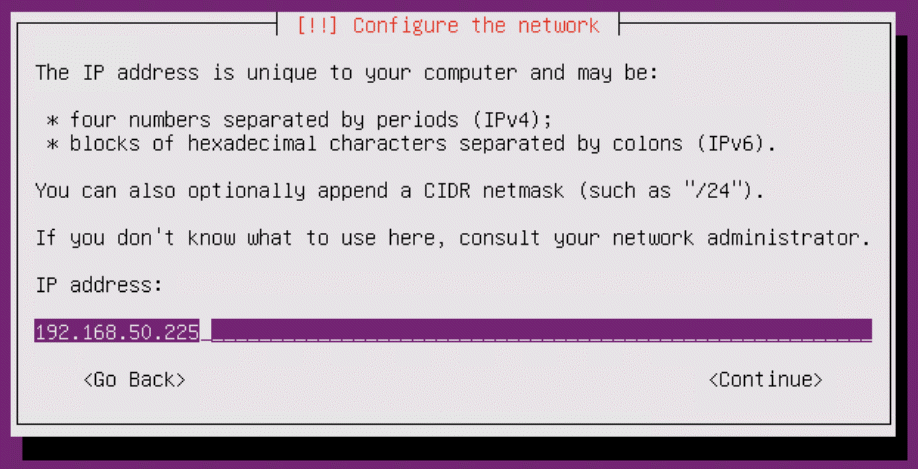
If it should get DHCP, check that you have the VM on the right network in vSphere and then you can retry the lookup, or simply enter it in manually:
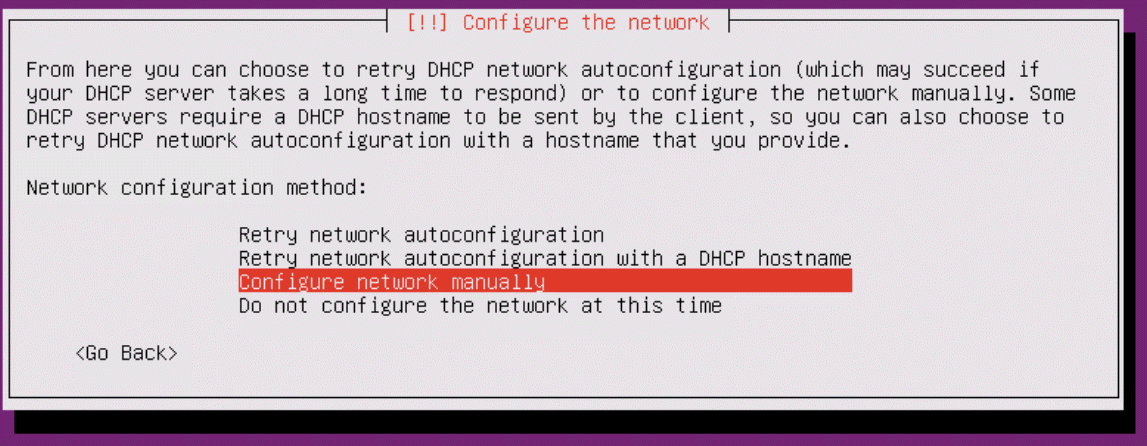
I will do the manual process. If you are using DHCP, skip these few steps:
Then enter the netmask:

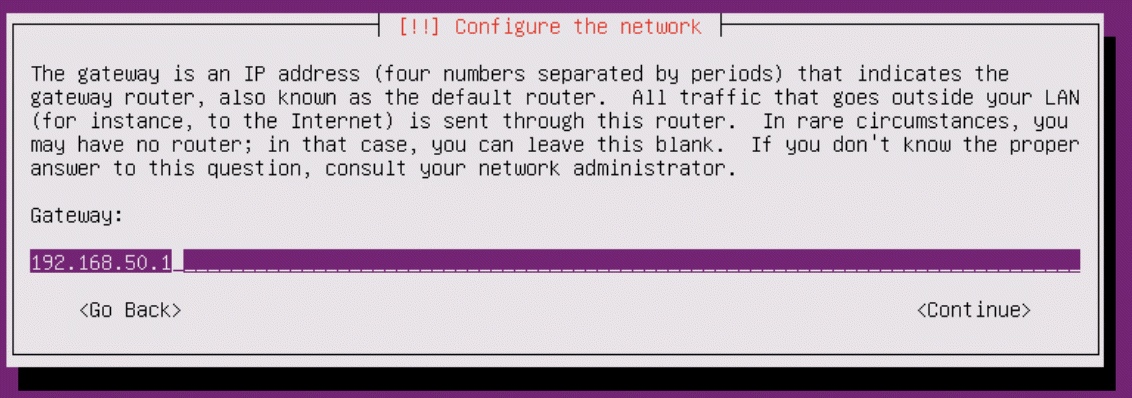
Then the gateway:
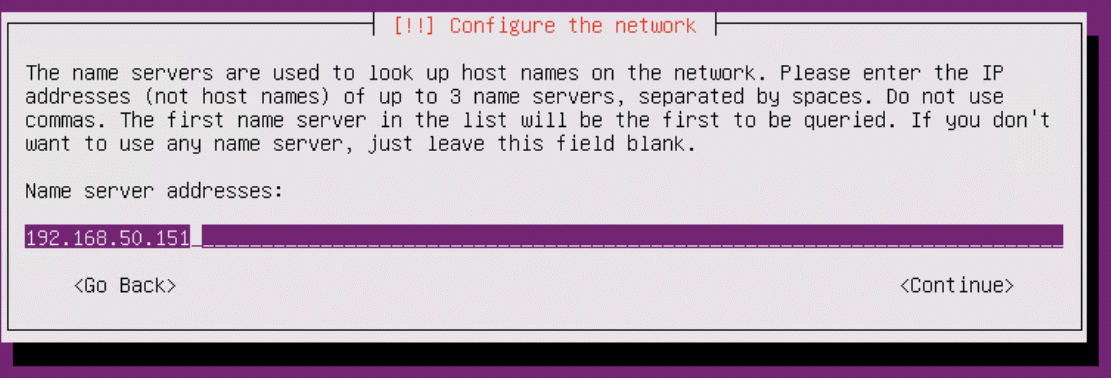
Then DNS:
Then the host name (this will autopopulate if DNS is configured and the previous networking settings were correct)
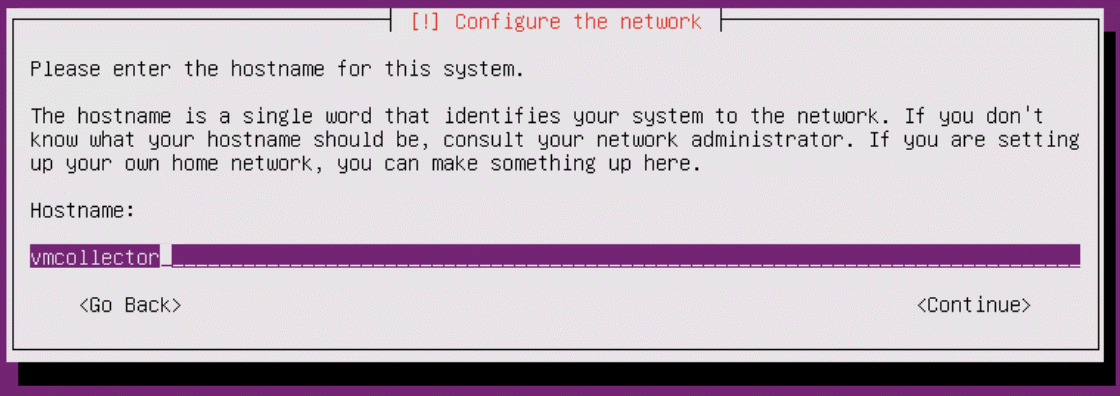
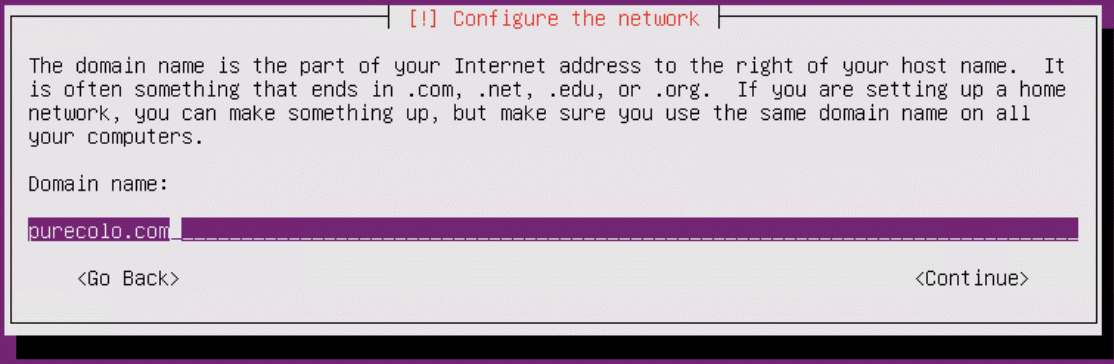
Then the domain suffix:
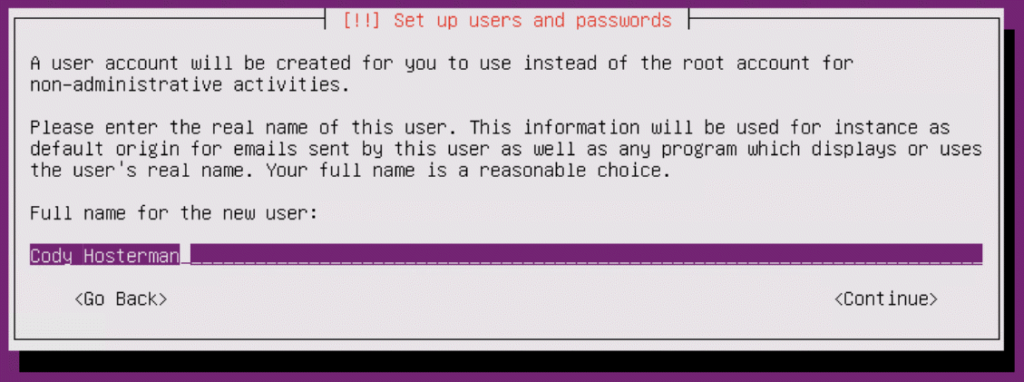
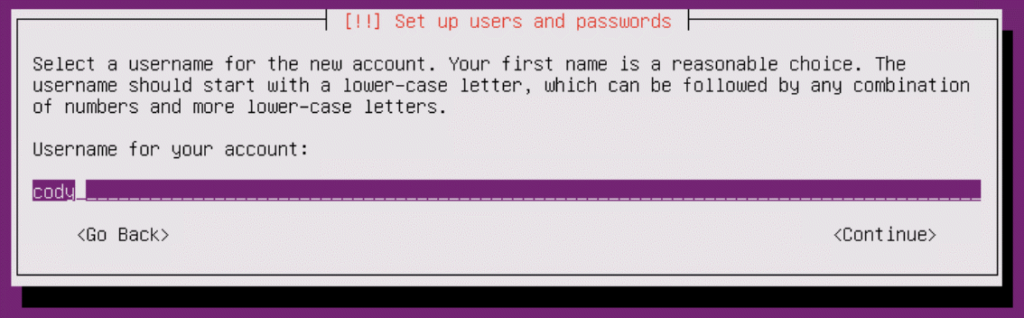
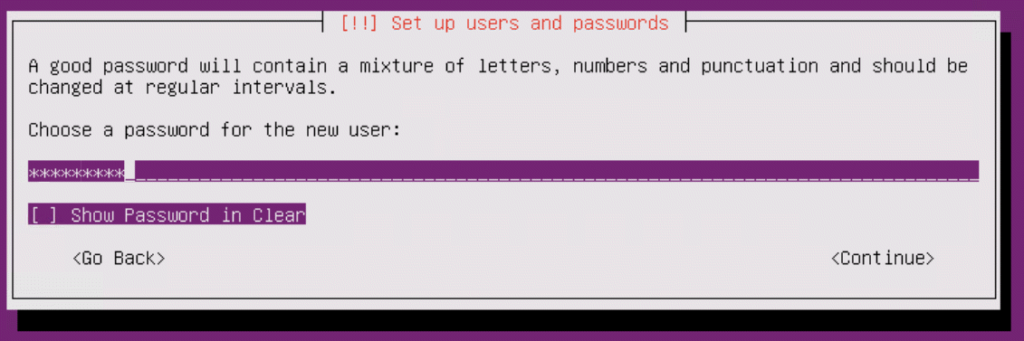
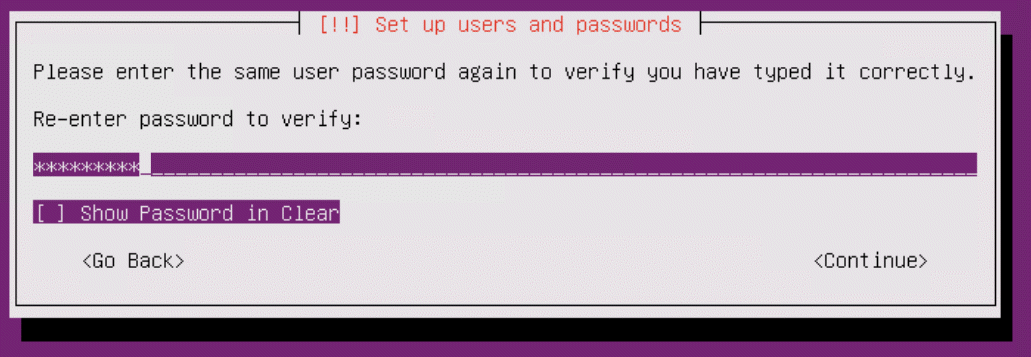
Now enter a full name for the default user (root is disabled by default in Ubuntu, so you must create at least one user)
I then choose to not encrypt my home, you may do whatever though: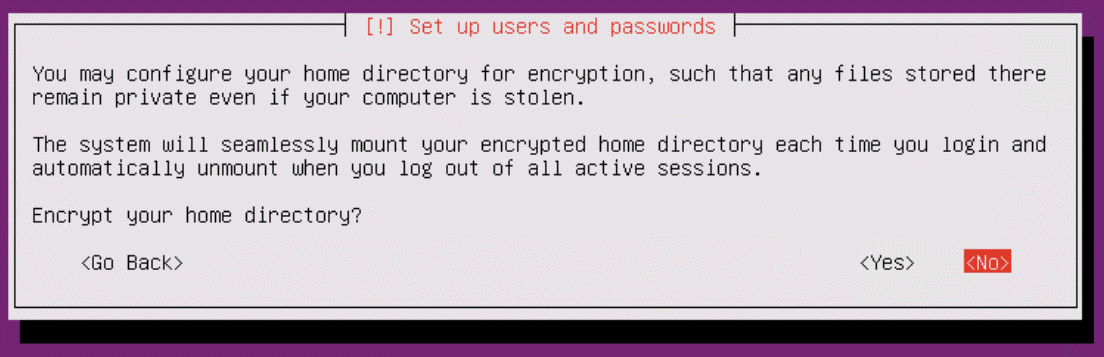
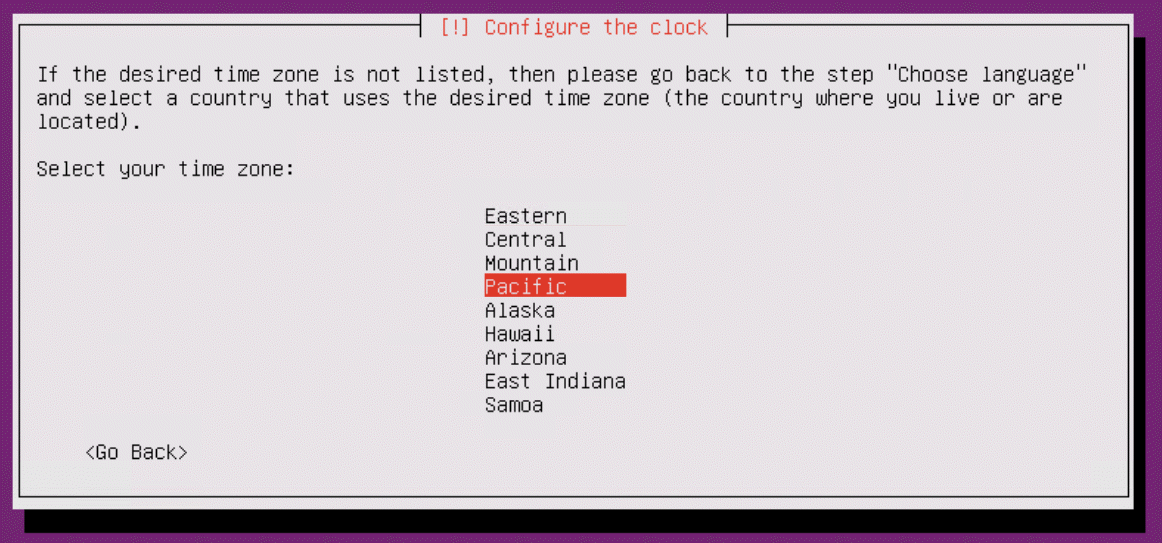
If the shown timezone is incorrect, change it to the right one.

Next create the file system. To keep it simple, let’s just use the “Guided – use entire disk” option (which is not the default).
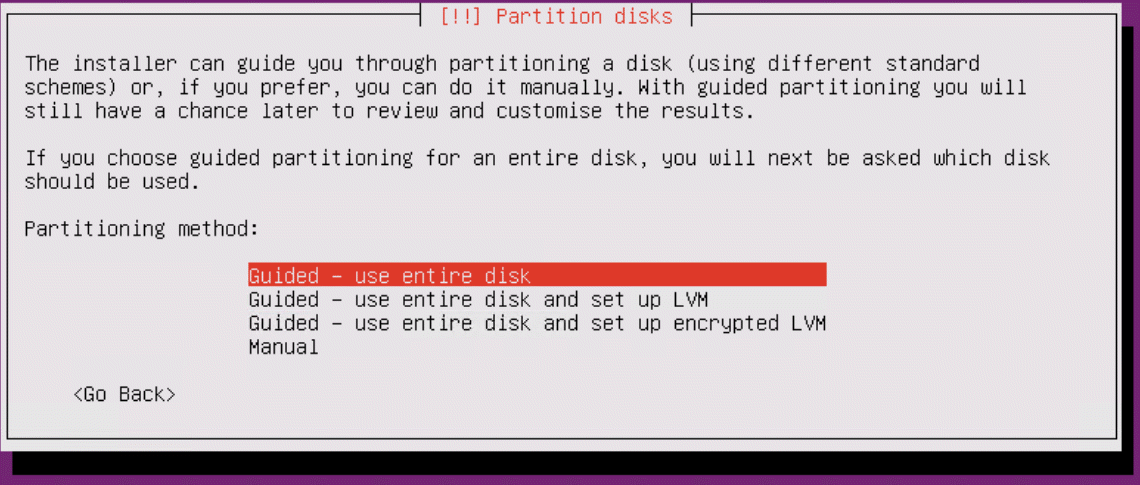
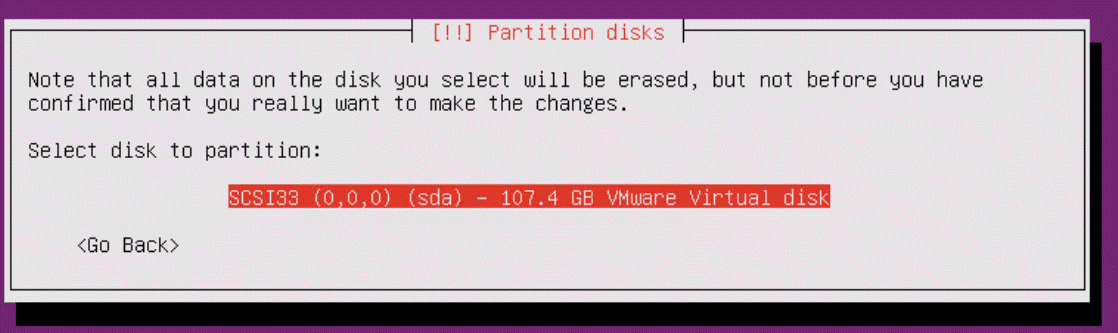
Select the disk:
Then confirm:
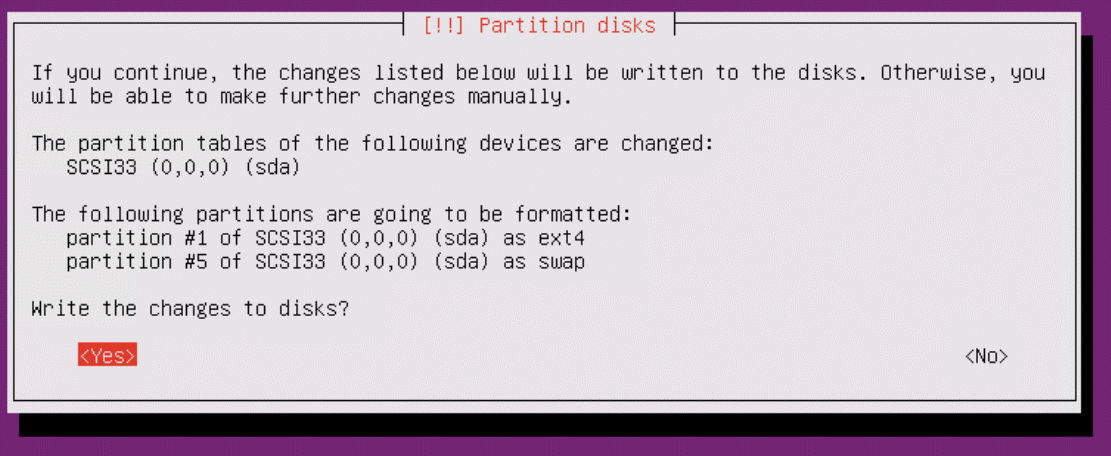
This will format the virtual disk. Wait for it to complete (takes about a minute).
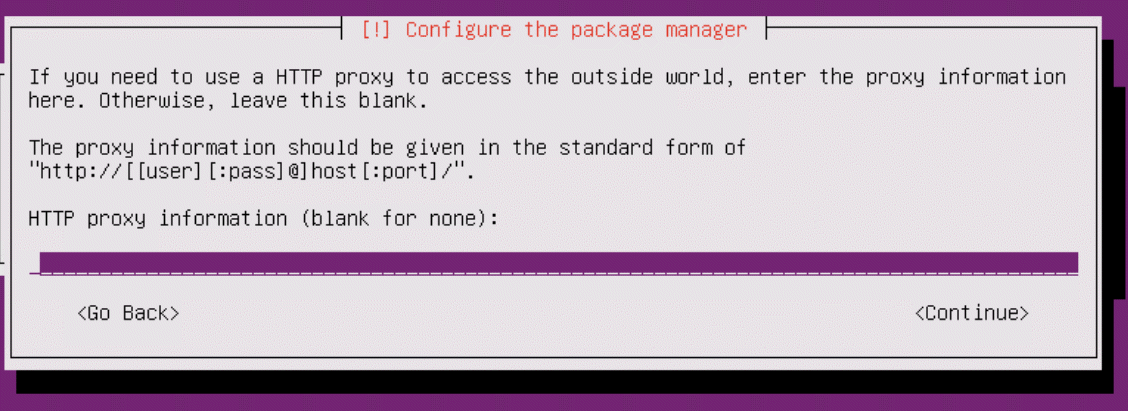
If you need a proxy to route to the internet, enter it here:
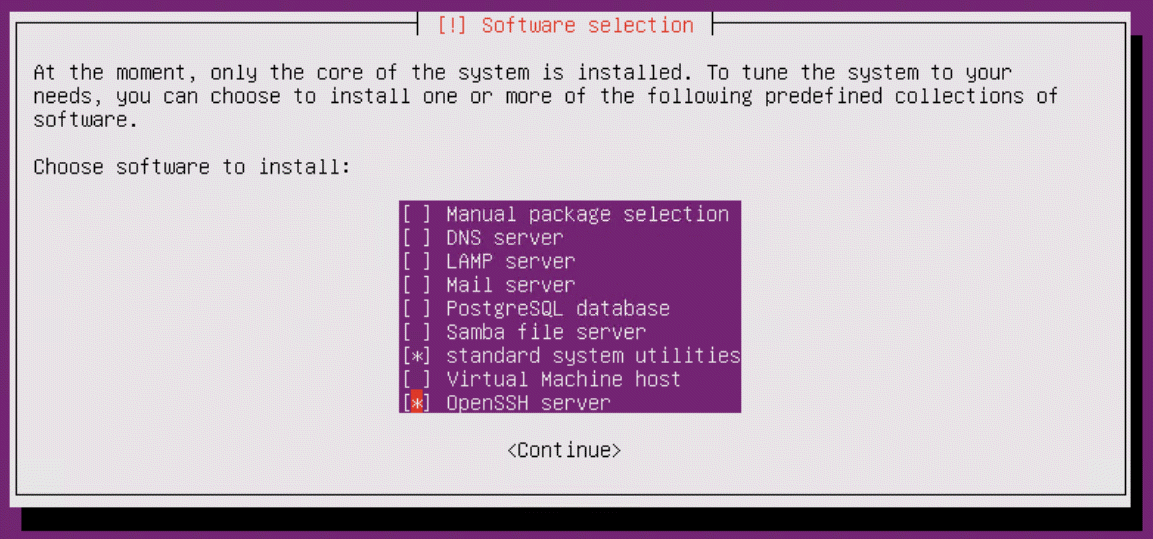
Then choose automatic updates
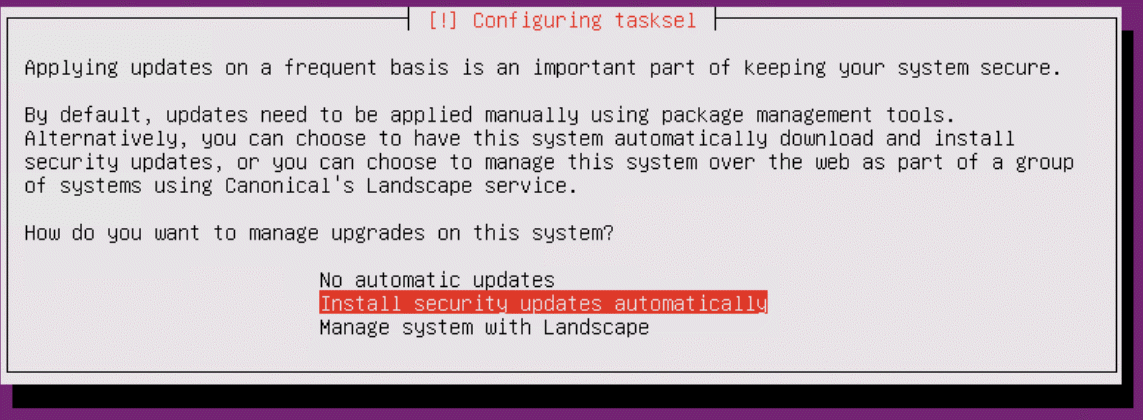
The next step is to choose the services–the only one you really need to add here is SSH server. Arrow down to it, then press the space bar to select hit. Hit enter to continue.
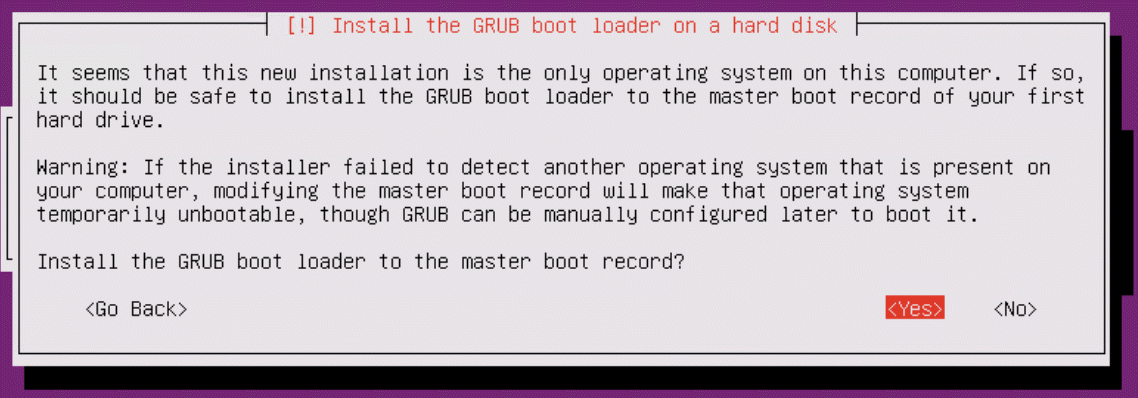
When complete, authorize the installation of the GRUB boot loader.
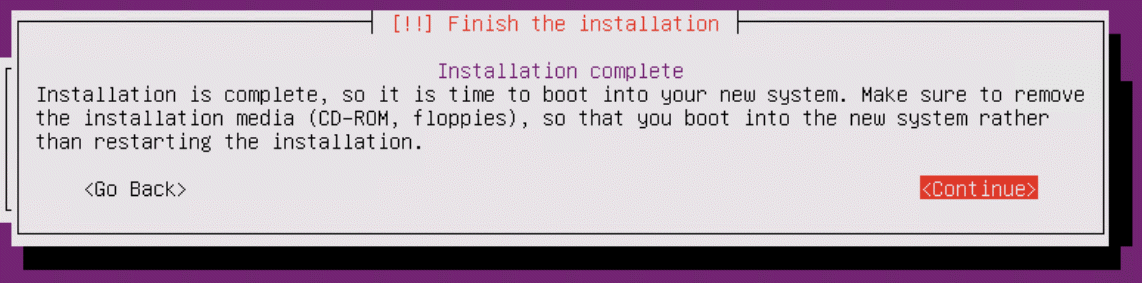
Let the install complete.
So remove the ISO by going to the VM settings:
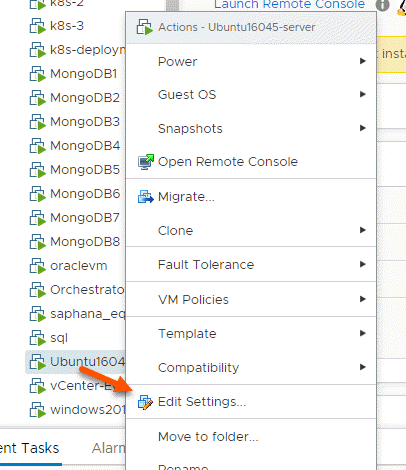
Then changing the CD/DVD drive back to “Client Device”. Click OK. Then let the VM reboot.
Configure the Pre-requisites
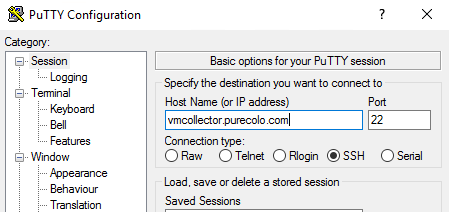
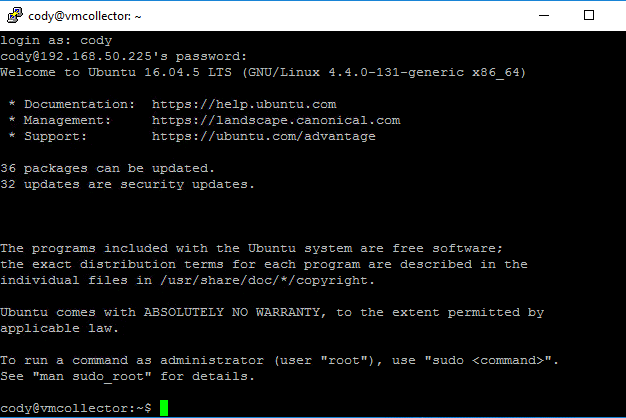
When it comes back up. SSH into your VM.
Use the login you provided during install:
One of the requirements is Python 3.5.2 or later, which nicely comes default with Ubuntu:

So all we have to do is install Docker. We support Docker EE (enterprise edition) and CE (community edition). Let’s just do CE. The instructions I follow below came from here:
https://docs.docker.com/install/linux/docker-ce/ubuntu/#install-docker-ce-1
First off, you need to make sure the apt package index is updated, so run this:
sudo apt-get update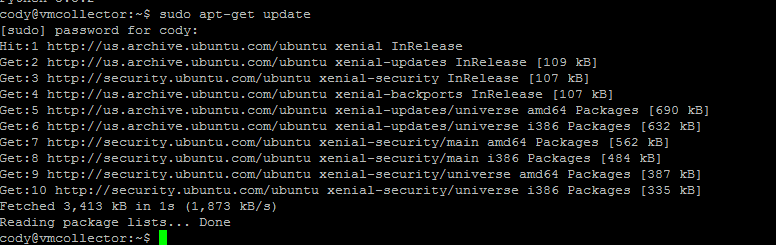
Now enable HTTPS for apt-get:
sudo apt-get install \
    apt-transport-https \
    ca-certificates \
    curl \
    software-properties-common
Copy and paste that whole command at once.
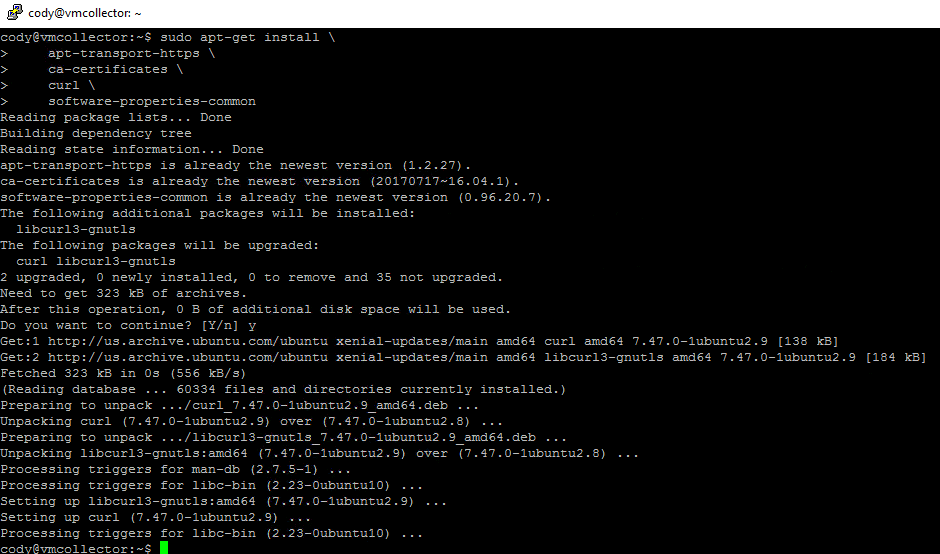
You will need to confirm in the middle by entering y on the keyboard and pressing enter.
Then we need to add Dockers GPG key. Yes the command ends with a solo dash. This is a one liner.
curl -fsSL https://download.docker.com/linux/ubuntu/gpg | sudo apt-key add -
Now to setup the repository:
sudo add-apt-repository \
   "deb [arch=amd64] https://download.docker.com/linux/ubuntu \
   $(lsb_release -cs) \
   stable"
Once again, this is a single copy and paste. Copy that whole operation above at once and then paste it into the SSH window and press enter to run it.

Now update apt-get again:
sudo apt-get update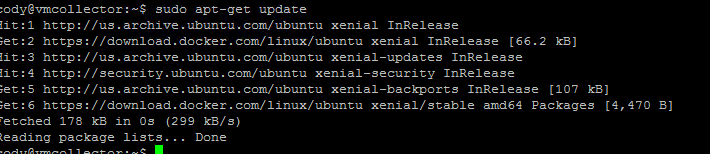
The install Docker:
sudo apt-get install docker-ce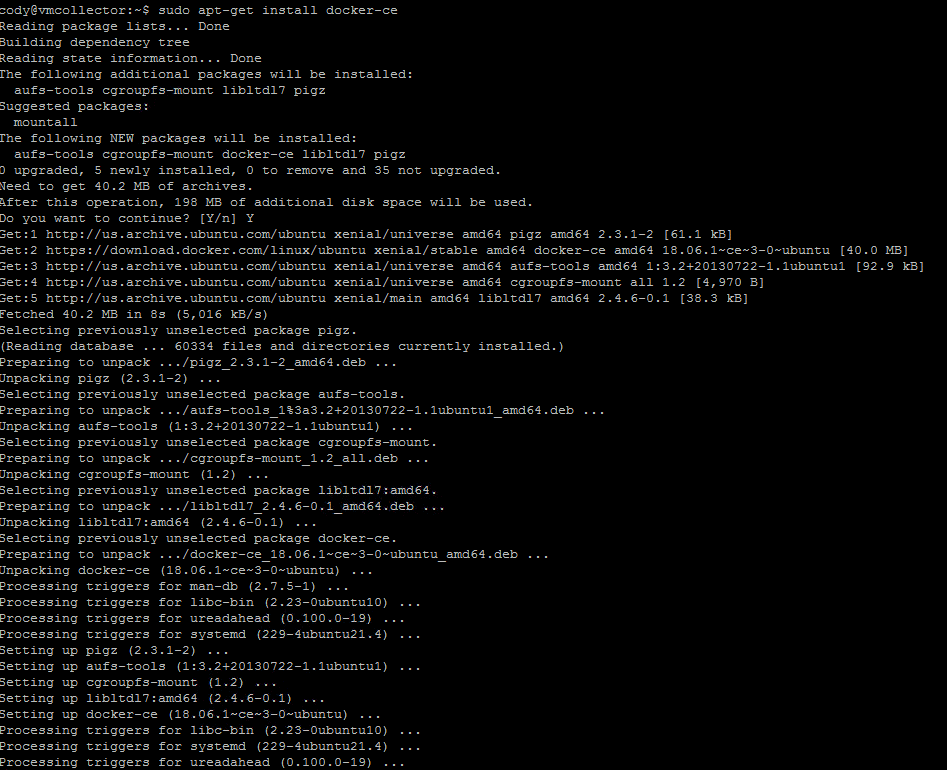
The last step before installing the collector is configuring the logs to rotate hourly so they can be phoned home.
Run the following command:
sudo mv /etc/cron.daily/logrotate /etc/cron.hourly
You’re done with pre-config!
Install the Collector
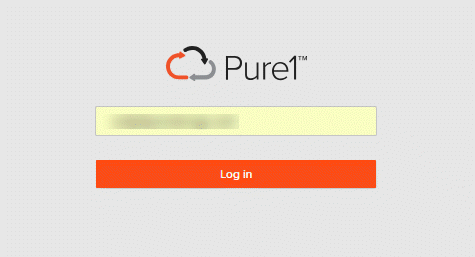
Before you can install the collector, you must create it in Pure1. So log into Pure1.
https://pure1.purestorage.com/
Click on VM topology on the left panel.
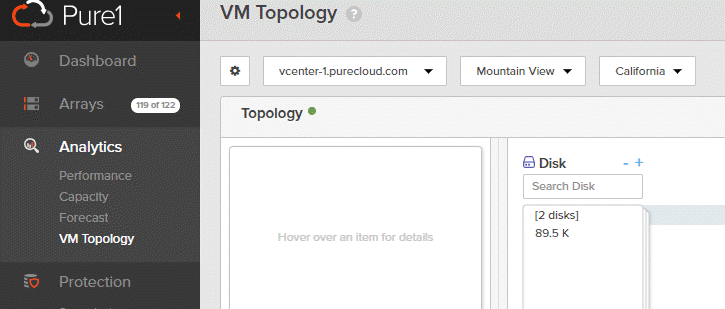
Then click on the gear icon in the top of the panel that appears.

In the panel that appears, click Create Collector
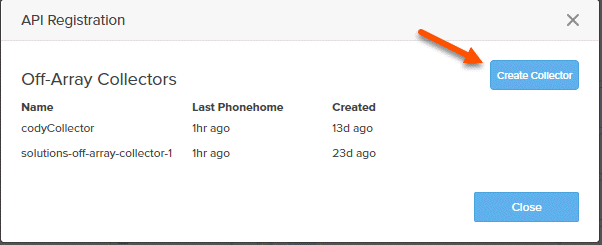
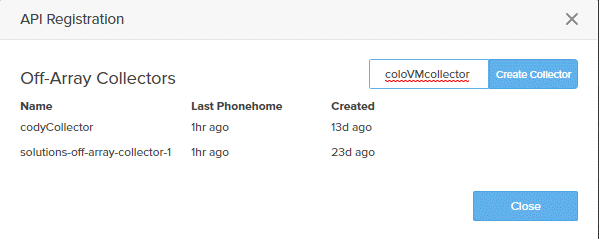
Give it a name (it is just a friendly name, it does not need to match the collector name).
Hover with your mouse of the new collector and then click the View Installation script icon.
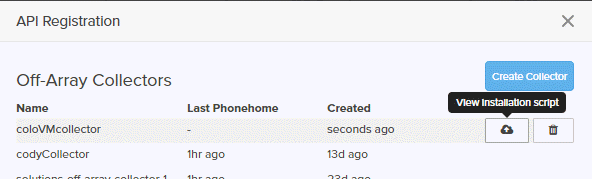
Click copy to copy the script.
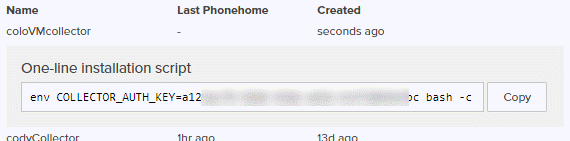
Go back to your SSH session and paste it into the collector and hit enter. Make sure to type in sudo before pasting it. If you forget, the script will fail and remind you do to so.
![]()
The collector will install.
Configure the Collector
Now the last step is to simply authenticate vCenter. You can use read only credentials if you choose.
(note if you are specifying a login domain, you will need to put the full user name in quotes like “pure\cody”)
sudo purevmanalytics connect --hostname <hostname>--username <username> --password <password>

You can review the status with purevmanalytics list:

You’re done! You should see data starting to populate in Pure1 in an hour or so.
We did this in the array, are there any pros an cons for having a vm vs direct in the array?
Cody covered this in another post: https://www.codyhosterman.com/2018/09/configuring-pure1-vm-analytics/
(See ‘On-Array Collector vs Off-Array’)
Thanx, missed that one….
Sorry for the delay in responding. Hopefully that helps. Let me know if you need more clarity.
I have no questions, the answers is: read all your blogs then you will find all the answers.
OVA needed!!!
I am a new client of Pure Storage and was quite disappointed that this is not provided as an OVA. I have been working with Pure Support who was to create the VM on my behalf due to certain steps not working out for us in the previous guide. Still waiting on feedback.
18.04.1 LTS is out, do we have to install 16.04.5?
It technically works, but there is a workaround required–we will be fixing this in an upcoming release. Until then, if you want to use 18, follow the instructions I posted in this comment:
https://www.codyhosterman.com/2018/09/configuring-pure1-vm-analytics/#comment-80099
So much detail…..so good! Thanks!
You’re welcome!
I’d like to add multiple vCenters. Do I need a separate collector for each vCenter instance?
Nope go ahead and add many vCenters to a single collector. As long as the vCenter can route to all of your vCenters you can use one. Only if the network is isolated between vCenters do you need more than one
When I configure the logs to rotate, I receive this message. Any ideas?
:~$ sudo mv /etc/cron.daily/logrotate /etc/cron.hourly
mv: cannot stat ‘/etc/cron.daily/logrotate’: No such file or directory
This usually means it has already been done. Check both /etc/cron.daily/ and /etc/cron.hourly/ to see if logrotate is there
I got everything set up and when I went to connect to vCenter I got this…………
lume@PureVMAnalytics:~$ sudo purevmanalytics connect –hostname vcenter-vcs-atl.cloudservices.com –username [email protected] –password **********
Name Host Username Password
vcenter-vcs-atl.cloudservices.com vcenter-vcs-atl.cloudservices.com [email protected] ****
Which was different than I got on the other two successful ones I set up.
Now I’m getting this and I’ve run the script twice.
lume@PureVMAnalytics:~$ purevmanalytics list
Got permission denied while trying to connect to the Docker daemon socket at unix:///var/run/docker.sock: Get http://%2Fvar%2Frun%2Fdocker.sock/v1.38/containers/analytics_collector/json: dial unix /var/run/docker.sock: connect: permission denied
Error: Unable to find Pure Storage VM Analytics Collector. Please run the installation script.
lume@PureVMAnalytics:~$
Try adding sudo before purevmanalytics list.
Thanks!
During collector configuration I am using a read only domain account for username and password. Don’t seem to be workin.
Account need to be local account on the VC?
Thanks
Solution was using quotes around the user name.
sudo purevmanalytics connect –hostname –username
Ah was going to look into this today. Thanks for letting me know–I will updates my posts.
I get errors that it can’t find my vSphere host, yet DNS resolution works in my VM. the installer suggested that 127.0.0.1 might not work in containers, so i configured an instance of unbound to act as a local resolver (with a stub zone set up to forward to my local AD DNS for local host names) and still no joy. Any ideas?
What we have is working well, but we see high latency reported and when you track it down to a disk, that disk has a very low IOPS count. Is there plans to allow filtering for these situations where a minimum IOPS is required to validate latency metrics?
This is a good idea–an issue I have seen personally as well. I will keep this in mind for the next update. Thanks!!
Just a quick note, for those of us on network 172.16.x.x, docker also uses 172.16.x.x for the bridge network (I think). Once I get docker installed, I loose connectivity to my VM due to routing issues. I haven’t figured out the fix, not a Docker guru but I am determined to figure it out.
I figured out a workaround for this issue:
https://success.docker.com/article/how-do-i-configure-the-default-bridge-docker0-network-for-docker-engine-to-a-different-subnet
Basically create a /etc/docker/daemon.json file with the following (set the ip to what would work in your environment):
{
“bip”: “192.168.200.5/24”
}
Then, restart docker:
sudo systemctl restart docker
All done.
Is VVOL’s supported?
After hours of waiting i can only see non VVOL-Datastore, and to be more precise: i see only non PureStorage Datastore 🙁
Any idea?
ESXi / vCenter 6.7, Purity 5.1.5, vCenter PlugIn 3.1.1
Not today. This will be added in a subsequent release. I mention what’s supported and other notes here: https://www.codyhosterman.com/2018/09/configuring-pure1-vm-analytics/
OK. Thanks. I missed that in your blog.
But why is my FA not reported? There is also a VMFS Datastore on it.
I figured it out.
As i did not have any active vm stored on the VMFS Datastore nothing was reported through the purevmanalytics about this volume and the FA.
I now moved the collector-vm to the VMFS Datastore and now i get the FA and the volume with the VMFS Datastore reported to Pure1 Manage VM Analytics.
Ah okay cool–yeah you need some type of workload on it
What would be involved in making everything self-contained in the containers so that they don’t rely on scripts or host dependencies?
I’m working on a VIC POC and it’d be cool to run these directly in VIC without setting up a separate Docker host.
I will keep this in mind, thanks! We are currently evaluating some other options on deploying this–so this feedback is helpful
Hi,
What is the command line to disconnect Off-array collector to Pure1?
Thanks..
That is actually done in Pure1–you can deauthenticate it at the same place where you initially created the collector install script
I’ve got the collector installed, it’s collecting data, I’ve triggered a couple of manual callhomes, but no data is showing up in Pure1. How can I tell if it’s making a successful callhome?
Hi,
I configured everything as per document and Collector is active at below
$ sudo purevmanalytics list
Name Enabled State Duration (s) Last collection
——————————– ——— ———- ————– ————————-
msVCSp02.paramount.ad.viacom.com True COLLECTING 471.971 2018-12-14 13:41:48-08:00
However i don’t see topology view populated in my Pure1 please suggest if i am missing something.
Can you confirm that logrotate is set to hourly? Is it still no dialing back. Anything of note in the CCM log?
Following all instructions for install… errors at:
sudo apt-get install \
> apt-transport-https \
> ca-certificates \
> curl \
> software-properties-common
————-Outputs
Reading package lists… Done
Building dependency tree
Reading state information… Done
ca-certificates is already the newest version (20170717~16.04.1).
software-properties-common is already the newest version (0.96.20.7).
The following additional packages will be installed:
libcurl3-gnutls
The following packages will be upgraded:
apt-transport-https curl libcurl3-gnutls
3 upgraded, 0 newly installed, 0 to remove and 90 not upgraded.
Need to get 350 kB of archives.
After this operation, 1,024 B of additional disk space will be used.
Do you want to continue? [Y/n] y
Err:1 http://security.ubuntu.com/ubuntu xenial-security/main amd64 curl amd64 7.47.0-1ubuntu2.11
403 Forbidden
Ign:2 http://security.ubuntu.com/ubuntu xenial-security/main amd64 libcurl3-gnutls amd64 7.47.0-1ubuntu2.11
Err:3 http://us.archive.ubuntu.com/ubuntu xenial-updates/main amd64 apt-transport-https amd64 1.2.29
403 Forbidden
Get:1 http://security.ubuntu.com/ubuntu xenial-security/main amd64 curl amd64 7.47.0-1ubuntu2.11 [139 kB]
Get:2 http://security.ubuntu.com/ubuntu xenial-security/main amd64 libcurl3-gnutls amd64 7.47.0-1ubuntu2.11 [185 kB]
Fetched 323 kB in 4s (72.3 kB/s)
E: Failed to fetch http://us.archive.ubuntu.com/ubuntu/pool/main/a/apt/apt-transport-https_1.2.29_amd64.deb 403 Forbidden
E: Unable to fetch some archives, maybe run apt-get update or try with –fix-missing?
———————-
Sadly I am not a Linux guy (yet). So I am a bit lost as to what to do to fix this. Any help?
cancel my comment…. security/proxy. grr
Hi Cody,
can we use the same VM for more than one vCenter installations?
Best regards,
Afsin
Yes–definitely. The only real reason to split them out is if it literally cannot reach all of the vCenters through the network it is on.
When does the OVF/OVA become available?
Just got out of a meeting talking about design/security of it. Too early to say when though, sorry. That answer is not known yet. If we are going to do this, we want to do it right and go above and beyond. So we are being very careful of the design.
Hi Cody,
ok, it is running now. But, I see it is trying to reach via HTTPS some targets like ec2-52-40-255-240.us-west-2.compute.amazonaws.com. But the VM is behind our Internet Proxy. What should do? Where can I configure for?
Thank you in advance!
Best regards,
Afsin
PS: for apt command it is defined in /etc/apt/apt.conf. Before running the installation script with wget I have exported the environment variable only on the command line. I do not want to change /etc/profile at the moment. May be your application has an another way to use a proxy.
The process here should help: https://support.purestorage.com/Pure1/Pure1_Manage/001_Overview/Pure1_Manage_-_VM_Topology#Configuring_a_Proxy
Thank you!
It works!
I see bad consuments visually!
Great!
🙂
Is it possible that it doesn’t work with vsphere 6.7U1?
root@vm-analytics:/var/log# sudo purevmanalytics connect –hostname “vcenter.weller.local” –user “vsphere\administrator” –password xxxxxxxx
[3] 4102
root@vm-analytics:/var/log# ^C
[3]+ Stopped sudo purevmanalytics connect –hostname “vcenter.weller.local” –user “vsphere\administrator” –password xxxxxxxx
vm-analytics and vcenter are in the same subnet.
It should be fine, I am using it with 6.7 U1. Anything in the log?
Docker bridge ip address was the issue. Changed it and now it runs, but nothing appears in Pure1
How long have you waited for it to appear? It will take an hour at least for the first data to show up. Also did you verify you set log rotate to 1 hour? Otherwise it defaults to a day. If those are good, then check the ccm.log to see if there are errors. Or open a support case with Pure–they should be able to quickly identify the issue. Could be a firewall thing
Hi,
We have just installed the Pure Analytics using the Ubuntu docker installation which works fine. However it’s not entirely clear how to automate startup on system boot. Can it be configured via systemd service
Thanks
Hermon.
I will look into this
Do we support NFS datastores ?
I ran into a problem authenticating to my 2 vcenters with the
“domain/username” syntax. What worked for me was “domain\username”.
ah thanks. Fixed
Well done, easy to follow.
I had an issue authenticating my vCenter’s – it didn’t like my complex password; quotes didn’t help, I ended up dropping it off the end of the command and then copy/pasting it in at the prompt.
Thanks! We are working on an OVA so this will be much better. Mind opening a support ticket on this? So this can be fixed?
Sure – just created it.
Something is not happy – data is not getting sent – this is in my ccm.log
2019-03-14 16:49:07.441 [taskScheduler-1] ERROR com.purestorage.ccm.transport.HttpClient Received error response from https://restricted-rest.cloud-support.purestorage.com/auth/1.0/appliance-certs. Status code: 400, request_uuid: 45f3ef68-85db-485b-a673-12a63ede9945.
2019-03-14 16:49:07.441 [taskScheduler-1] ERROR com.purestorage.ccm.transport.HttpClient Errors in response content:
2019-03-14 16:49:07.441 [taskScheduler-1] ERROR com.purestorage.ccm.transport.HttpClient Appliance fae2f7ea-a33f-410e-82c8-69f5ebe4930a needs to be pre-registered before issuing appCert
2019-03-14 16:49:07.441 [taskScheduler-1] ERROR com.purestorage.ccm.security.service.CertMgmtService Status code: 400, Status Text: Bad Request.
2019-03-14 16:49:07.441 [taskScheduler-1] ERROR com.purestorage.ccm.security.service.CertMgmtService Errors in response content:
2019-03-14 16:49:07.441 [taskScheduler-1] ERROR com.purestorage.ccm.security.service.CertMgmtService Appliance fae2f7ea-a33f-410e-82c8-69f5ebe4930a needs to be pre-registered before issuing appCert
2019-03-14 16:49:07.441 [taskScheduler-1] ERROR com.purestorage.ccm.scheduler.RegisterJob Registration check encountered some error: Appliance Registration Request failed
2019-03-14 16:49:07.441 [taskScheduler-1] INFO com.purestorage.ccm.scheduler.RegisterJob Registration check completed, took 81ms
Any idea on how to mitigate that? It wasn’t working so I did copy and run the one-line installation script a second time and restarted the VM.
This sounds like it might have been a failed install that was restarted and caused the collector registration to collide. Sometimes the best solution here is the create a new VM, create a new collector registration and start from scratch. We are working on improving this process quite a bit in the next major release.
It’s resolved – I had my network/security team open up some things yesterday. The existing deployment didn’t work, but I deployed again using the same IP and firewall rules and this time it worked.
Could this container be run on a Windows Server that supports Docker containers?
Honestly, I am not sure. I know someone got it working on RedHat, but my suspicion is that it has to be at least linux. We are working on an OVA though
Hello Cody, we have a problem around right access of metrics through vcenter….
In ‘vm_analytics.log’ we get “INFO – VCenter.******:wse2149 – No applicable counters found. Entity is either offline or insufficient permissions”
We register vcenter with ‘[email protected]’…
We review the ‘[email protected]’ rights and of course he has all the rights…
What can we verify to get rights to collect metrics for our VMs ?
Thanks 🙂
What is wse2149? All this is saying is that the object doesnt have any metrics. An example would be a VM that is in a state that causes vCenter to not have performance data for it. Or a datastore that is not the valid type (like NFS) or in some offline/disconnected state. This generally is an innocuous error, unless you want metrics for that object.
Is this out on github or docker hub that we can pull from?
Not today–at this point it can only be installed via that script or directly on the array through a support request. We are working on alternative delivery methods right now.
I saw WARN and ERROR using this using this command to view the ccm.log :
pureuser@vm-analytics-2:/var/log/docker/vm_analytics$ tail -f ccm.log | grep “ailed”
2019-04-24 13:13:42.216 [taskScheduler-1] WARN com.purestorage.ccm.transport.HttpClient Failed to call Arcus POST https://restricted-rest.cloud-support.purestorage.com/auth/1.0/appliance-certs java.net.UnknownHostException: restricted-rest.cloud-support.purestorage.com
2019-04-24 13:13:42.216 [taskScheduler-1] WARN com.purestorage.ccm.scheduler.RegisterJob Last register job failed, trigger next job after 30000 ms
2019-04-24 13:14:31.956 [taskScheduler-2] WARN com.purestorage.ccm.transport.HttpClient Failed to call Arcus POST https://restricted-rest.cloud-support.purestorage.com/logs/1.0/hourly-log java.net.UnknownHostException: restricted-rest.cloud-support.purestorage.com: Temporary failure in name resolution
2019-04-24 13:14:31.957 [taskScheduler-2] ERROR com.purestorage.ccm.logupload.LogUploadServiceImpl Failed when sending requests to Arcus: /ccm/log/vm_analytics_metrics.log-2019042411.gz
2019-04-24 13:14:31.957 [taskScheduler-2] INFO com.purestorage.ccm.logupload.LogUploadServiceImpl Upload failed, sleeping for 60000 milliseconds
2019-04-24 13:14:31.959 [taskScheduler-1] WARN com.purestorage.ccm.transport.HttpClient Failed to call Arcus POST https://restricted-rest.cloud-support.purestorage.com/auth/1.0/appliance-certs java.net.UnknownHostException: restricted-rest.cloud-support.purestorage.com
2019-04-24 13:14:31.959 [taskScheduler-1] WARN com.purestorage.ccm.scheduler.RegisterJob Last register job failed, trigger next job after 30000 ms
Solved :
Use IP address instead of name in /var/lib/ccm/network/http_proxy
https://“domain\login”:password@IP:port
https://“domain\login”:password@IP:port
Is there a way to see which account is used for vCenter integration, and update if necessary? I found the “sudo purevmanalytics list” command which shows all vCenters, but I need the account that is being used. Thanks very much!
Long answer is kinda. But not in the CLI today–it is stored in a YAML file. At this point to update the user, you remove the connection and then add it back with a new user. We are working on a major update for the collector now, I will see if we can get this added
That’s perfect. I found the YAML file where it’s stored, so I appreciate the detail on how to “update” it. Thanks for the quick reply. This write-up is awesome BTW! We really appreciate all the work you put into documentation! 🙂
You’re welcome! Thank you–thats great to hear! I’m glad it is useful
Hi Cody,
Thanks for the detailed guide. As I have read from previous comments, there are some people/companies sets up RedHat VM for the collector. Can I ask if there is any specific reason to recommend Ubuntu (best practice, compatibility etc.)? And if there is nothing special to use Ubuntu should we take the same system requirements for RedHat?
No real technical reason–this is the distro we have the most experience with. We are working on an OVA so it will not really matter moving forward. But yeah the requirements are essentially the same, but there are a few tweaks that need to be made to the OS to get it to work.
where the virtual appliance?
Any update on the OVA for this Cody?
Yes eng is getting close to finishing the first release. We have fairly extensive plans to make it a larger and streamlined offering, but in the interest of getting something out, we will have a basic one done soon.
I am getting this error when I am trying to connect to vCenter. Able to ping and resolve vCenter IP/hostname without any issues
Error: Cannot find hostname xxxxxx : Name or service not known
What version of Ubuntu are you using? If it is not 16.04 then the DNS configuration doesnt work right out of the box
I had the same issue with Ubuntu Server 19.04. What worked for me was to use the VCenter IP instead of hostname.
Ubuntu Build : 16.04.5 LTS
vCenter Build : VMware VirtualCenter 6.7.0 build-13007421
I have even added vCenter IP/Hostname in /etc/hosts file.
Anything else I can try??
This is no longer working as documented.
When you try to connect to the collector you will get
ImportError: No module named `requests`
You need to run “sudo apt-get install python3-requests”
to correct the issue.
Ah okay thanks, I will fix this. But we are releasing an OVA very soon, so all of this will be a moot point which will be nice
I was working on installing the Off Array Collector. I have made it to the “Install the Collector” section. After logging into pure1 and selecting the VM Topology, then the gear. It is only allowing me to create an OVA. There is nothing under the Off-Array listing and no create button for it. If I select the create button under OVA, it want’s to create an OVA only. Have I missed a step?
We haven’t officially opened up the OVA to everyone. Though for the ones we have the old collector will be disabled. So if that’s what you see it means someone in your org signed up for the beta. We are retiring the old one next week so the ova is the off array way forward
https://www.codyhosterman.com/2019/10/vm-analytics-collector-now-an-ova/