Features I Use Regularly in Pure’s vSphere Plugin

Today I want to tell to you about what I use the vSphere plugin for regularly in my lab to hopefully help you get more value out of your existing Pure array and tools. The assumption of this guide is that you already have the vSphere plugin installed (follow this guide if you don’t currently have it installed or would like to upgrade to a more feature-rich remote plugin version). Our vSphere plugin release notes KB covers the differences between versions. If you aren’t sure what version you want, use the latest version.

Why should you care about the vSphere plugin and why would I highlight these workflows for you? Pure’s vSphere plugin can save you a significant amount of time in the configuration/management of your vSphere+FlashArray environment. It can also greatly reduce the barriers to success in your projects by reducing the steps required of the administrator for successful completion of a workflow. Additionally, you might currently be using the vSphere plugin for a couple of workflows but didn’t realize all of the great work our engineers have put into making your life easier.

I am planning to write more blogs on the vSphere plugin and the next one I plan to write is on the highest value features that exist in current vSphere plugin versions.

Create and Manage FlashArray Hosts and Host Group Objects

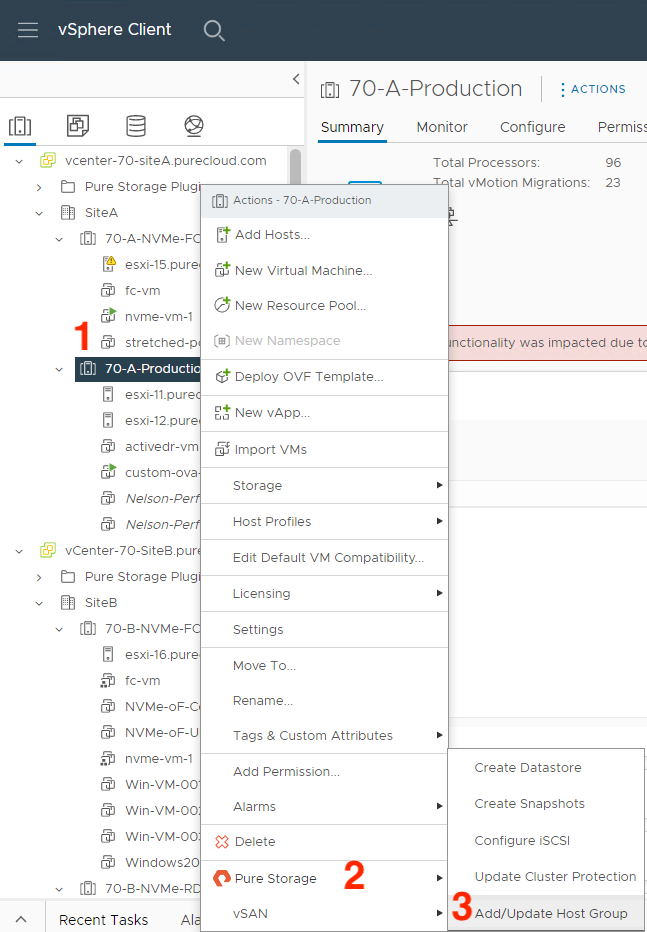
If you’re currently a Pure customer, you have likely managed your host and host group objects directly from the array. Did you know you can also do this from the vSphere plugin without having to copy over WWNs/IPs manually? (1) Right-click on the ESXi cluster you want to create/manage a host or host group object on, (2) hover over Pure Storage, then (3) left-click on Add/Update Host Group.

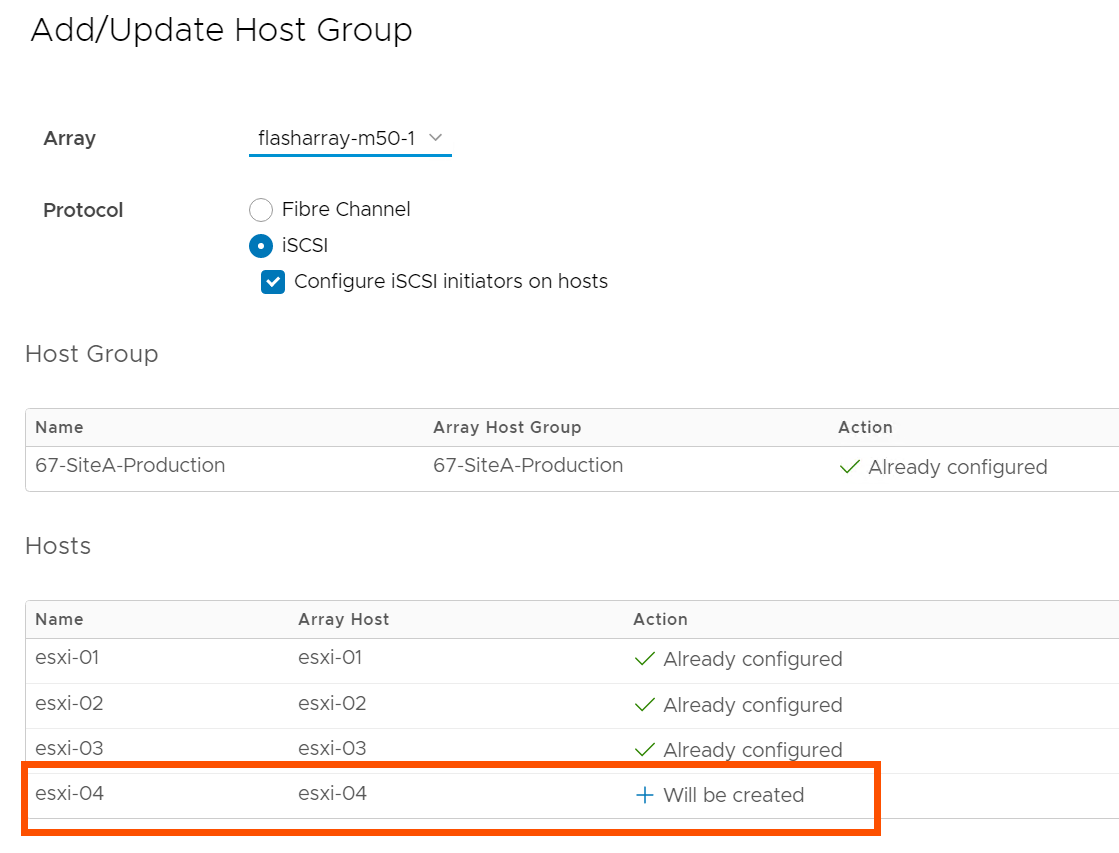
In this menu, there are currently Fibre Channel and iSCSI protocol configuration options. We are currently exploring options here for NVMe-oF configuration; stay tuned by following this KB. You can also check a box to configure your ESXi hosts for Pure’s best practices with iSCSI, making it so you don’t have to manually configure new iSCSI ESXi hosts.

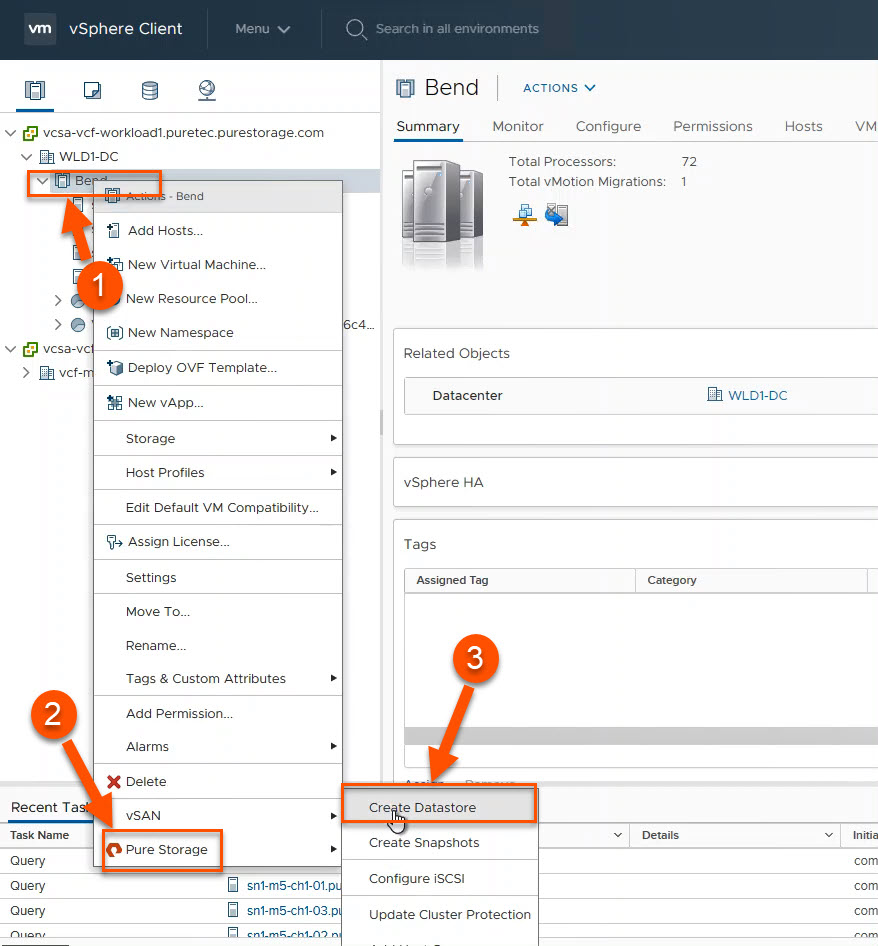
FlashArray VMFS Datastore and Volume Management (Creation and Deletion)

There are a lot of options for VMFS volume management in the plugin. I’ll only cover the basics: creation and deletion.

When you use the plugin for datastore creation, the plugin will create the appropriate datastore in vSphere, the volume on the FlashArray, and it will connect the volume to the appropriate host(s) and host group objects on the FlashArray. (1) Right-click on the pertinent cluster or host object in vSphere, (2) hover over Pure Storage and finally (3) left-click on Create Datastore. This will bring up a wizard with a lot of options that I won’t cover here, but the end result will be a datastore that has a FlashArray volume backing it.

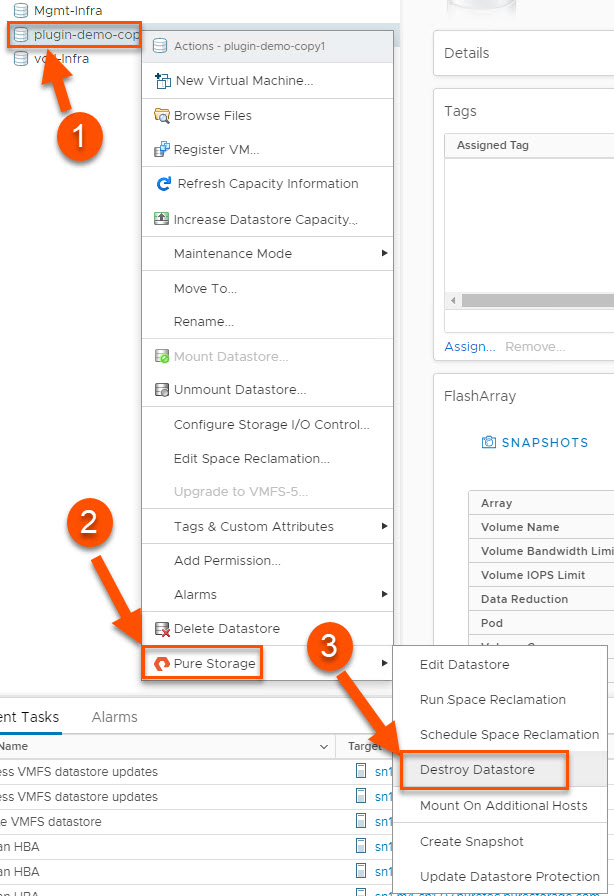
The great thing about deleting a datastore from the plugin is that there are no additional steps required on the array to clean up the objects. This is the most satisfying workflow for me personally because cleanup in a lab can feel like it’s not a good use of time until I’ve got hundreds of objects worth cleaning up. This workflow enables me to quickly clean up every time after I’ve completed testing instead of letting this work pile up.

(1) Right-click the datastore you want to delete, (2) hover over Pure Storage and (3) left-click on Destroy Datastore. After the confirmation prompt, the FlashArray volume backing that datastore will be destroyed and is pending eradication for whatever that value is configured on the FlashArray (default 24 hours, configurable up to 30 days with SafeMode). That’s it!

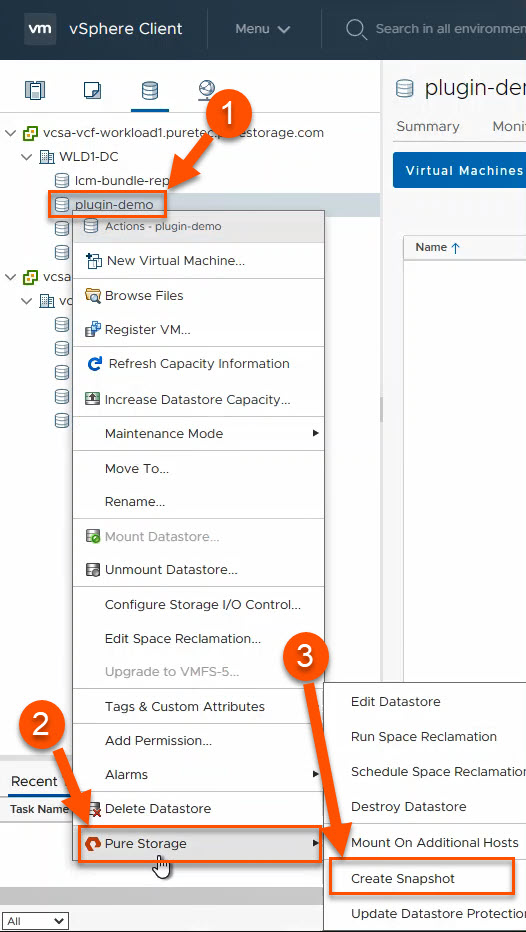
FlashArray Snapshot Creation

One of the benefits of FlashArray is its portable and lightweight snapshots. The good news is that you can create these directly from vSphere without having to log into the FlashArray. It’s worth mentioning that although the snapshot recovery workflows built into the vSphere plugin (vVols and VMFS) are far more powerful and useful when you really need them, I’m covering what I use regularly and I rarely have to recover from snapshots in my lab. I try to take snapshots every time I make a major change to my environment in case I need to quickly roll-back.

There are two separate workflows for snapshot creation: one for VMFS and one for vVols. The granularity advantage with vVols over VMFS is very clear here- with VMFS, you are taking snapshots of the entire VMFS datastore, no matter how many VMs or disks are attached to those VMs. With vVols, you only have to snapshot the volumes you need to, as granular as a single disk attached to a single VM.

With VMFS, (1) right click on the datastore, (2) hover over Pure Storage and (3) left click on Create Snapshot.

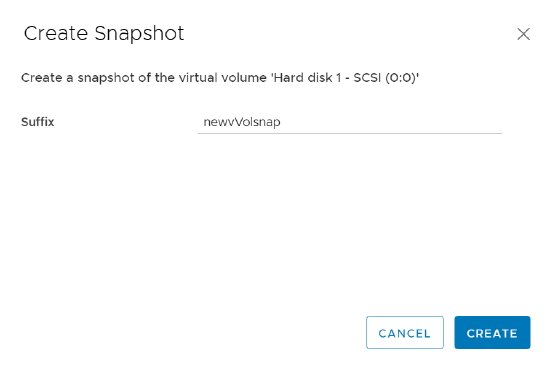
For a vVols backed disk, from the Virtual Machine Configure tab, navigate to the Pure Storage – Virtual Volumes pane, (1) select the disk you would like to snapshot and (2) click Create Snapshot.

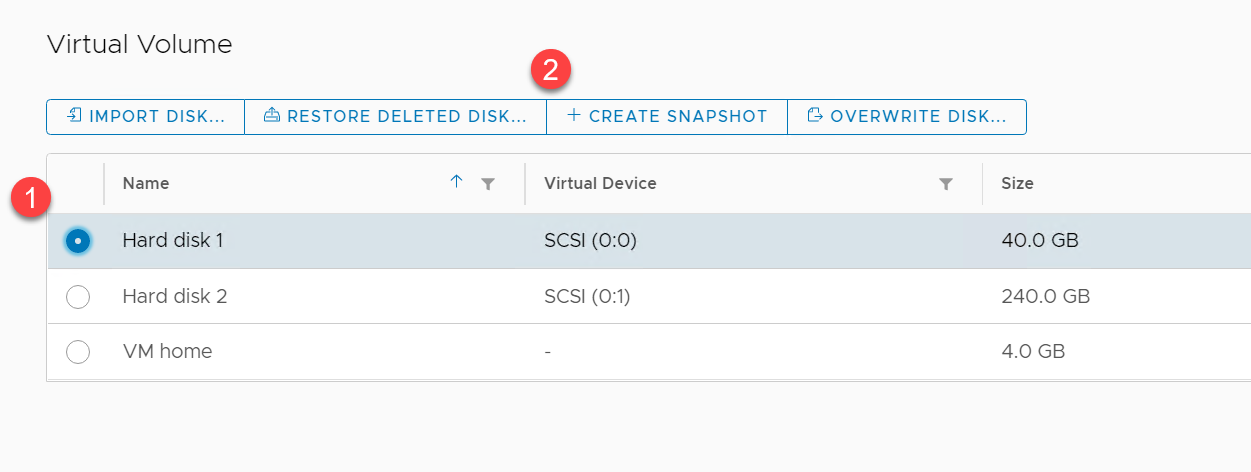
A prompt will pop up to add a suffix to the snapshot if you’d like; click on create and you’ve got your FlashArray snapshot of a vVols backed disk created!

Stay tuned for a blog on the vSphere plugin features you might not know about that, like the above, can save you a significant amount of time and effort.

Multiple vVol Datastores on FlashArray

This is certainly a post that has been a long time in coming. As many customers were probably aware we only supported one vVol datastore per FlashArray from the inception of our support. Unlike VMFS, this doesn’t hinder as much as one might think: they datastore can be huge (up to 8 PB), features are granular to the vVol (virtual disk), and a lot of the adoption was driven by the VMware team who didn’t often really need multiple datastores.

Sure.

Before you start arguing, of course there are reasons for this and is something we needed to do. But as with our overall design of how we implement vVols on FlashArray (and well any feature) we wanted to think through our approach and how it might affect later development. We quickly came to the conclusion that leveraging pods as storage containers made the most sense. They act as similar concept as a vVol datastore does–provide feature control, a namespace, capacity tracking, etc. And more as we continue to develop them. Purposing these constructs on the array makes array management simpler: less custom objects, less repeated work, etc.

Continue reading “Multiple vVol Datastores on FlashArray”

Migrating From SCSI To NVMe on vCenter (Part 1 – Live Migration)

This is going to be broken up into two parts- first, a live migration where no VMs get powered off during the migration; second, a migration where you temporarily power off VMs attached to the SCSI datastore.

Why would you want to do it one way or another?

Pros of live migration:

  • No VM downtime
  • Simpler configuration changes and overlap. Less to go wrong or mess up

Pros of powering off VMs:

  • The total migration time will be significantly less because no data will have to be moved. Currently VMware doesn’t support XCOPY (even on the same array) for NVMe-oF
Continue reading “Migrating From SCSI To NVMe on vCenter (Part 1 – Live Migration)”

Pure Storage vSphere Remote Plugin™ 5.1.0 launch: vVol Point-in-Time Recovery

We are excited to announce the launch of the latest version of Pure Storage’s remote vSphere plugin, 5.1.0. It includes a number of bug fixes PLUS a highly sought after feature: vVols VM point-in-time (PiT) recovery!

Why am I excited about this feature?

With vVol PiT VM recovery, you can now easily recover an entire VM that was accidentally deleted (and eradicated) or you can restore the state of a VM back to a point in time that you took a snapshot from vCenter directly while using Pure’s vSphere plugin.

The requirements of this are Pure’s vSphere remote plugin 5.1.0 and Purity™ 6.2.6 or higher for PiT revert and for PiT VM undelete with a vVol VM that has had its FlashArray™ volumes eradicated from the FlashArray itself. If you’re undeleting a vVol VM that has not been eradicated yet, that functionality is present for Purity versions 6.1 and lower.

For PiT VM revert, you will also need to make sure that you have snapshots of all of the volumes associated with the vVol VM except swap- at least one data volume and one configuration volume.

For VM undelete before the volumes have been eradicated, you will need a snapshot of the vVol VM’s configuration volume.

For VM undelete after the vVol-backed VM has been eradicated, you’ll need a FlashArray protection group snapshot of all the VM’s data volumes, managed snapshots and configuration volumes.

Rather than rehash what my teammate Alex Carver has put a lot of work into, I’m just going to link to the KB and videos he created:

Download the new plugin (part of Pure’s OVA), read the release notes and test out vVol PiT recovery today! Like a lot of things, it’s better to have some understanding of what’s happening and why before needing something that might be part of your recovery process. Please note that you can also upgrade in-place from 5.0.0 to 5.1.0 (and future remote plugin releases) by following this guide.

Affecting Persistent Volumes in VMware Tanzu

Note: This is another guest blog by Kyle Grossmiller. Kyle is a Sr. Solutions Architect at Pure and works with Cody on all things VMware.

VMware Tanzu is a game-changing piece of technology for numerous reasons, but probably the most transformational piece of it is also the most apparent – it provides the capability for the vCenter admin to give resources for both consumers of traditional virtual machines as well as Kubernetes/DevOps users from the same set of compute hosts and storage. This consolidation means that the vCenter admin can more easily see what is being allocated where, as well as gaining insight into what application(s) might be candidates to make the move into a container-based environment from a virtual machine.

A Tanzu deployment is comprised of quite a few moving pieces and a central piece of this is durable storage made possible by persistent volumes. While container nodes and pods are ephemeral by nature (which is one of their major advantages), the data that they consume, produce and manipulate must be performant, portable and often, saved. So, there is obviously a different set of things we care about for persistent data vs the Kubernetes nodes that Tanzu runs in unison with here. For the remainder of this post we will show a couple of quick and easy ways you can change your persistent volumes to suit your application needs. There’s a bit of work and some choices to be made around getting a Tanzu environment up and running in vSphere, and I’d encourage you to check out the VMware Tanzu User Guide on our Pure Storage support site or Cody’s blog series to get some additional information.

With that being said, when a persistent volume is created via either dynamic or static provisioning, one of the first things the application developer needs to decide is what will happen to that volume and data when the application that uses it itself is no longer needed. The default behavior for an SPBM policy/storageclass assigned to a vSphere Namespace is to delete it, but through a simple kubectl patch command line, the persistent volume can be saved for future usage.

To make this change, first get the persistent volume name that you want to Retain/save:

 
$ kubectl get pv
 NAME           CAPACITY    RECLAIM POLICY   STATUS 
 pvc-f37c39fd   5Gi         Delete           Bound 

Next, apply this kubectl command line to it to switch the reclaim policy from Delete to Retain:

​$ kubectl patch pv (PV_Name) -p '{"spec":{"persistentVolumeReclaimPolicy":"Retain"}}'

So for our PV example:

$ kubectl patch pv pvc-f37c39fd -p '{"spec":{"persistentVolumeReclaimPolicy":"Retain"}}'

When we run the kubectl get pv command again, we can see it is set to Retain, so we are all set:

$ kubectl get pv
NAME           CAPACITY    RECLAIM POLICY   STATUS  
pvc-f37c39fd   5Gi         Retain           Bound          

If there is anything close to a certainty in the storage world – it is that the longer a volume exists, the more full of data it will become. This becomes even more of a certainty if a persistent volume is retained and reused across multiple application instances for increasing amounts of time. In the vSphere and Supervisor cluster 7.0U2 release VMware has introduced the capability for Online Volume Expansion. What this means is that while in previous versions users had to unbind their persistent volume claim from a pod or node prior to resizing it (otherwise known as offline volume expansion) – now they are able to accomplish that same operation without that step . This is a huge advantage as the offline expansion required that the volume be effectively be taken out of service when additional space was added to it, which could lead to application downtime. With the online volume expansion enhancement that annoyance goes away completely.

Online volume expansion operation is really simple to do. This time we find the persistent volume claim (which is basically the glue between the persistent volume and the application) that we need to expand:

$ kubectl get pvc
NAME             STATUS  VOLUME        CAPACITY
pvc-vvols-mysql  Bound   pvc-f37c39fd  5Gi      

Now we run the following patch command against the PVC name we found above so that it knows to request additional storage for the persistent volume that it is bound to. In this case, we will ask to expand from 5Gi to 6Gi:

$ kubectl patch pvc pvc-vvols-mysql -p '{"spec": {"resources": {"requests":{"storage": "6Gi"}}}}'

After waiting for a few moments for the expansion to complete, we look at the pvc in order to confirm we have the additional space that we asked for and we can see it has been added:

$ kubectl get pvc
NAME              STATUS   VOLUME         CAPACITY
pvc-vvols-mysql   Bound    pvc-f37c39fd   6Gi     

Taking a closer look at the PVC via the describe command shows that it indeed increased the PV size while it remained mounted to the mysql-deployment node under the events section:

$ kubectl describe pvc
Name:          pvc-vvols-mysql
Namespace:     default
StorageClass:  cns-vvols
Status:        Bound
Volume:        pvc-f37c39fd-dbe9-4f27-abe8-bca85bf9e87c
Labels:        <none>
Annotations:   pv.kubernetes.io/bind-completed: yes
               pv.kubernetes.io/bound-by-controller: yes
               volume.beta.kubernetes.io/storage-provisioner: csi.vsphere.vmware.com
               volumehealth.storage.kubernetes.io/health: accessible
Finalizers:    [kubernetes.io/pvc-protection]
Capacity:      6Gi
Access Modes:  RWO
VolumeMode:    Filesystem
Mounted By:    mysql-deployment-5d8574cb78-xhhq5
Events:
  Type     Reason                      Age   From                                             Message
  ----     ------                      ----  ----                                             -------
  Warning  ExternalExpanding           52s   volume_expand                                    Ignoring the PVC: didn't find a plugin capable of expanding the volume; waiting for an external controller to process this PVC.
  Normal   Resizing                    52s   external-resizer csi.vsphere.vmware.com          External resizer is resizing volume pvc-f37c39fd-dbe9-4f27-abe8-bca85bf9e87c
  Normal   FileSystemResizeRequired    51s   external-resizer csi.vsphere.vmware.com          Require file system resize of volume on node
  Normal   FileSystemResizeSuccessful  40s   kubelet, tkc-120-workers-mbws2-68d7869b97-sdkgh  MountVolume.NodeExpandVolume succeeded for volume "pvc-f37c39fd-dbe9-4f27-abe8-bca85bf9e87c"

Those are just a couple of the ways we can update our persistent volumes to do what we need them to do within a Tanzu deployment, and we have really just scratched the surface with these few examples. To see how to do more advanced operations like migrating a persistent volume to a different Tanzu Kubernetes Cluster, please head over to our new Tanzu User Guide. Of course, it also is very important to mention that Portworx combined with Tanzu gives us even more features and functionalities like RBAC, automated backup and recovery and a whole lot more. Getting deeper into how Portworx interoperates with Tanzu is what I’m working on next so please stay tuned for some more cool stuff.

NVMe-oF Multipath Configuration for Pure Storage Datastores

Hello- my name is Nelson Elam and I’m a Solutions Engineer at Pure Storage. I am guest writing this blog for use on Cody’s website. I hope you find it helpful!

With the introduction of Purity 6.1, Pure now supports NVMe-oF via Fibre Channel, otherwise known as NVMe/FC. For VMware configurations with multipathing, there are some important considerations. Please note that these multipathing recommendations apply to both NVMe-RoCE and NVMe/FC.

Continue reading “NVMe-oF Multipath Configuration for Pure Storage Datastores”

Digging into vSphere Workload Management Options

Note: This is another guest blog by Kyle Grossmiller. Kyle is a Sr. Solutions Architect at Pure and works with Cody on all things VMware.

VMware Tanzu is a great way for VMware users to manage their virtual machine environments while in parallel coming up to speed with containers all under the same familiar pane of glass. In fact, that’s possibly the biggest value proposition that Tanzu gives us today: extending vSphere and all of its enterprise features and goodness to the realm of K8s in a recognizable context.

There’s a catch, though. Before one can start to use Tanzu one has to get Tanzu setup. While it’s reasonably straight forward to do so – it is also important to note that there are multiple ways to enable Tanzu and to distinguish the pros/cons of each of them. It’s also key to understand what these underlying components are and how they interact to help troubleshoot any potential problems. This post will focus on two of these methods: vCenter Network Option (HA-Proxy) and NSX-T (VMware Cloud Foundation). Cody covered the 3rd option of directly deploying Tanzu Kubernetes Grid to vSphere in an earlier post that can be found here.

It’s critical to note that you must be at a minimum of vSphere 7 before you can use either of these below methods we will cover. ESXi 6.7U3 and up is supported via the method shown in Cody’s post I linked above. The two Workload Management enablement networking options are built right into the vSphere 7 UI under Workload Management when you add a cluster:

The other important prerequisite is that you will need one or more SPBM (Storage Policy Based Management) policies defined in order to get the Supervisor Cluster up and running. There are a couple of KB articles on our Platform Guide which shows how to do this on the FlashArray and the differences between VMFS and vVols based policies.

So let’s lay out the key components and differences between the vCenter Server Network and NSX-T backed Workload Management options and provide some more information on how to enable each of them…

The vCenter Server Network option allows customers to get Workload Management working in their vSphere environment by deploying a single OVA (known as HA-Proxy) and does not require any other external products like NSX-T or SDDC Manager. This OVA and associated information can be found at this link on GitHub. The main benefit of this option is the relative simplicity of getting Tanzu running since the only items you need to setup are a distributed switch portgroup to handle your Kubernetes ingress/egress ranges and the HA-Proxy OVA itself. The HA-Proxy will act as the load balancer for kubernetes traffic and provide the supervisor cluster API endpoint. The downside is that the HA-Proxy VM represents a single point of failure and larger kubernetes deployments at some point will more than likely overwhelm the CPU/memory resources available to it. This option is best for those who want to look at Tanzu in a POC/exploratory type of setup.

Here’s a quick narrated technical video I created showing how to setup Workload Management with the HA-Proxy OVA:

After Workload Management was enabled, I created another quick demo video showing how to create Namespaces and deploy a Tanzu Kubernetes Guest Cluster:

NSX-T based Workload Management is recommended to be backed/managed by a VMware Cloud Foundation deployment. This option gives you all of the enterprise grade features, resilience and lifecycle management that comes embedded with SDDC Manager. The con of this option is there is more setup work and moving pieces involved than the other Tanzu deployment choices and it requires additional licensing once the trial period expires. The key component that needs to be setup for Tanzu in particular is called an NSX-T Edge Cluster. An Edge Cluster is comprised of at least one (but really it should be two for resiliency) Edge VMs which help route and load balance network traffic from your top of rack switch to the underlying kubernetes deployments. The Edge Cluster deployment can be automated to a large extent from within SDDC Manager via a wizard.

In our lab, I went the route of manually deploying a 2 node Edge Cluster within NSX-T as this gives a better ‘under the hood’ view of how everything works together. As most customers likely do not have top of rack switch access to setup BGP, I also decided to use the static routing option within NSX-T. Here’s a video showing how to set this up end-to-end:

With the EdgeCluster built, the next step is to enable Workload Management which is shown in this video:

Hopefully this post has provided a bit of guidance and insight in terms of what Tanzu solution might be right for your environment. We are continuing to investigate and document how to best leverage the FlashArray with kubernetes so please check back here and our platform guide often for updates. Thanks for reading.

Pure Storage Plugin for the vSphere Client 4.5.0 Release

Howdy doody folks. Lots of releases coming down the pipe in short order and the latest is well the latest release of the Pure Storage Plugin for the vSphere Client. This may be our last release of it in this architecture (though we may have one or so more depending on things) in favor of the new preferred client-side architecture that VMware released in 6.7. Details on that here if you are curious.

Anyways, what’s new in this plugin?

The release notes are here:

https://support.purestorage.com/Solutions/VMware_Platform_Guide/Release_Notes_for_VMware_Solutions/Release_Notes%3A_Pure_Storage_Plugin_for_the_vSphere_Client#4.5.0_Release_Notes

But in short, five things:

  1. Improved protection group import wizard. This feature pulls in FlashArray protection groups and converts them into vVol storage policies. This was, rudimentary at best previously, and is now a full-blown, much more flexible wizard.
  2. Native performance charts. Previously performance charts for datastores (where we showed FlashArray performance stats in the vSphere Client) was actually an iframe we pulled from our GUI. This was a poor decision. We have re-done this entirely from the ground up and now pull the stats from the REST API and draw them natively using the Clarity UI. Furthermore, there are now way more stats shown too.
  3. Datastore connectivity management. A few releases ago we added a feature to add an existing datastore to new compute, but it wasn’t particularly flexible and it wasn’t helpful if there were connectivity issues and didn’t provide good insight into what was already connected. We now have an entirely new page that focuses on this.
  4. Host management. This has been entirely revamped. Initially host management was laser focused on one use case: connecting a cluster to a new FlashArray. But no ability to add/remove a host or make adjustments. And like above, no good insight into current configuration. The host and cluster objects now have their own page with extensive controls.
  5. vVol Datastore Summary. This shows some basic information around the vVol datastore object

First off how do you install? The easiest method is PowerShell. See details (and other options) here:

https://support.purestorage.com/Solutions/VMware_Platform_Guide/User_Guides_for_VMware_Solutions/Using_the_Pure_Storage_Plugin_for_the_vSphere_Client/vSphere_Plugin_User_Guide%3A_Installing_the_vSphere_Plugin

Continue reading “Pure Storage Plugin for the vSphere Client 4.5.0 Release”

Managing vVol Storage Policies with PowerShell

I just posted about some new cmdlets here:

Also in that release are a few more cmdlets concerning storage policy creation, editing, and assignment. They were built to make the process easier–the original cmdlets and their use is certainly an option–and for very specific things you might want to do they might be necessary, but the vast majority of common operations can be more easily achieved with these.

As always, to install run:

Install-Module PureStorage.FlashArray.VMware

Or to upgrade:

Update-Module PureStorage.FlashArray.VMware

These modules are open source, so if you just want to use my code or open an RFE or issue go here:

https://github.com/PureStorage-OpenConnect/PureStorage.FlashArray.VMware/

For detailed help on a cmdlet, run Get-Help

Continue reading “Managing vVol Storage Policies with PowerShell”

New vVol Replication PowerShell Cmdlets

Happy New Year everyone! Let’s work to make 2021 a better year.

In furtherance of that goal, I have put out a few new vVol-related PowerShell cmdlets! So baby steps I guess.

The following are the new cmdlets:

Basics:

  • Get-PfaVvolStorageArray

Replication:

  • Get-PfaVvolReplicationGroup
  • Get-PfaVvolReplicationGroupPartner
  • Get-PfaVvolFaultDomain

Storage Policy Management:

  • Build-PfaVvolStoragePolicyConfig
  • Edit-PfaVvolStoragePolicy
  • Get-PfaVvolStoragePolicy
  • New-PfaVvolStoragePolicy
  • Set-PfaVvolVmStoragePolicy

Now to walk through how to use them. This post will talk about the basics and the replication cmdlets. The next post will talk about the profile cmdlets.

Continue reading “New vVol Replication PowerShell Cmdlets”