With the release of Purity 6.4.1, FlashArray now has the capability to provision multiple vVol storage containers on the same FlashArray. Cody covered this well in his previous blog post.
When Purity 6.4.4 was launched, we introduced the ability to resize these storage containers! This might have snuck by you when reading this note because it’s not clear until the end of the note that this also improves things for vVols:
“Supports setting an upper limit on the data a pod can contain. When a pod quota limit is in place, the limit prevents creating volumes (in the pod) that would require more logical space than the quota limit. With this feature, custom limits can now be configured for vVol datastores, and organizations can place consumption limits for application groups and business groups. Use the purepod create --quota-limit and purepod setattr --quota-limit CLI commands to create and manage a pod quota limit. These quota limits also apply to vVol datastores.“
Hello- this is part 4 in the series of blogs on ActiveDR + NFS datastores. In part 3, I covered how to configure vSphere for a test failover and then how to perform a test failover. In this blog I’ll be covering how to perform a failover and failback.
FlashArray Failure – ActiveDR Failover
What happens if an array fails? I’m going to forcefully stop Purity on both controllers of the source FlashArray (flasharray-x50-1) to simulate this situation. In this case, the workflow is the same as during the failover test except disconnecting the networking from the VMs you are about to power on. It is probably not a good idea to disconnect that so in general, you’ll want to leave these VMs as-is for this scenario. The requirements of your environment might require something else here. So you’ll promote the surviving array and power on the VMs based on the last-replicated state of the VMs.
If this is a test you are doing in a test/proof of concept deployment, to replicate what I’m doing, simply unplug the power cables on the FlashArray. Please do not pull power on your production FlashArrays :-). Here’s a table of articles in this series:
Hello- this is part 3 in the series of blogs on ActiveDR + NFS datastores. In part 2, I covered how to connect ActiveDR to an NFS file system that’s backing an NFS datastore. In this blog, I’ll be covering how to connect the target NFS export in vSphere and how to run a test failover. The reason for covering test failovers before production failovers and failbacks is that I strongly recommend performing or scheduling a test failover immediately after configuring any disaster recovery solution. It is possible to not have the necessary requirements for a failover when it is critical that the failover happens quickly; testing failing over your environment before needing it in a production down scenario will reduce or eliminate this possible pain.
For the purposes of this blog, I am using Pure Storage’s remote vSphere plugin. In general, I strongly recommend installing and using this plugin to manage your FlashArray(s) more easily from the vSphere GUI. Additionally, I’ve made a demo video that covers the steps covered here. Here’s a table of articles in this series:
This environment already has a mounted NFS file system from the source FlashArray. The steps to mount the NFS file system from the source array are the same as the steps for the target array except you won’t have to promote the pod on the source array.
When you perform failovers, do test failovers or are cleaning up your objects from these operations you’ll want to ensure that you follow the steps outlined here.
Hello- this is part 2 in the series of blogs on ActiveDR + NFS datastores. In part 1, I introduced the two technologies to give you a background on them. In this blog I’ll be covering how to connect ActiveDR to an NFS file system that’s backing an NFS datastore.
For the purposes of this blog, I am using Pure Storage’s remote vSphere plugin. In general, I strongly recommend installing and using this plugin to manage your FlashArray(s) more easily from the vSphere GUI. Additionally, I’ve made a demo video that covers the steps covered here as well as the failover steps covered in part 3. Here’s a table of articles in this series:
Hello- with the release of Pure Storage’s vSphere plugin 5.3.2, there is an included fix that works around a known VMware issue with CBT VMs on VMFS datastores. Here is the release note item on the vSphere plugin:
“TMAN-18446: VMFS PiT and environmental recovery would fail when CBT (changed block tracking) was enabled on the VM. This is a known VMware issue. In order to workaround this issue, the VMFS PiT recovery workflow will now present options for recovery when recovering a CBT enabled VM.”
What changes were made to accomplish this? There is an additional GUI step when you are recovering from snapshot on VM(s) that have CBT enabled. You’ll go through the normal steps to recover from a FlashArray snapshot of the VMFS VM(s). Follow the steps under Recover a VMFS VM from FlashArray snapshot.
I’m going to be writing a series of blogs on ActiveDR (Active Disaster Recovery) with NFS datastores over the next couple of posts. Some of the other posts I have planned in the near future are:
Failover scenarios where the ESXi hosts are connected to both arrays
Failover scenarios where the ESXi hosts are only connected to one array
In this blog I will do an introduction to the technologies and I will give some high level information on how you might want to use them together.
Replication Options on FlashArray
This post will be covering FlashArray specific replication techniques that you may or may not be familiar with. If it is the latter, my colleague Cody Hosterman has a great primer on our technologies that might be worth a read for you. Here’s a table of articles in this series:
It can be difficult to understand the work that has gone into Pure Storage’s vSphere plugin if you’re not digesting the release notes for every release. Because NVMe-oF is going to become more and more relevant I think it’s worth highlighting some recent improvements we’ve made around NVMe-oF in the vSphere plugin. I’ll mostly be referencing the vSphere plugin release notes in this blog. I strongly recommend installing the vSphere plugin for all of your vCenter + FlashArray needs but it is a requirement of following along with the new features of the plugin later.
The first update that involves NVMe-oF datastores was back in April of 2020 and was version 4.3.0. We added support for identification of NVMe-oF datastores. A good first step!
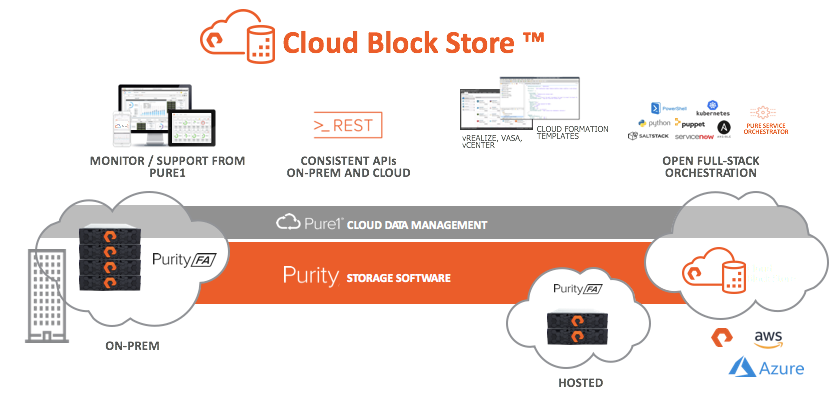
One of our goals with Purity (our operating software on Pure Cloud Block Store which also of course runs on FlashArray) is to deliver the Evergreen Storage model to the cloud. This means we continue to innovate our platform with no changes to how you create, deploy, or manage the front end. Denser. Faster. More efficient. Cheaper. Better. More features. You subscribe to our storage–and it only gets better from there. There is no “sunk cost” on that subscription. In the case of the public cloud, we continue to analyze the available infrastructure and see how we can incorporate it into CBS to achieve one or more of those enhancements. Our engineering team becomes your cloud storage expert. We analyze, test, make our product better, and you get the impact.
Last year, a new storage tier in Azure became available in the form of Premium SSD v2. https://azure.microsoft.com/en-us/updates/general-availability-azure-premium-ssd-v2-disk-storage/
This is a new tier of storage, nestled between the existing Ultra SSD and Premium SSD (v1). When v2 became available, our engineering team dug in. I/O profiling, workload assessments, CPU interactions, and more. How does it behave? How can we take advantage of it? Does it make sense for us? After awhile, we found through all of the optimization we made in Purity and the general ways of how Purity works, we could incorporate it. Our early efforts in the use of commodity SSDs at Pure and then the transition to direct flash modules have only continued to pay off in ways unrelated to hardware flash.
This week, we released our next update to Pure Cloud Block Store in Azure. This new version, 6.4.7, includes support for Premium SSDv2 as well as new VM controller types in the E-series. What does this mean?
This new version is 2-3x more cost efficient to run than our previous version (which was already saving customers money).
It is also up to 30% faster in terms of IOPS and throughput.
It even has improved latency consistency due to some engineering work to take advantage of the newer Intel processors in the new Azure VM controller type we chose.
So if you are looking to optimize your storage costs, look no further. With this latest version, we improve that ROI even more. Premium SSDv2 drops our operating costs by 2-3, while thin provisioning and data reduction further drops the spend on storage (average data reduction still hovers around 5 to 1), compounding the cost benefit. If you move directly to premium SSDv2, you can improve your costs, but if you move to CBS using Premium SSDv2 you can improve them far more.
Don’t forget Pure Cloud Block Store can be entirely run and managed by Pure Fusion–allowing you to customize and manage your CBS (and/or FlashArray) fleet via the policy-driven, storage-as-code platform.
What excites me about all of this? We are just barely getting started.
Most of us try to optimize how we personally spend money–and a common way is to examine your overall operating expenditures and figure out how you can reduce it. How much do I spend on groceries? Can I buy cheaper groceries? Can I buy less? What streaming services do I pay for? Should I cancel all of them? Some of them? Drop down on the tiers? Etc.
This is where we find money in our budget. We certainly try increase our income, but at the same time a surefire and impactful way to improve “cash at hand” is to reduce, in some way, what we spend. With the goal of not returning that money to our employer of course, but to invest it in some more impactful way to improve our life or our future. Maybe buying something cool, investing in retirement, taking a trip, whatever. Even if you do increase your income, making these changes just allow you to have even more money to spend in more impactful ways.
Cloud costs are no different. Budgets don’t always increase–an easier path to do more is to make better use of the money you do have to spend. This is essentially a universal truth.