Why Do I Recommend Automatic Directory Management in FA File with NFS Datastores?

Hello- Nelson Elam here. I wanted to go over the reasons why I think you should enable automatic directory management (autodir) if you are planning to use NFS datastores on FA File. A quick note before we get started- autodir is not restricted to ESXi hosts but ESXi hosts will be the focus of this blog.

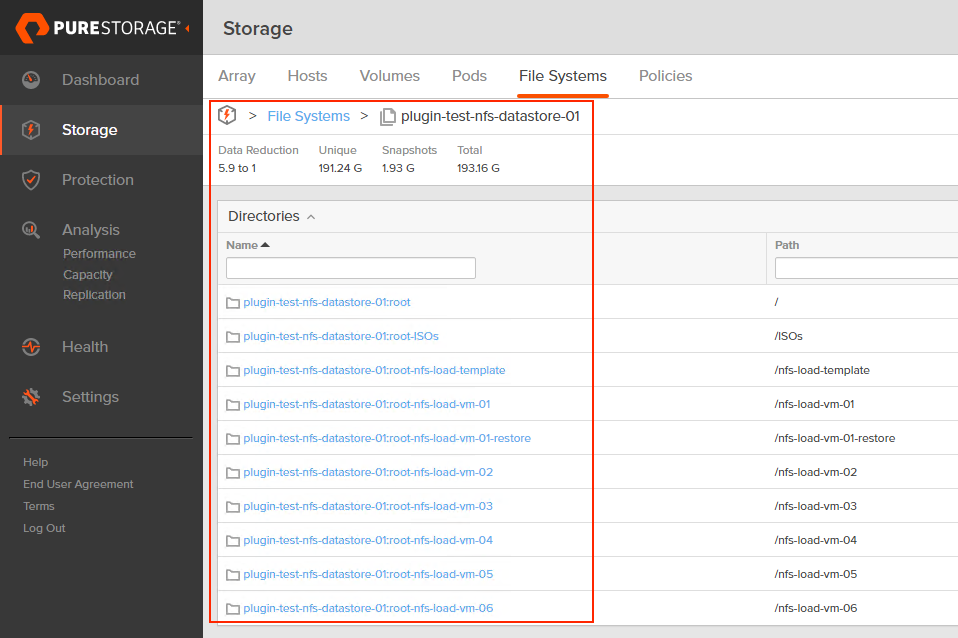
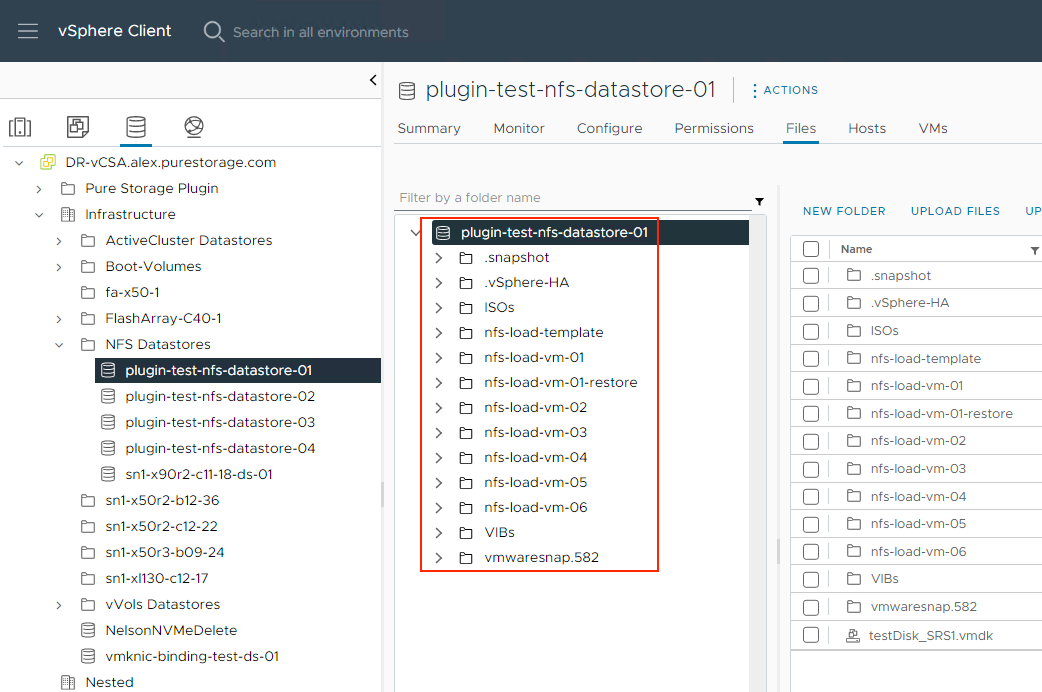
What is autodir? Autodir is a way for FlashArray to reflect the current directory structure on an NFS datastore that’s managed by a connected host- a managed directory. What does this mean for ESXi? Whenever a VM gets created on an NFS datastore, a new directory (folder) gets created for the VM on the datastore. When a VM gets deleted from disk, the directory gets destroyed. Note that directories you create or destroy manually on an NFS datastore in vCenter get reflected in FlashArray as well. Simple enough!

FlashArray directory structure
vCenter datastore directory structure

If you’ve read the FA File launch blogs or have seen some of the webinars we’ve done about FA File or NFS datastores, you’ve likely seen or heard us talk about VM granular management being part of FA File. Autodir enables VM granular management. Let’s dive into VM granular management in the context of NFS datastores.

With autodir enabled, these changes are reflected on FlashArray and enable FlashArray administrators to be able to see the current state of the NFS file system from a directory perspective.

Want to figure out why the data reduction ratio of a file system dropped so significantly? Now you can see that at a per-VM basis on FlashArray.

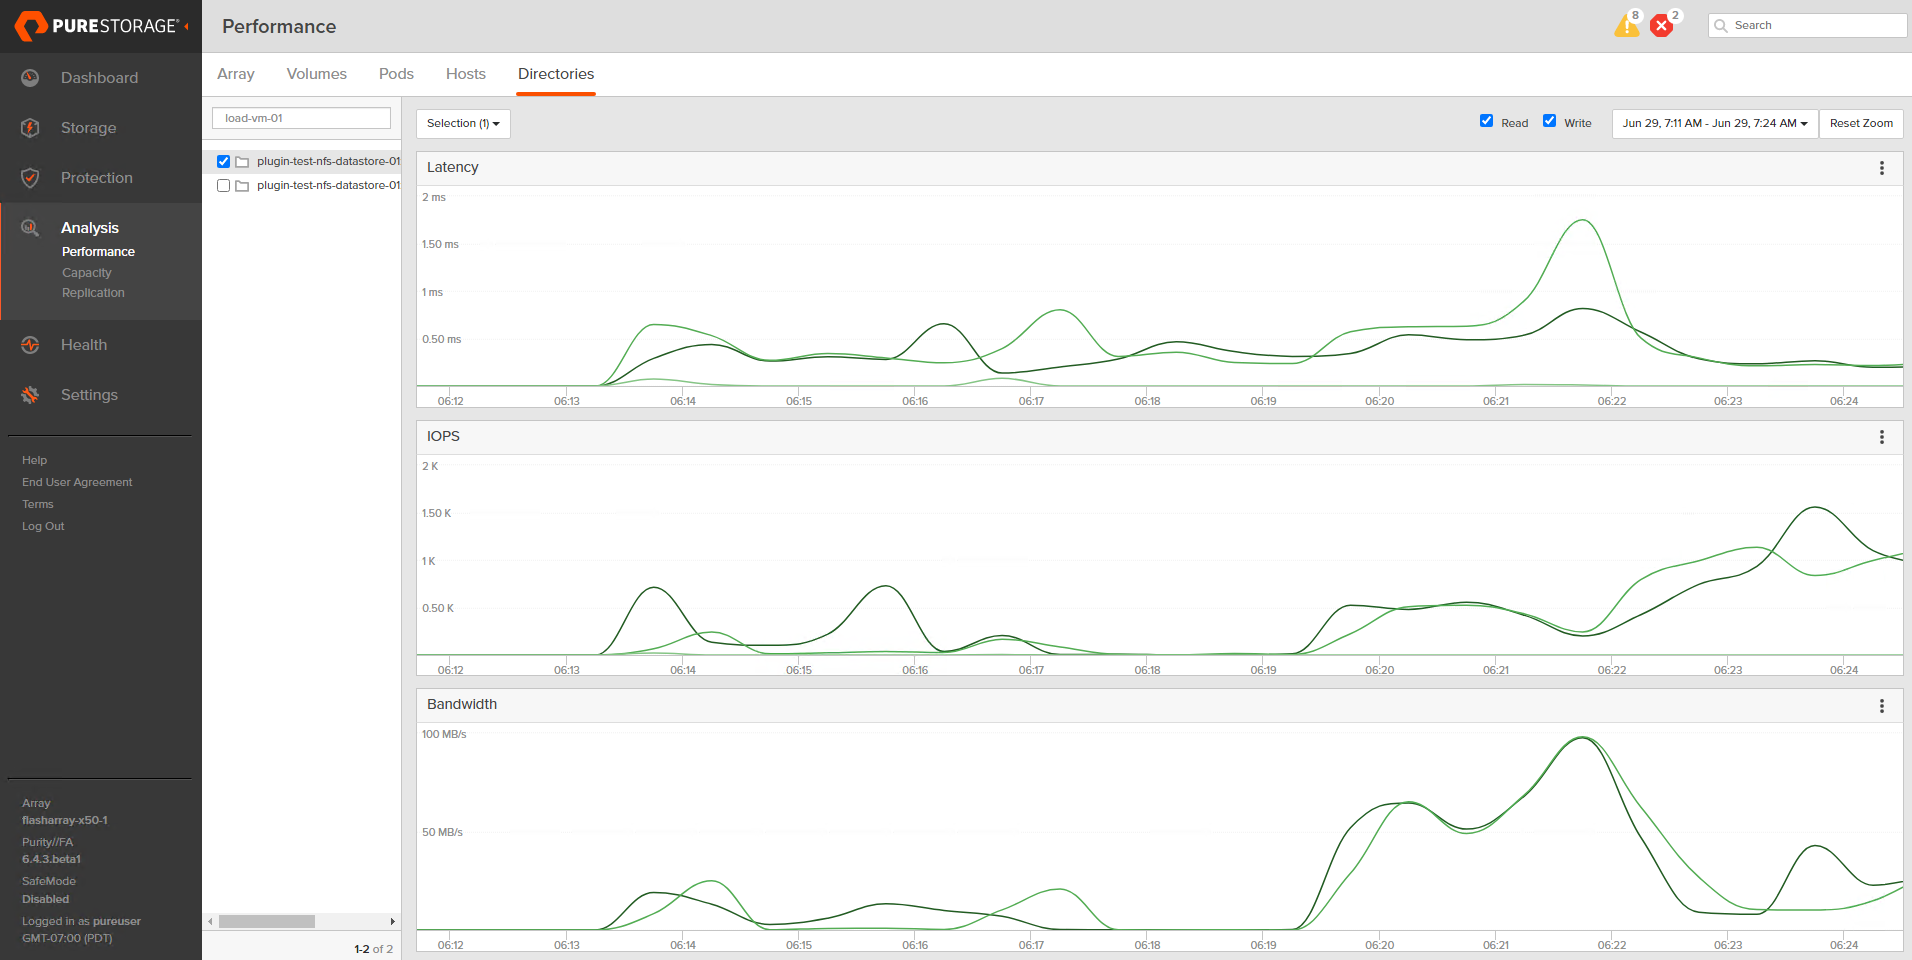
Want to see which VMs are spiking in load at inopportune times? You can use the FlashArray GUI to help figure that out. Worth mentioning this info is more easily consumed in Pure1 when using the VM analytics collector.

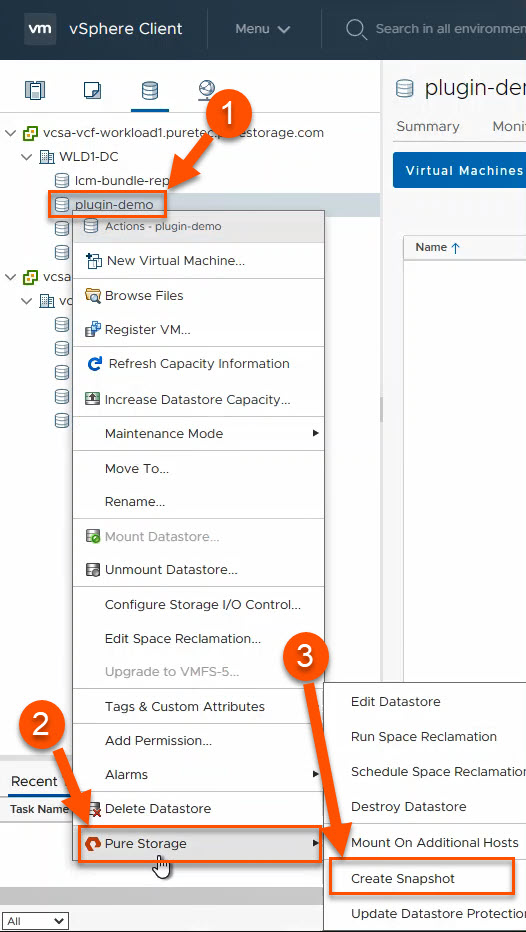
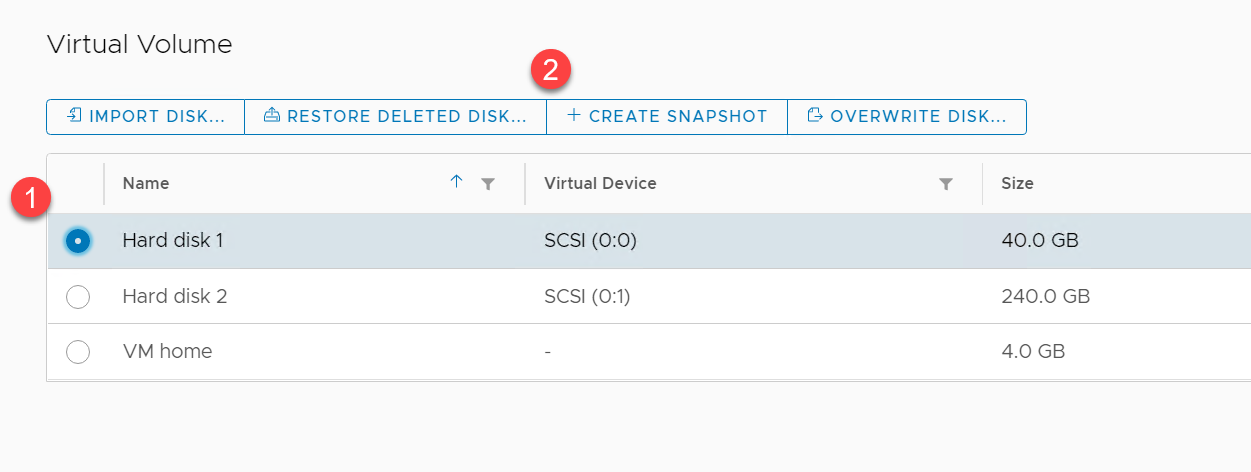
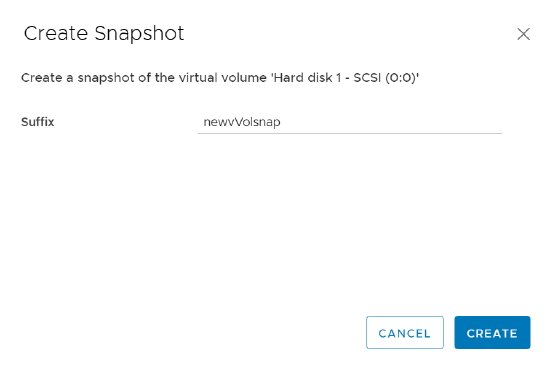
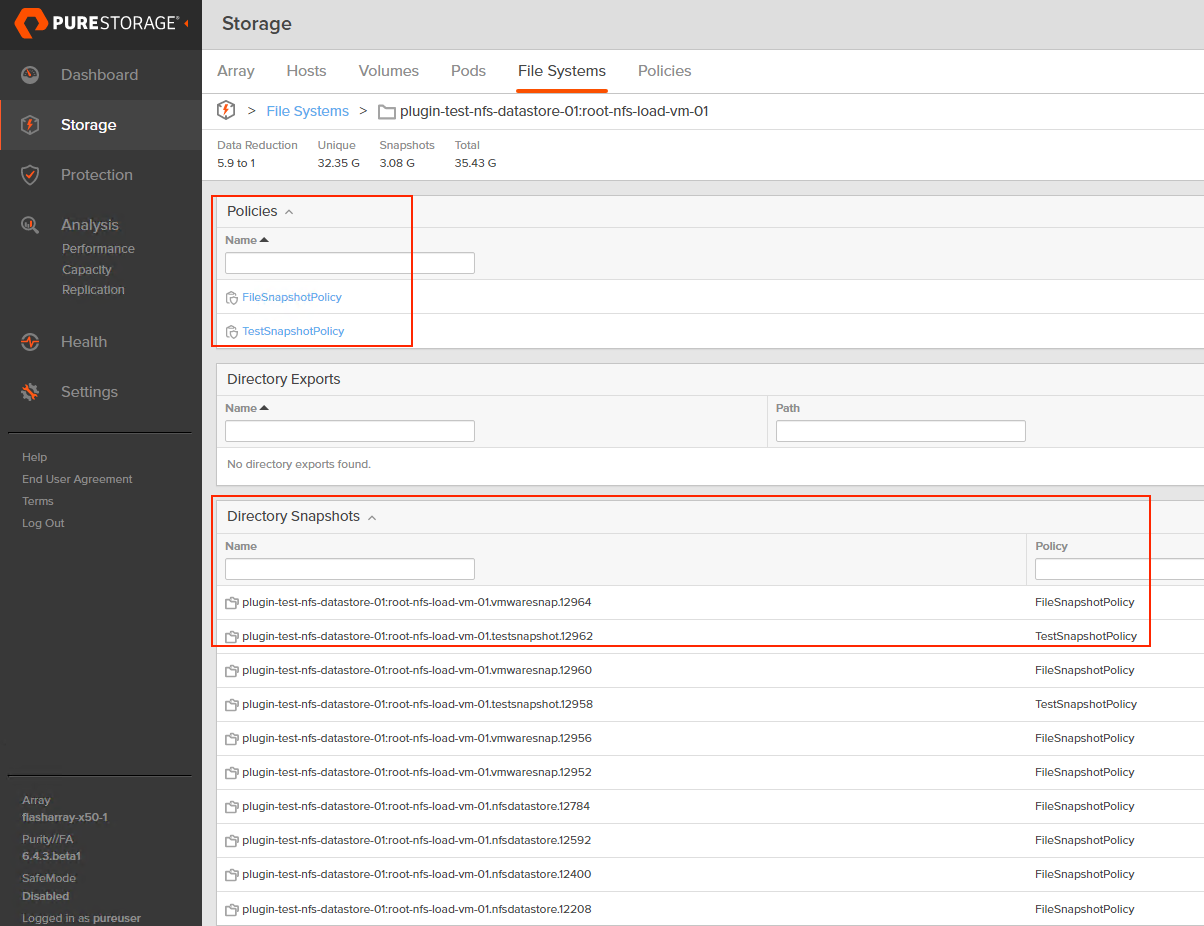
Want to have a special snapshot schedule for a certain group of VMs on a FlashArray-backed NFS datastore? With autodir, you can create snapshot policies and apply them to specific directories, allowing you to get around having to snapshot an entire NFS datastore like it’s a VMFS datastore. You can still snapshot the entire NFS file system if you want! Autodir enables you to have other options.

Your mission critical VMs likely have more complex snapshot retention and frequency requirements than your test VMs. With autodir, you can also apply multiple snapshot policies to the same directory (VM).

That’s sounds great Nelson, but surely autodir isn’t a good option for every NFS datastore on FlashArray. What are the reasons you wouldn’t want to enable autodir?

The main circumstance where autodir doesn’t make sense is if the scale limits of autodir are less than the directory count in your NFS datastore. Those can be found in this KB under “Managed Directories per array“.

If you want to see a demo of how autodir is configured on FlashArray, this video goes over it.

If you want to get detailed written instructions for how to configure autodir on FlashArray, this KB article is a good resource.

Features I Use Regularly in Pure’s vSphere Plugin

Today I want to tell to you about what I use the vSphere plugin for regularly in my lab to hopefully help you get more value out of your existing Pure array and tools. The assumption of this guide is that you already have the vSphere plugin installed (follow this guide if you don’t currently have it installed or would like to upgrade to a more feature-rich remote plugin version). Our vSphere plugin release notes KB covers the differences between versions. If you aren’t sure what version you want, use the latest version.

Why should you care about the vSphere plugin and why would I highlight these workflows for you? Pure’s vSphere plugin can save you a significant amount of time in the configuration/management of your vSphere+FlashArray environment. It can also greatly reduce the barriers to success in your projects by reducing the steps required of the administrator for successful completion of a workflow. Additionally, you might currently be using the vSphere plugin for a couple of workflows but didn’t realize all of the great work our engineers have put into making your life easier.

I am planning to write more blogs on the vSphere plugin and the next one I plan to write is on the highest value features that exist in current vSphere plugin versions.

Create and Manage FlashArray Hosts and Host Group Objects

If you’re currently a Pure customer, you have likely managed your host and host group objects directly from the array. Did you know you can also do this from the vSphere plugin without having to copy over WWNs/IPs manually? (1) Right-click on the ESXi cluster you want to create/manage a host or host group object on, (2) hover over Pure Storage, then (3) left-click on Add/Update Host Group.

In this menu, there are currently Fibre Channel and iSCSI protocol configuration options. We are currently exploring options here for NVMe-oF configuration; stay tuned by following this KB. You can also check a box to configure your ESXi hosts for Pure’s best practices with iSCSI, making it so you don’t have to manually configure new iSCSI ESXi hosts.

FlashArray VMFS Datastore and Volume Management (Creation and Deletion)

There are a lot of options for VMFS volume management in the plugin. I’ll only cover the basics: creation and deletion.

When you use the plugin for datastore creation, the plugin will create the appropriate datastore in vSphere, the volume on the FlashArray, and it will connect the volume to the appropriate host(s) and host group objects on the FlashArray. (1) Right-click on the pertinent cluster or host object in vSphere, (2) hover over Pure Storage and finally (3) left-click on Create Datastore. This will bring up a wizard with a lot of options that I won’t cover here, but the end result will be a datastore that has a FlashArray volume backing it.

The great thing about deleting a datastore from the plugin is that there are no additional steps required on the array to clean up the objects. This is the most satisfying workflow for me personally because cleanup in a lab can feel like it’s not a good use of time until I’ve got hundreds of objects worth cleaning up. This workflow enables me to quickly clean up every time after I’ve completed testing instead of letting this work pile up.

(1) Right-click the datastore you want to delete, (2) hover over Pure Storage and (3) left-click on Destroy Datastore. After the confirmation prompt, the FlashArray volume backing that datastore will be destroyed and is pending eradication for whatever that value is configured on the FlashArray (default 24 hours, configurable up to 30 days with SafeMode). That’s it!

FlashArray Snapshot Creation

One of the benefits of FlashArray is its portable and lightweight snapshots. The good news is that you can create these directly from vSphere without having to log into the FlashArray. It’s worth mentioning that although the snapshot recovery workflows built into the vSphere plugin (vVols and VMFS) are far more powerful and useful when you really need them, I’m covering what I use regularly and I rarely have to recover from snapshots in my lab. I try to take snapshots every time I make a major change to my environment in case I need to quickly roll-back.

There are two separate workflows for snapshot creation: one for VMFS and one for vVols. The granularity advantage with vVols over VMFS is very clear here- with VMFS, you are taking snapshots of the entire VMFS datastore, no matter how many VMs or disks are attached to those VMs. With vVols, you only have to snapshot the volumes you need to, as granular as a single disk attached to a single VM.

With VMFS, (1) right click on the datastore, (2) hover over Pure Storage and (3) left click on Create Snapshot.

For a vVols backed disk, from the Virtual Machine Configure tab, navigate to the Pure Storage – Virtual Volumes pane, (1) select the disk you would like to snapshot and (2) click Create Snapshot.

A prompt will pop up to add a suffix to the snapshot if you’d like; click on create and you’ve got your FlashArray snapshot of a vVols backed disk created!

Stay tuned for a blog on the vSphere plugin features you might not know about that, like the above, can save you a significant amount of time and effort.

Multiple vVol Datastores on FlashArray

This is certainly a post that has been a long time in coming. As many customers were probably aware we only supported one vVol datastore per FlashArray from the inception of our support. Unlike VMFS, this doesn’t hinder as much as one might think: they datastore can be huge (up to 8 PB), features are granular to the vVol (virtual disk), and a lot of the adoption was driven by the VMware team who didn’t often really need multiple datastores.

Sure.

Before you start arguing, of course there are reasons for this and is something we needed to do. But as with our overall design of how we implement vVols on FlashArray (and well any feature) we wanted to think through our approach and how it might affect later development. We quickly came to the conclusion that leveraging pods as storage containers made the most sense. They act as similar concept as a vVol datastore does–provide feature control, a namespace, capacity tracking, etc. And more as we continue to develop them. Purposing these constructs on the array makes array management simpler: less custom objects, less repeated work, etc.

Continue reading “Multiple vVol Datastores on FlashArray”

Migrating From SCSI To NVMe on vCenter (Part 1 – Live Migration)

This is going to be broken up into two parts- first, a live migration where no VMs get powered off during the migration; second, a migration where you temporarily power off VMs attached to the SCSI datastore.

Why would you want to do it one way or another?

Pros of live migration:

  • No VM downtime
  • Simpler configuration changes and overlap. Less to go wrong or mess up

Pros of powering off VMs:

  • The total migration time will be significantly less because no data will have to be moved. Currently VMware doesn’t support XCOPY (even on the same array) for NVMe-oF
Continue reading “Migrating From SCSI To NVMe on vCenter (Part 1 – Live Migration)”

Pure Storage vSphere Remote Plugin™ 5.1.0 launch: vVol Point-in-Time Recovery

We are excited to announce the launch of the latest version of Pure Storage’s remote vSphere plugin, 5.1.0. It includes a number of bug fixes PLUS a highly sought after feature: vVols VM point-in-time (PiT) recovery!

Why am I excited about this feature?

With vVol PiT VM recovery, you can now easily recover an entire VM that was accidentally deleted (and eradicated) or you can restore the state of a VM back to a point in time that you took a snapshot from vCenter directly while using Pure’s vSphere plugin.

The requirements of this are Pure’s vSphere remote plugin 5.1.0 and Purity™ 6.2.6 or higher for PiT revert and for PiT VM undelete with a vVol VM that has had its FlashArray™ volumes eradicated from the FlashArray itself. If you’re undeleting a vVol VM that has not been eradicated yet, that functionality is present for Purity versions 6.1 and lower.

For PiT VM revert, you will also need to make sure that you have snapshots of all of the volumes associated with the vVol VM except swap- at least one data volume and one configuration volume.

For VM undelete before the volumes have been eradicated, you will need a snapshot of the vVol VM’s configuration volume.

For VM undelete after the vVol-backed VM has been eradicated, you’ll need a FlashArray protection group snapshot of all the VM’s data volumes, managed snapshots and configuration volumes.

Rather than rehash what my teammate Alex Carver has put a lot of work into, I’m just going to link to the KB and videos he created:

Download the new plugin (part of Pure’s OVA), read the release notes and test out vVol PiT recovery today! Like a lot of things, it’s better to have some understanding of what’s happening and why before needing something that might be part of your recovery process. Please note that you can also upgrade in-place from 5.0.0 to 5.1.0 (and future remote plugin releases) by following this guide.

vCenter Storage Provider “Refresh certificate” Functionality Restored

This will be a short blog, partially because my teammate Alex Carver already wrote a great blog that covers one workaround for this button not working that uses vCenter’s MOB.

If you have been using self-signed certificates in your vVols environment since vCenter 6.7 and updated to vCenter 7.0, you might have noticed something frustrating when trying to refresh those certificates manually: the button was greyed out! If you were like me, you were probably wondering why this useful functionality was removed and thought maybe it was for security reasons; your concerns might have been validated when searching VMware’s KB system and finding this KB that read like it was functionality that was removed on purpose (recently updated to reflect the current situation better).

Turns out my guess was wrong and that KB was a little misleading. VMware has brought this button’s functionality back in vCenter 7.0U3d and higher. You might say to yourself “that’s great Nelson, but I don’t upgrade my production vCenter whenever a new vCenter version comes out”. If you want a simpler workflow than re-creating the storage providers before you upgrade to newer versions of vCenter when the certificates expire eventually, Alex Carver has the method for you which uses vCenter’s MOB to refresh the storage providers without re-creating them.

Pure Storage’s vROps Management Pack ™ 3.2.0 – New Features and Changes

Pure Storage recently launched a new management pack for vROps that had a number of important fixes and some changes to the interface. You can download it here and find the full release notes here. What’s new?

  • Interface changes
    • Updated icons
    • Restructuring of Pure Storage objects in the Object view of vROps
  • Add Offload Snapshot capacity metric
  • Add FlashArray Software™ version property

Let’s go over the interface changes first. If you navigate to Environment -> Object Browser -> Pure Storage FlashArray -> FlashArray Resources -> PureStorage World and expand an array, the layout will look quite different than what was there before. For starters, the icons have almost all been updated to mirror what you would expect to see on a modern FlashArray Purity version (or vCenter if that is a vCenter object). We made this change to make the vROps management pack experience as close to the FlashArray experience as possible.

Additionally, we moved the structure of the objects around to be more consistent with what you’d expect from the FlashArray. No objects were removed and the same object can be listed in multiple places where it makes sense (for example, if you expand a Hosts group, you will see the pertinent volumes there as well as under the Volumes group).

Next, we’ve added the Offload Snapshot capacity metric in this version as well as a FlashArray Offload Target object. The Offload Target object is visible under Protection and you can see the current space used by that Offload Target in the badge for that object; additionally, there is a Capacity metric for this object that shows historical consumption.

Lastly, you can now retrieve the Purity version of the array directly from vROps to help plan your FlashArrays’ upgrades. This information is found by selecting a FlashArray and going to Metrics -> Properties -> Details -> Purity Version.

Native Pure Storage FlashArray™ File Replication – Purity 6.3


With the release of Purity 6.3, Native FA File replication has been added to the Pure Storage FlashArray™ software. This adds an often important feature to the FA File folder redirection solution I wrote about last year. Pure Storage is referring to this feature as ActiveDR for File Services.

ActiveDR for File Services is a useful feature if you’ve set up or are going to set up folder redirection on FA File and you would like the file data to be replicated asynchronously to a different array, whether that FlashArray hardware is at the same site or a different one. This feature is included with FlashArray.

This allows you to use your FlashArray for native block and file workloads that need the protection that replication provides and allow you to benefit from the great data reduction rate that FlashArray is known for with those replicated file sets.

Now, if you lose a site or an array for some reason, the file workload you have hosted on FA File can be recovered natively on FlashArray easily and quickly.

There are some differences between file and block workloads when it comes to ActiveDR replication. You can read more in the ActiveDR for File Services section of this Pure KB.

Horizon Folder Redirection Hosted on FlashArray™ File

Late last year, I wrote a KB for a solution that I wanted to bring up here- hosting Horizon’s VDI user directories on FlashArray™ File with folder redirection controlled through a group policy object (GPO). I’d like to discuss this for a couple of reasons:

1. Configuring FA File was surprising easy, especially compared to what I remember from setting up a Windows file server was for the same purpose in a previous role.
2. Why I landed on using folder redirection for this KB instead of roaming profiles or another solution for user shares in a VDI environment.

When I have managed or set up VDI environments from scratch in previous jobs, there were always a ton of considerations that went into the VDI environment. From determining the appropriate amount of virtual resources to deploy to each VDI user to determining how much hardware I actually needed to buy to support the full deployment, each step can be more painful than the last. Any opportunity we can take to help ourselves be successful in the project is a good step to invest in. But when that step is easier and I don’t have to invest any resources to get the benefit of improving the success of the project, I have to take a step back and appreciate what just went so well.

ComputerEntryFlashArrayConfiguration.png


It took me roughly 30 minutes to deploy and configure FA File in my existing Active Directory environment in my lab the first time. That included carefully digesting all the applicable new-to-me Pure documentation. From what I can recall with this process from my previous roles, that was at best a 2 hour job with a carefully put together and well documented Active Directory environment with automated Windows server deployments; at worst, that might have taken me a full day or two when I had to build everything from scratch. When any task took a day or more, I always had interrupts that would drag the process out and I ended up taking more time to review what I had done and what I needed to do from a documentation perspective.

AD create dialog.png


On the point of why I used folder redirection instead of roaming profiles with Active Directory, VMware has this very helpful KB that outlines decisions you might make if you are using Dynamic Environment manager (DEM), but I think a lot of the points are applicable even if you aren’t using DEM. I’d like to highlight some disadvantages they list of roaming profiles:

Disadvantages
-Large roaming profiles might get corrupted and cause the individual roaming profile to reset completely. As a result, users might spend a lot of time getting all personalized settings back.
-Roaming profiles do not roam across different operating systems. This results in multiple roaming profiles per user in a mixed environment, like desktops and Terminal Services.
-Potential for unnecessary growth of roaming profile, causing long login times.

When I saw these three specifically, I decided to go with folder redirection instead of roaming profiles. Anytime corruption is mentioned I try to avoid it. With VDI projects (let’s be real, most IT projects), you always want to minimize the impact to the end users partially because it will hurt adoption of it or reduce confidence from different groups in the company.

There is more to come with FA File and data protection, so please keep this blog in mind!

Validating SafeMode configuration on your Pure Storage Fleet with Pure1 API via PowerShell

If you are not familiar with Pure Safemode, you should be, check out the details here:

Or some of my thoughts in general here

Each FlashArray, Cloud Block Store, and FlashBlade has a built-in REST API, but so does Pure1–a place that aggregates all reporting for you in one API. Reporting on a Safemode configuration is a useful tool, to ensure our extra protections are configured (if they aren’t reach out to Pure support–for security reasons customers cannot turn it on themselves, nor off).

The Pure1 REST API has a beta release out (v1.1.b) that includes Safemode reporting in the arrays endpoint and it is super easy to pull via PowerShell.

Install the module (if you haven’t):

Install-Module PureStorage.Pure1

Create a new certificate (if you haven’t already) and retrieve the public key

Login to Pure1.purestorage.com as an admin and add the public key to Pure1 and get the application ID.

If you already created an app ID you do not need to do all of the above each time. Just once.

Now normally you can just connect, but the module auto-connects to the latest GA REST version by default, so before you do you need to set a variable to force it to the beta release:

Now connect.

Next, use Get-PureOneArrays and store it in a variable.

If you look at one of the results, you will see each array returned has a new property:

safe_mode

And there are additional properties available stating what is turned on (if at all)

If you see all-disabled, it means it is not enabled on that platform. Now keep in mind, this is a beta API so it may and likely will change by GA release of the REST–especially since our Safemode work is rapidly expanding on the storage platforms.