Affecting Persistent Volumes in VMware Tanzu

Note: This is another guest blog by Kyle Grossmiller. Kyle is a Sr. Solutions Architect at Pure and works with Cody on all things VMware.

VMware Tanzu is a game-changing piece of technology for numerous reasons, but probably the most transformational piece of it is also the most apparent – it provides the capability for the vCenter admin to give resources for both consumers of traditional virtual machines as well as Kubernetes/DevOps users from the same set of compute hosts and storage. This consolidation means that the vCenter admin can more easily see what is being allocated where, as well as gaining insight into what application(s) might be candidates to make the move into a container-based environment from a virtual machine.

A Tanzu deployment is comprised of quite a few moving pieces and a central piece of this is durable storage made possible by persistent volumes. While container nodes and pods are ephemeral by nature (which is one of their major advantages), the data that they consume, produce and manipulate must be performant, portable and often, saved. So, there is obviously a different set of things we care about for persistent data vs the Kubernetes nodes that Tanzu runs in unison with here. For the remainder of this post we will show a couple of quick and easy ways you can change your persistent volumes to suit your application needs. There’s a bit of work and some choices to be made around getting a Tanzu environment up and running in vSphere, and I’d encourage you to check out the VMware Tanzu User Guide on our Pure Storage support site or Cody’s blog series to get some additional information.

With that being said, when a persistent volume is created via either dynamic or static provisioning, one of the first things the application developer needs to decide is what will happen to that volume and data when the application that uses it itself is no longer needed. The default behavior for an SPBM policy/storageclass assigned to a vSphere Namespace is to delete it, but through a simple kubectl patch command line, the persistent volume can be saved for future usage.

To make this change, first get the persistent volume name that you want to Retain/save:

 
$ kubectl get pv
 NAME           CAPACITY    RECLAIM POLICY   STATUS 
 pvc-f37c39fd   5Gi         Delete           Bound 

Next, apply this kubectl command line to it to switch the reclaim policy from Delete to Retain:

​$ kubectl patch pv (PV_Name) -p '{"spec":{"persistentVolumeReclaimPolicy":"Retain"}}'

So for our PV example:

$ kubectl patch pv pvc-f37c39fd -p '{"spec":{"persistentVolumeReclaimPolicy":"Retain"}}'

When we run the kubectl get pv command again, we can see it is set to Retain, so we are all set:

$ kubectl get pv
NAME           CAPACITY    RECLAIM POLICY   STATUS  
pvc-f37c39fd   5Gi         Retain           Bound          

If there is anything close to a certainty in the storage world – it is that the longer a volume exists, the more full of data it will become. This becomes even more of a certainty if a persistent volume is retained and reused across multiple application instances for increasing amounts of time. In the vSphere and Supervisor cluster 7.0U2 release VMware has introduced the capability for Online Volume Expansion. What this means is that while in previous versions users had to unbind their persistent volume claim from a pod or node prior to resizing it (otherwise known as offline volume expansion) – now they are able to accomplish that same operation without that step . This is a huge advantage as the offline expansion required that the volume be effectively be taken out of service when additional space was added to it, which could lead to application downtime. With the online volume expansion enhancement that annoyance goes away completely.

Online volume expansion operation is really simple to do. This time we find the persistent volume claim (which is basically the glue between the persistent volume and the application) that we need to expand:

$ kubectl get pvc
NAME             STATUS  VOLUME        CAPACITY
pvc-vvols-mysql  Bound   pvc-f37c39fd  5Gi      

Now we run the following patch command against the PVC name we found above so that it knows to request additional storage for the persistent volume that it is bound to. In this case, we will ask to expand from 5Gi to 6Gi:

$ kubectl patch pvc pvc-vvols-mysql -p '{"spec": {"resources": {"requests":{"storage": "6Gi"}}}}'

After waiting for a few moments for the expansion to complete, we look at the pvc in order to confirm we have the additional space that we asked for and we can see it has been added:

$ kubectl get pvc
NAME              STATUS   VOLUME         CAPACITY
pvc-vvols-mysql   Bound    pvc-f37c39fd   6Gi     

Taking a closer look at the PVC via the describe command shows that it indeed increased the PV size while it remained mounted to the mysql-deployment node under the events section:

$ kubectl describe pvc
Name:          pvc-vvols-mysql
Namespace:     default
StorageClass:  cns-vvols
Status:        Bound
Volume:        pvc-f37c39fd-dbe9-4f27-abe8-bca85bf9e87c
Labels:        <none>
Annotations:   pv.kubernetes.io/bind-completed: yes
               pv.kubernetes.io/bound-by-controller: yes
               volume.beta.kubernetes.io/storage-provisioner: csi.vsphere.vmware.com
               volumehealth.storage.kubernetes.io/health: accessible
Finalizers:    [kubernetes.io/pvc-protection]
Capacity:      6Gi
Access Modes:  RWO
VolumeMode:    Filesystem
Mounted By:    mysql-deployment-5d8574cb78-xhhq5
Events:
  Type     Reason                      Age   From                                             Message
  ----     ------                      ----  ----                                             -------
  Warning  ExternalExpanding           52s   volume_expand                                    Ignoring the PVC: didn't find a plugin capable of expanding the volume; waiting for an external controller to process this PVC.
  Normal   Resizing                    52s   external-resizer csi.vsphere.vmware.com          External resizer is resizing volume pvc-f37c39fd-dbe9-4f27-abe8-bca85bf9e87c
  Normal   FileSystemResizeRequired    51s   external-resizer csi.vsphere.vmware.com          Require file system resize of volume on node
  Normal   FileSystemResizeSuccessful  40s   kubelet, tkc-120-workers-mbws2-68d7869b97-sdkgh  MountVolume.NodeExpandVolume succeeded for volume "pvc-f37c39fd-dbe9-4f27-abe8-bca85bf9e87c"

Those are just a couple of the ways we can update our persistent volumes to do what we need them to do within a Tanzu deployment, and we have really just scratched the surface with these few examples. To see how to do more advanced operations like migrating a persistent volume to a different Tanzu Kubernetes Cluster, please head over to our new Tanzu User Guide. Of course, it also is very important to mention that Portworx combined with Tanzu gives us even more features and functionalities like RBAC, automated backup and recovery and a whole lot more. Getting deeper into how Portworx interoperates with Tanzu is what I’m working on next so please stay tuned for some more cool stuff.

Using PowerShell with Tanzu and the Kubernetes API

Sounds like a silly thing, but we all have to start somewhere. Generally when I dig into something new, I like to start from a place I know well. So when it comes to using a new API, I like to use a tool I know how to use. Kubernetes–and its API is fairly new to me from a hands-on perspective. PowerShell, however, is not. I have decent handle on that. So seems to me a good place to start with the k8s API.

I don’t know if this is the best way, or even a good way, but it does work. And there is also this:

https://www.powershellgallery.com/packages/Microsoft.PowerShell.KubeCtl/0.0.3

But I am trying to learn authentication and the finer points of the API, so I like to start with first principles.

Create a Service Account

So the first step is to create a service account. So create a new file and then in that, enter in the following information, replacing the username and/or namespace with whatever you want:

vim newuseracct.yml

Then apply it:

Again using your favorite editor, create a new file:

vim newuser.yaml

This will apply the cluster admin role to that account. Replace the username, the namespace or even role as needed.

apiVersion: rbac.authorization.k8s.io/v1
kind: ClusterRoleBinding
metadata:
  name: pscody
roleRef:
  apiGroup: rbac.authorization.k8s.io
  kind: ClusterRole
  name: cluster-admin
subjects:
  - kind: ServiceAccount
    name: pscody
    namespace: kube-system

Now apply it:

kubectl apply -f newuser.yaml

Retrieve the Token

Once the account is created, you need the token. Run:

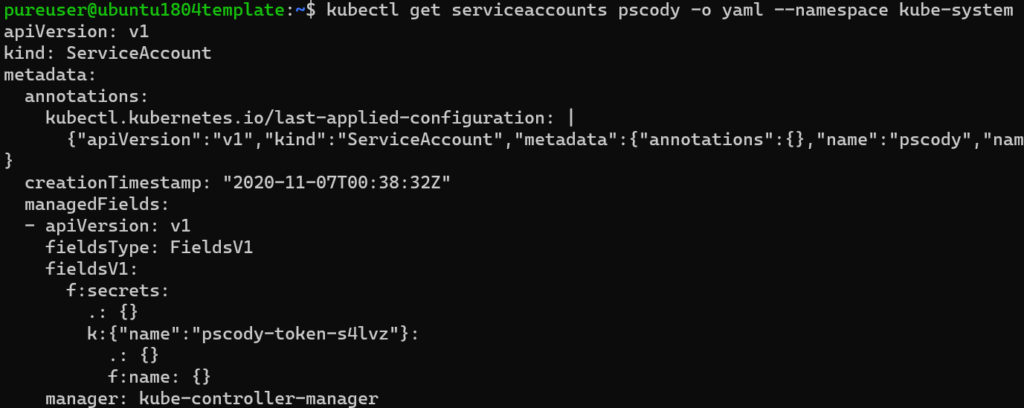
kubectl get serviceaccounts pscody -o yaml --namespace kube-system

Replacing the username and the namespace as needed.

Under the secrets, grab the name. In my case it is “pscody-token-s4lvz”.

Then run:

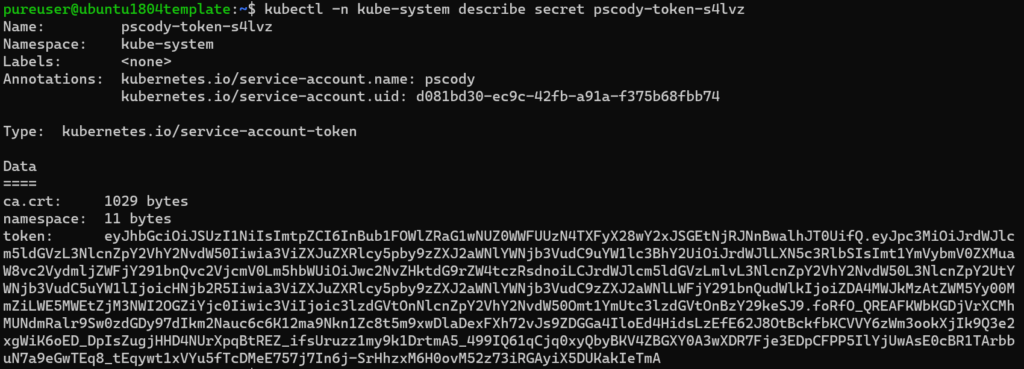
kubectl -n kube-system describe secret pscody-token-s4lvz

Copy everything in the token.

Get Server Address

Now you need to get the server address for the cluster where you created the user. So if you don’t know, look at the context via kubectl config get-contexts:

Then, run kubectl config view and pull the server address for the corresponding cluster, so for mine it is cody-dev so the address is https://10.21.202.237:6443

Connect with Invoke-RestMethod

Now head over to PowerShell!

First, store your token in an object, I will use $token.

Then we need to form the header as a bearer token:

$k8sheader = @{authorization="Bearer $($token)"}

This is the format needed to authenticate with that token.

Now you are ready!

To pull the storage classes for instance run:

Invoke-RestMethod -Method GET -Uri https://10.21.202.237:6443/apis/storage.k8s.io/v1/storageclasses -Headers $k8sheader -SkipCertificateCheck

You will need skip certificate check for now–I didn’t configure the certificate checking yet.

If we store the response in an object we can more easily dig in:

And find my default storage class.

Definitely a lot more for me to learn here, but it is a start!

Cloud Native Storage Part 1: Storage Policy Configuration

Previous series on Tanzu setup:

  1. Tanzu Kubernetes 1.2 Part 1: Deploying a Tanzu Kubernetes Management Cluster
  2. Tanzu Kubernetes 1.2 Part 2: Deploying a Tanzu Kubernetes Guest Cluster
  3. Tanzu Kubernetes 1.2 Part 3: Authenticating Tanzu Kubernetes Guest Clusters with Kubectl

The next step here is storage. I want to configure an ability to provision persistent storage in Tanzu Kubernetes. Storage is generally managed and configured through a specification called the Container Storage Interface (CSI). CSI is a specification created to provide a consistent experience in an orchestrated container environment for storage provisioning and management. There are a ton of different storage types (SAN, NAS, DAS, SDS, Cloud, etc. etc.) from 100x that in vendors. Management and interaction with all of them is different. Many people deploying and managing containers are not experts in any of these, and do not have the time nor the interest in learning them. And if you change storage vendors do you want to have to change your entire practice in k8s for it? Probably not.

So CSI takes some proprietary storage layer and provides an API mapping:

https://github.com/container-storage-interface/spec/blob/master/spec.md

Vendors can take that and build a CSI driver that manages their storage but provides a consistent experience above it.

At Pure Storage we have our own CSI driver for instance, called Pure Service Orchestrator. Which I will get to in a later series. For now, lets get into VMware’s CSI driver. VMware’s CSI driver is part of a whole offering called Cloud Native Storage.

https://github.com/kubernetes/cloud-provider-vsphere/blob/master/docs/book/tutorials/kubernetes-on-vsphere-with-kubeadm.md

https://blogs.vmware.com/virtualblocks/2019/08/14/introducing-cloud-native-storage-for-vsphere/

This has two parts, the CSI driver which gets installed in the k8s nodes, and the CNS control plane within vSphere itself that does the selecting and provisioning of storage. This requires vSphere 6.7 U3 or later. A benefit of using TKG is that the various CNS components come pre-installed.

Continue reading “Cloud Native Storage Part 1: Storage Policy Configuration”

Tanzu Kubernetes 1.2 Part 3: Authenticating Tanzu Kubernetes Guest Clusters with Kubectl

In my previous posts, I spoke about deploying Tanzu Kubernetes Grid and then Tanzu Kubernetes Clusters. See the posts below:

  1. Tanzu Kubernetes 1.2 Part 1: Deploying a Tanzu Kubernetes Management Cluster
  2. Tanzu Kubernetes 1.2 Part 2: Deploying a Tanzu Kubernetes Guest Cluster
  3. Tanzu Kubernetes 1.2 Part 3: Authenticating Tanzu Kubernetes Guest Clusters with Kubectl

So we are up and running!

Quick shout out to Jon Owings who helped with some much needed background on a few things.

So now if you run want to see the available clusters you can run:

tkg get clusters

You can also use kubectl to see the clusters. Since one is in a non-default namespace I need to query for that namespace.

Continue reading “Tanzu Kubernetes 1.2 Part 3: Authenticating Tanzu Kubernetes Guest Clusters with Kubectl”

Tanzu Kubernetes 1.2 Part 2: Deploying a Tanzu Kubernetes Guest Cluster

So in the previous post, I wrote about deploying a Tanzu Kubernetes Grid management cluster.

VMware defines this as:

A management cluster is the first element that you deploy when you create a Tanzu Kubernetes Grid instance. The management cluster is a Kubernetes cluster that performs the role of the primary management and operational center for the Tanzu Kubernetes Grid instance. This is where Cluster API runs to create the Tanzu Kubernetes clusters in which your application workloads run, and where you configure the shared and in-cluster services that the clusters use.

https://docs.vmware.com/en/VMware-Tanzu-Kubernetes-Grid/1.2/vmware-tanzu-kubernetes-grid-12/GUID-tkg-concepts.html

In other words this is the cluster that manages them all. This is your entry point to the rest. You can deploy applications in it, but not usually the right move. Generally you want to deploy clusters that are specifically devoted to running workloads.

  1. Tanzu Kubernetes 1.2 Part 1: Deploying a Tanzu Kubernetes Management Cluster
  2. Tanzu Kubernetes 1.2 Part 2: Deploying a Tanzu Kubernetes Guest Cluster
  3. Tanzu Kubernetes 1.2 Part 3: Authenticating Tanzu Kubernetes Guest Clusters with Kubectl

These clusters are called Tanzu Kubernetes Cluster. Which VMware defines as:

After you have deployed a management cluster, you use the Tanzu Kubernetes Grid CLI to deploy CNCF conformant Kubernetes clusters and manage their lifecycle. These clusters, known as Tanzu Kubernetes clusters, are the clusters that handle your application workloads, that you manage through the management cluster. Tanzu Kubernetes clusters can run different versions of Kubernetes, depending on the needs of the applications they run. You can manage the entire lifecycle of Tanzu Kubernetes clusters by using the Tanzu Kubernetes Grid CLI. Tanzu Kubernetes clusters implement Antrea for pod-to-pod networking by default.

https://docs.vmware.com/en/VMware-Tanzu-Kubernetes-Grid/1.2/vmware-tanzu-kubernetes-grid-12/GUID-tkg-concepts.html
Continue reading “Tanzu Kubernetes 1.2 Part 2: Deploying a Tanzu Kubernetes Guest Cluster”

Tanzu Kubernetes 1.2 Part 1: Deploying a Tanzu Kubernetes Management Cluster

I wrote awhile back on how to deploy TKG on top of vSphere, but there have been some improvements, some changes, and I have personally learned more so I thought it was time to write a new one.

The process requires a few things, but first the deployment of the management cluster–and there are a few options for this. A burgeoning option is the more integrated version to vSphere, which is called Tanzu Kubernetes Grid Service. This means the supervisor cluster is tightly integrated into vSphere. This comes in two forms vSphere with Tanzu or VMware Cloud Foundation (VCF) with Tanzu. The latter is the most feature rich but of course requires VCF and NSX. The former doesn’t quite have all of the options, but does not require those two, instead just vSphere and virtual distributed switches.

The third option is to deploy the management cluster directly. This has the least requirements, but has the least direct integration into vSphere. This is what I will focus on today. I will follow up with the other options. This choice is generally just called Tanzu Kubernetes Grid.

https://docs.vmware.com/en/VMware-Tanzu-Kubernetes-Grid/1.2/vmware-tanzu-kubernetes-grid-12/GUID-index.html

  1. Tanzu Kubernetes 1.2 Part 1: Deploying a Tanzu Kubernetes Management Cluster
  2. Tanzu Kubernetes 1.2 Part 2: Deploying a Tanzu Kubernetes Guest Cluster
  3. Tanzu Kubernetes 1.2 Part 3: Authenticating Tanzu Kubernetes Guest Clusters with Kubectl
Continue reading “Tanzu Kubernetes 1.2 Part 1: Deploying a Tanzu Kubernetes Management Cluster”

Deploying VMware Tanzu Kubernetes Grid with Pure Storage vVols Part I: Deploy TKG on vSphere

This is the start of a multi-part series (how many parts? I have no idea). But let’s start at the basics–getting TKG deployed on vSphere.

Prepare Environment

So the first step is to download the two OVAs required:

The HA proxy and the photon appliance itself. Download the latest:

https://my.vmware.com/group/vmware/downloads/info/slug/infrastructure_operations_management/vmware_tanzu_kubernetes_grid/1_x

Continue reading “Deploying VMware Tanzu Kubernetes Grid with Pure Storage vVols Part I: Deploy TKG on vSphere”