
Hello there! The FlashArray and FlashBlade products from Pure have always had a REST API service built in–this REST service allows you to manage, provision, and pull raw statistics from the array.
But there are two pieces missing:
- You need to iterate through each array if you want to intelligently place a volume on it (or find a volume or whatever)
- They only offer raw statistics–you need to do some crunching possibly to get what you want. Create projections and forecast, find how busy an array is, etc.
Luckily this is what Pure1 does for you. Every customer has access to our Pure1 web tool. This is something we host, all of your dial-home information gets fed into it. We use that information to figure out how “busy” an array is, when it will fill up from a capacity or performance perspective and much more. We now offer a REST API for Pure1 as well, so you can do some one-stop shopping for the information you need, that the arrays cannot natively provide.
First, as always, some links:
https://static.pure1.purestorage.com/api-swagger/index.html
These should provide you what you need. I plan on writing a couple different posts on using different tools to connect to it. PowerShell. Python. vRealize Orchestrator. Stay tuned for those.
UPDATE: I wrote a PowerShell module that makes this quite simple. Find it here: https://www.codyhosterman.com/scripts-and-tools/pure1-rest-api/pure1-powershell-module/
For this post I will explain how it works. Mostly around authentication. I will focus on the swagger option and how to use it, to introduce the feature. In subsequent posts, I will show you how to programmatically leverage it.
A couple things about the Pure1 REST:
- Authentication is different than what is used with the FlashArray REST. It is RSA key based, not username/password based.
- Pure1 DOES NOT currently configure/manage your arrays–it is read only today. Pulls in the config, performance, etc, and analyzes it. But it cannot create volumes and whatnot. Though this could very well change in the future.
There are a few steps in connecting to the Pure1 REST. A few that are one time only, and a few that are required for each authentication session:
- Create a PEM-based RSA public/private key pair.
- Authenticate the key with Pure1 to create an API user
- Create an authentication token request
- Send that token to Pure1 to get an access token
- Make your REST calls!
I will walk through each step one by one.
Create Key Pair
The first step is to create a key pair. This is a one-time operation, or a per-user operation. Depending on how you want to divvy up connectivity for auditing purposes or whatever.
There are a variety ways of doing this, but the simplest option is to just use OpenSSL took native in Linux distributions. As far as I can tell you CANNOT use Windows tools like Putty keygen to do this, because it does not create a PEM-based key pair which is required.
I have a bare bones install of Ubuntu 16.04–though as I said any Linux distribution with openssl will do just fine.
I have been told that the GitBash tool for Windows will work for doing this as well, but I have yet to try it. https://docs.joyent.com/public-cloud/getting-started/ssh-keys/generating-an-ssh-key-manually/manually-generating-your-ssh-key-in-windows#git-bash
Generating a key pair is fairly easy here. A few commands. First create your private key. Run the following command pretty much exactly. The only thing you can change is the name of the key.
openssl genrsa -aes256 -out private.pem 2048This will create a private key call private.pem in the current directory.
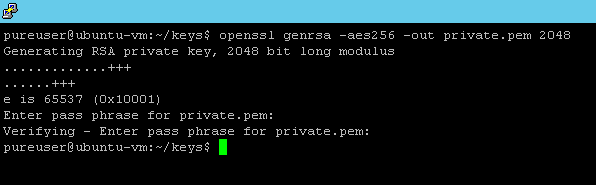
It will prompt you for a password to use for key encryption. Enter that in and confirm.
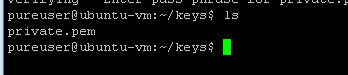
We will see the key is now created.
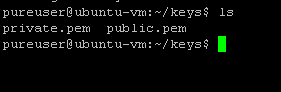
Now time to export the public key:
openssl rsa -in private.pem -outform PEM -pubout -out public.pemEnter in your private key location (which is in my current directory) and then a name for your public key. This will export a key called public.pem in my current directory.

It will ask you for your private key password. The key will then be located in the current directory under the name public.pem:
Great step 1 is done!
Registering the key pair with Pure1
Now you need to actually tell Pure1 that this key is valid for REST access. This is important: you must be an administrator in your Pure1 organization to be able to do this step. If you are not, you must have an administrator do it for you. How do you know? Well go to http://pure1.purestorage.com and login.
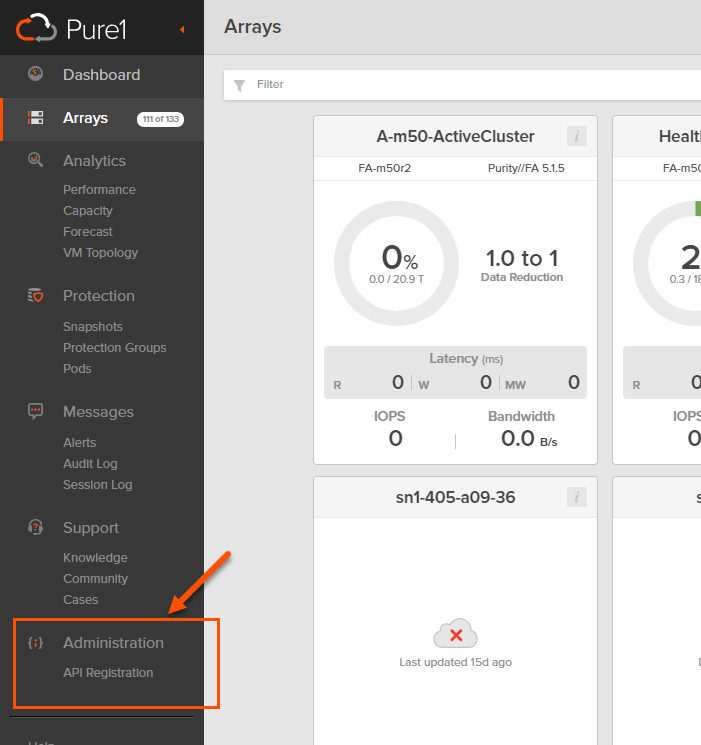
If you do not see the Administration section on the lower left–you are not an admin. If you do, you are! Click on API registration. Then Register Application.
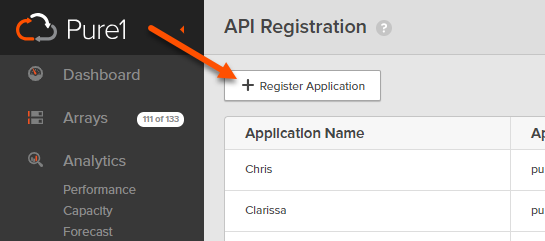
Now enter in a friendly name for the application or user. Doesn’t really matter–just something that make sense for your purposes.
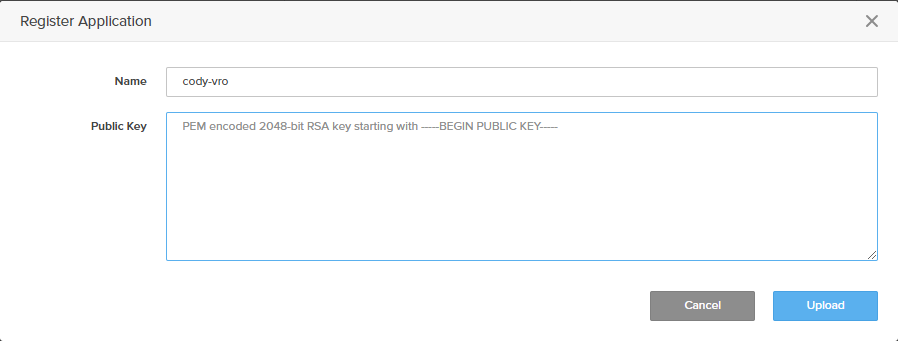
Now you need to enter in the public key. Go to wherever you have it stored. In my case, it is still in my Ubuntu VM. I will run “more” against it to see the full key.
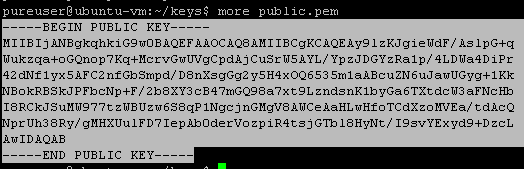
Copy and paste the whole key. Including the dashes and the BEGIN/END stuff (everything that I have highlighted above). Paste it into the text box in Pure1:
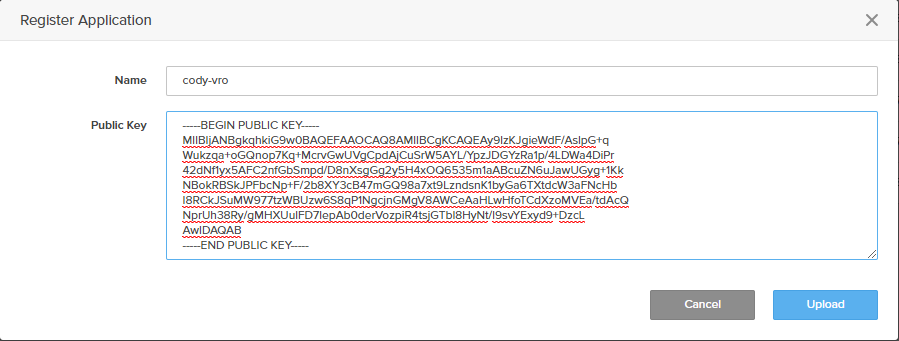
Click Upload when done. You should then see it listed in Pure1.

Once you have done this, or your administrator has, you can now authorize sessions and you no longer need to interact with the Pure1 web interface, you can now do everything from external tools. The one piece of information you do need though is the application ID from Pure. Mine is:
pure1:apikey:AuccHqCmfIYqBWcW
You will need this to authenticate sessions.
Creating your ID Token
The above steps will never need to be done again, unless the key changes, or you want to authenticate a new one. The next steps though will need to be run through each time you need to create a new authenticated session.
The Pure1 REST API uses what are called JSON Web Tokens, (JWT for short). JWTs consist of JSON data that is signed using a private key and verified using a public key.
There are two primary mechanisms for doing this hashing. Symmetric algorithms and asymmetric algorithms.
Symmetric algorithms basically means that either side of the communication have the same password. It is like zipping up files with a password and then sending the file along and the receiving end needs that password to see the data.
Asymmetric algorithms mean that both sides do not have the same information. This is the whole idea behind private and public keys. Only you can sign a message with the private key, anyone with the public key can validate it. This is the methodology we use for our JWT.
A JWT is comprised of three parts:
- Header. This says which algorithm is actually used.
- Payload/data. This includes timestamps and the above application ID from Pure1.
- RSA signature.
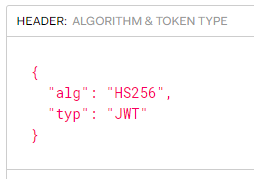
The header always looks like this:
{
  "alg": "RS256",
  "typ": "JWT"
}
It indicates the algorithm (RSA-SHA256) and that is is being used to create a JWT.
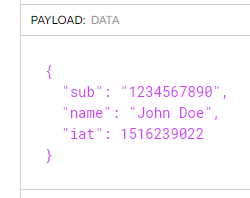
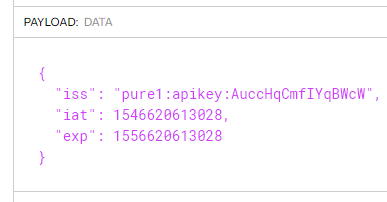
The payload changes and will look something like this:
{
  "iss": "pure1:apikey:AuccHqCmfIYqBWcW",
  "iat": 1546620613028,
  "exp": 1556620613028
}
ISS is your application ID that you retrieved from Pure1. IAT and EXP are both times in Unix time (which is the number of milliseconds counted back to January 1st 1970). IAT is the current time, EXP is the expiration. You can go to a site like this to get the current time. If you up the 7th digit by one, you will give yourself 15 minutes.
Note that EXP will not indicate the expiration of the eventual REST session–it is the expiration of this JWT. So after the specified time, Pure1 will not accept this JWT to create a new session token. So set this to some time in the future that will give you enough time to exchange it with Pure1. If this will be scripted a couple seconds or so should do fine. The above epoch time represents April 30th, 2019 (it is January 2019 as of time of writing) so I gave myself plenty of time.
A JWT is essentially a string of text. It is in the format of:
<URL encoded header>.<URL encoded data>.<RSA signature>
In subsequent posts, I will explain how to generate these via the respective languages (PowerShell, Python, etc.). For now, let’s use Swagger and the web site jwt.io so we can play around with the REST API.
First go to http://jwt.io
This site has a ton of libraries for creating a JWT. So whatever language you are using for REST calls, you should find what you need there. For today though, let’s just use the web site directly to create the JWT, so we can play with the Pure1 Swagger. Scroll down on the page a bit and you will see the following:
The first step, change the ALGORITHM drop down to RS256.
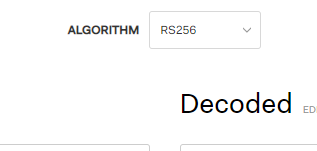
You will note that the “header” box also changes with this automatically. From this:
To this:

That drop-down selection configures your header properly. The next step is the configure the payload. The default is something similar to this:
This will need to be changed. Delete all of the text in there and replace it with what we need:
- iss which will be your Pure1 application ID
- iat which is the current Unix time
- exp which is the expiration time of this request
So mine will look like this:
To get the current Unix time you can go here. Then just increment that value to create an expiration time. Just give yourself enough time to be able to send it to Pure1 before it expires.
The next step is to configure the VERIFY SIGNATURE box. For this, you need your unencrypted private key. When you created your private key, you supplied a password, this encrypts it. So you need to unencrypt it.
Run the following command against your private key and then enter your password:
openssl rsa -in <key name>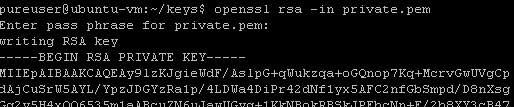
This will spit out the key unencrypted. Now copy the entirety of it–including the dashes, being private key, end private key and ending dashes. Go back to jwt.io.
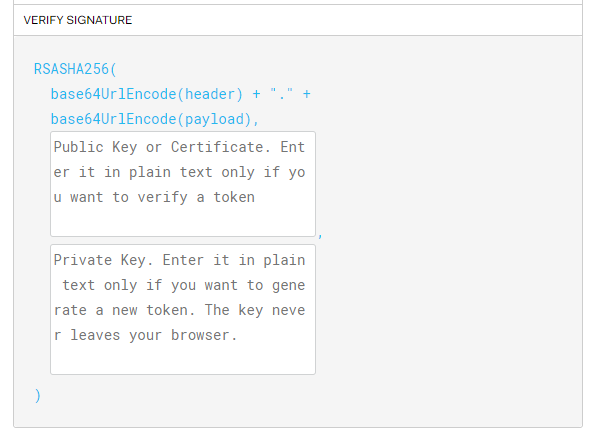
Delete all of the text in the public key box and the private key box. Should look like above. Now paste in your unencrypted private key.
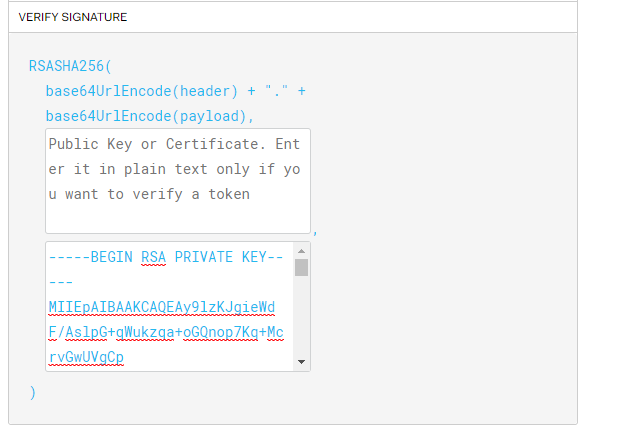
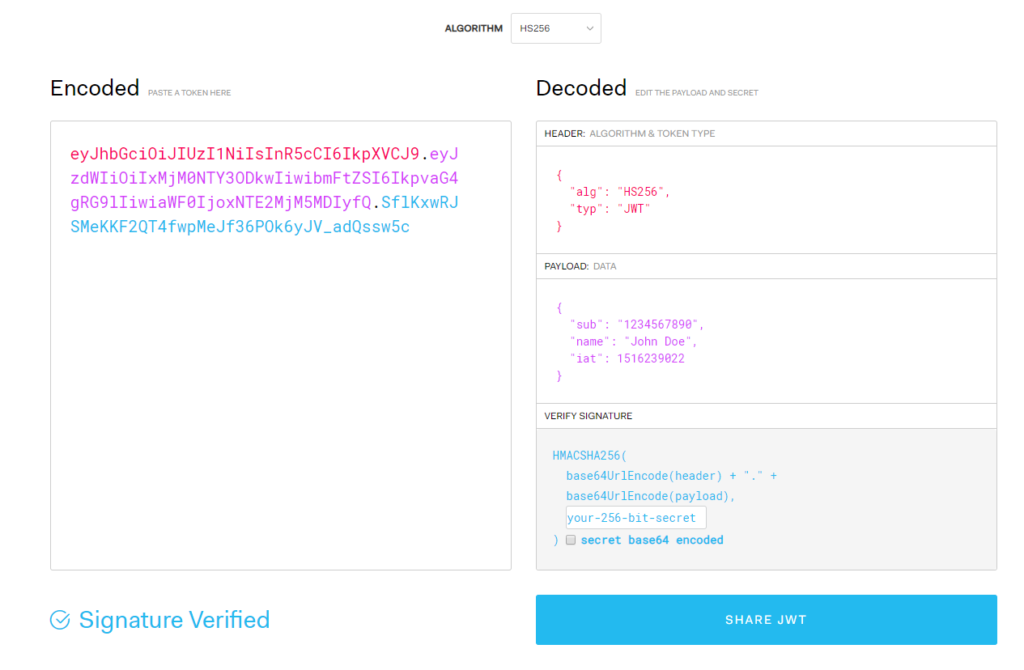
Now in the left-hand box, you will see the JWT has been created!
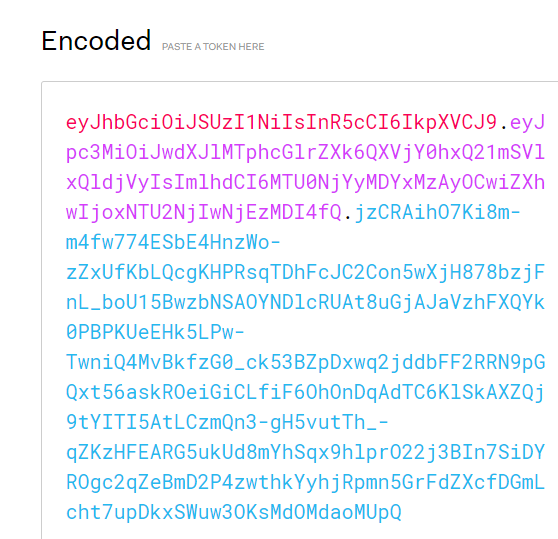
There are three parts to it, the header encoded, the payload encoded, and the RSA signature. Copy all of it. You are technically done with this part, but if you want to verify it was created properly, paste in your public key into the public key box.
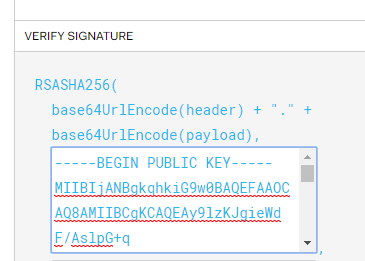
If everything is good, the lower left-hand corner will change from:

To:

If it does not work, likely one of the keys weren’t pasted in correctly. Or they key was generated in the wrong format.
Authenticating with Swagger
Okay now on to Swagger! Go here:
https://static.pure1.purestorage.com/api-swagger/index.html
First click on the green POST bar under AUTHORIZATION
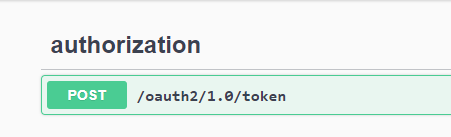
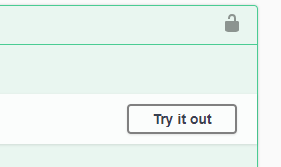
Click “Try it out” on the right.
Then in the middle field called “subject_token”

Enter in your full JWT into the subject_token field:
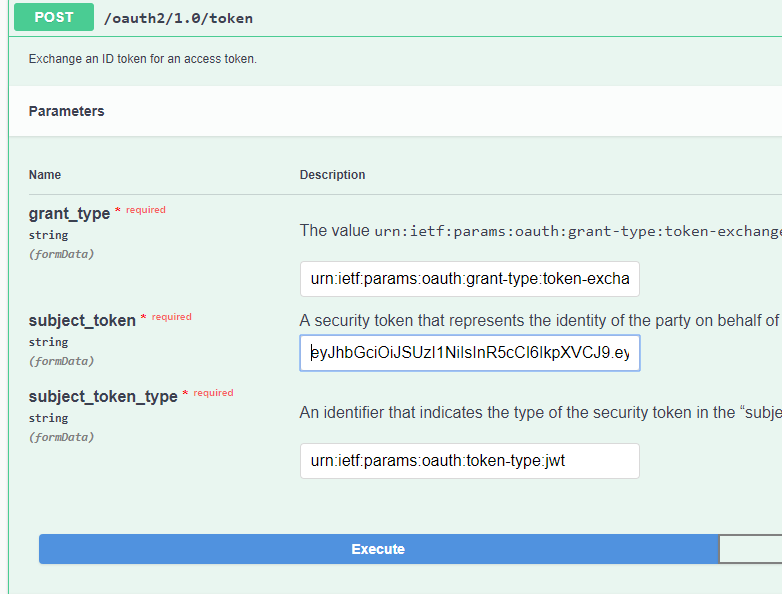
Then click Execute. If you were doing this manually, you would need to add the other two parameters as well with the values shown above. In the swagger UI, this is done automatically for you. Right below, the response should include the access token, also called a bearer token.
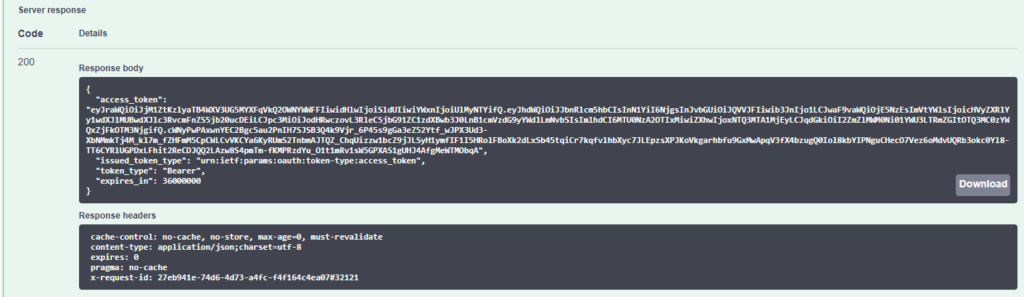
Copy the access token, which is basically everything in the access_token key (not including the quotes):

Now go back to the top and click on the Authorize button.
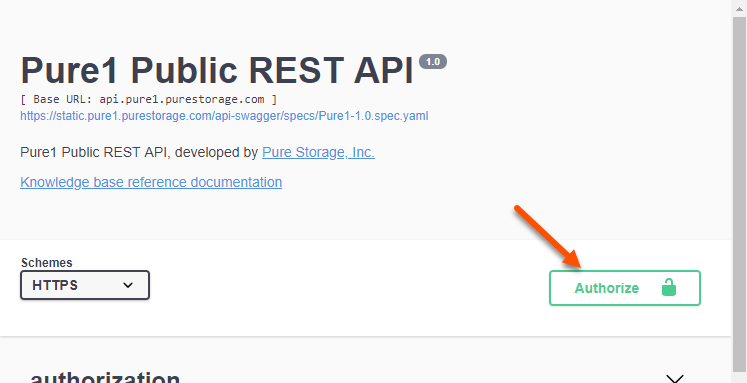
As seen above, click on the Authorize button–you’ll note its icon shows unlocked right now. A window will pop up:
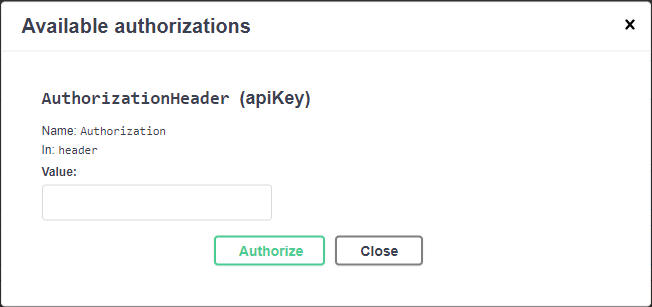
In the Value box, type in Bearer, then a space, then paste in the access token you just copied:
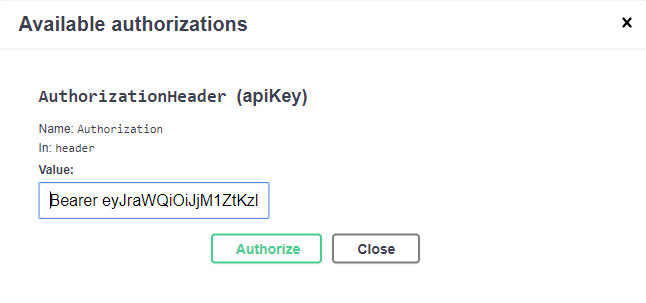
It will save this. Click Close.
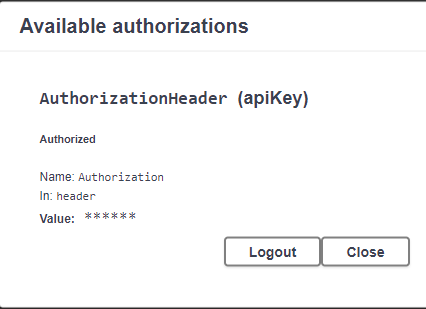
Now your screen is authenticated! You can start running REST API calls.
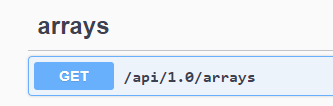
Click on the first GET under the arrays column:
Normally, you would have to enter in your access token if you were scripting this, but Swagger does it for you (that’s what that last authorize step is, it includes that token in the header for all calls from that page).
Click “Try it out” then scroll past the optional parameters and click Execute.

As you can see above, it lists all of my arrays! Cool. All 127 of them. If I want to limit it to a certain array, I can put the name in the names parameter.

Click Add item then type in the name of the array inside of single quotes.
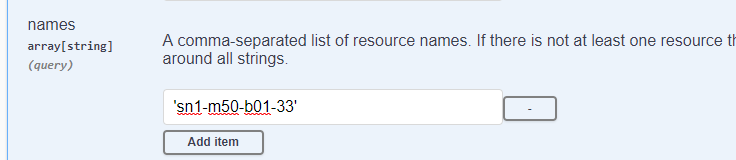
Click Execute:
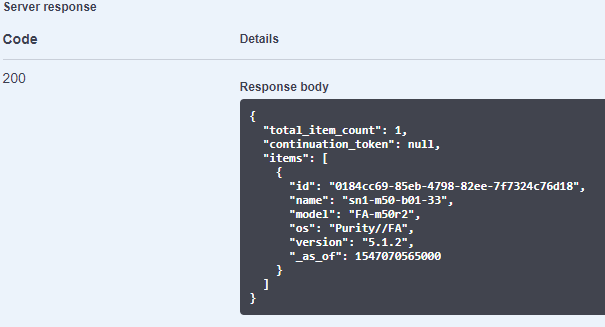
Sweet!
I think this is going to be very useful–I plan on adding it to a lot of our integration. Pure1 has information like the busy meter–which says how truly busy an array is. This will be very helpful in creating intelligent storage placement. Say how much capacity you want and we can figure out what array it should go on.
As I noted earlier this if read only for the most part. One thing you can do right now, is create tags and tag arrays in Pure1. Helping you better organize those arrays. We are adding more soon, so stay tuned!
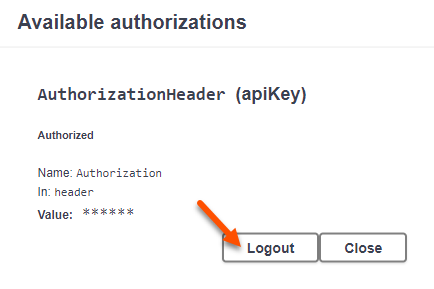
To end the session, click Authorize and then log out. Or just close the browser.
In upcoming posts, I will walk through doing this with PowerShell, Python, and vRealize Orchestrator. And maybe more depending on what people ask about.
The REST API link – first one – is borken.
I think this one works – https://support.purestorage.com/Pure1/Pure1_Manage/Pure1_Manage_-_REST_API/Pure1_Manage_-_REST_API__Reference
Whoops. Fixed!
do you have a similar post ( for python ) for purity
REST 1 -> REST 2
Bob–can you be a bit more specific? Are you looking for a post on the Pure1 REST with python? Or FlashArray REST with Python? If the latter, REST 1.x or 2.x?