
Migrating VMDKs or virtual mode RDMs to VVols is easy: Storage vMotion. No downtime, no pre-creating of volumes. Simple and fast. But physical mode RDMs are a bit different.
As we all begrudgingly admit there are still more than a few Raw Device Mappings out there in VMware environments. Two primary use cases:
- Microsoft Clustering. Virtual disks can only be used for Failover Clustering if all of the VMs are on the same ESXi hosts which feels a bit like defeating the purpose. So most opt for RDMs so they can split the VMs up.
- Physical to virtual. Sharing copies of data between physical and virtual or some other hypervisor is the most common reason I see these days. Mostly around database dev/test scenarios. The concept of a VMDK can keep your data from being easily shared, so RDMs provide a workaround.
So when it comes to VVols the same questions linger. Can I do these things? Well the first issue is being resolved with VVols in the next vSphere release according to public statements made by VMware at VMworld. So until that release, RDMs will still be needed for that use case.
But the other use case works great on VVols. VVols can be used and shared just like RDMs. And in many ways they are much better.
So how do I then migrate an RDM to a VVol? Well there are a couple of options.
Please note that I am doing this with the Pure Storage FlashArray, array functions may vary from vendor to vendor, but theoretically if the array doesn’t block it, it is all allowed from a VMware perspective.
So in the below scenarios, I have a VM with a physical mode RDM with my SQL database on it. In this case it happens to be a copy of my SQL DB for my vRA environment. Though it doesn’t really matter what the data is.
Disk mgr:
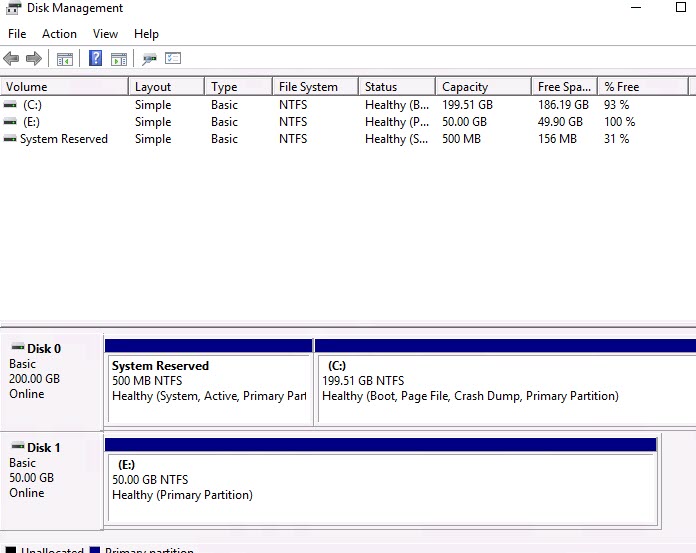
SQL files:

Used space:

RDM config:
Option 1: Create a new VVol and Copy
The first option is to create a similar size VVol and copy the content from the RDM to the VVol via array-based copying.
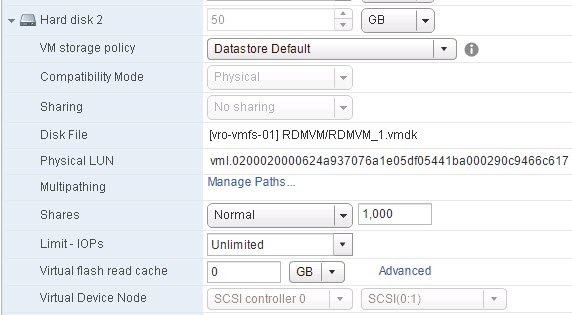
So I have my pRDM:
The first step is to remove the RDM (you don’t necessarily have to do it in this order, but this ensures you have a quiesced RDM).

Then create a VVol of the same size on the same array as the RDM.
Then go to the array and copy the RDM to the VVol. Depending on your array this may or may not be possible and if it is, how this is done might vary.
First find your RDM volumes, then identify your VVol volume. My RDM volume name on my FlashArray is “rdmvolume”.
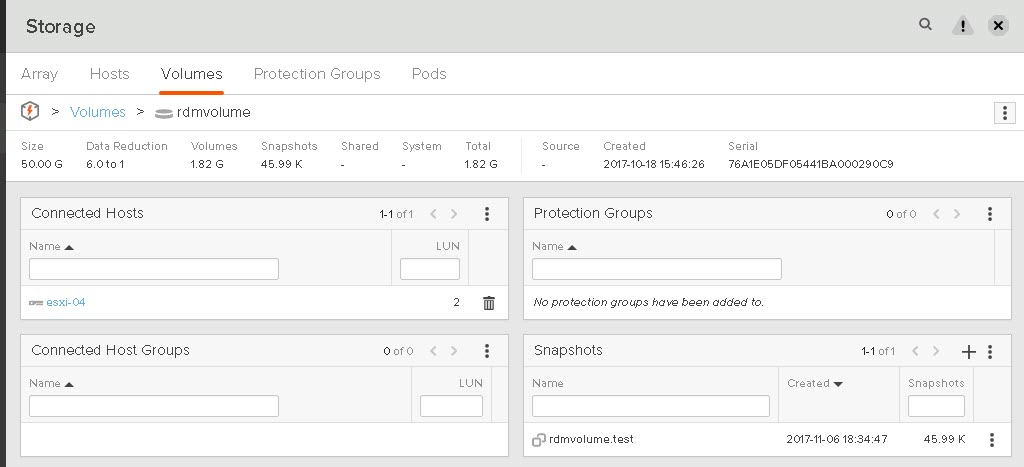
Since the rest of my VM is VVol-based, I can see the VM on my array, I see my new data VVol (50 GB).
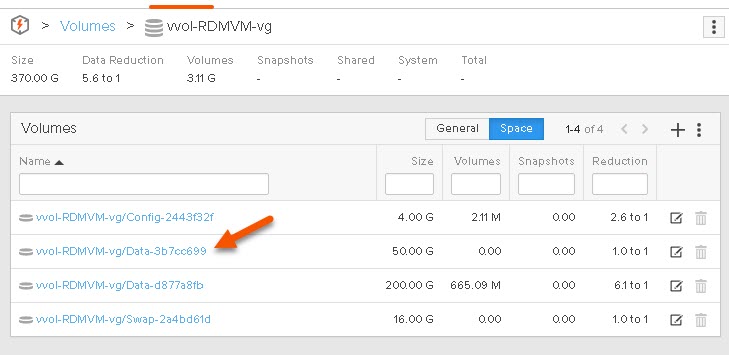
Clicking on it I can see the details of the VVol.

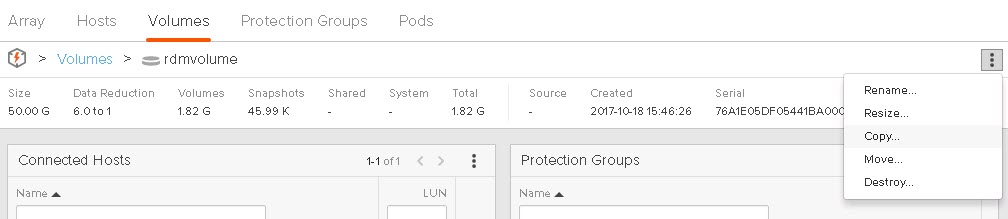
Now all I have to do is copy the RDM to the VVol.
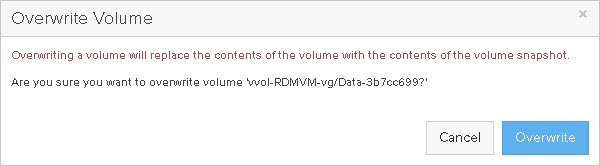
Copy the RDM to the VVol:
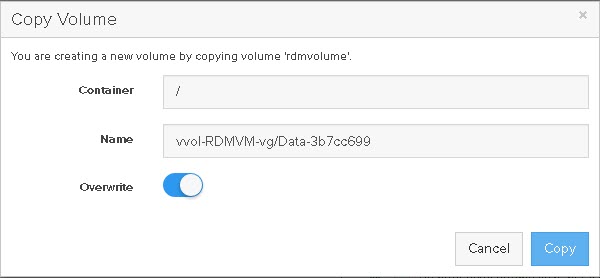
Overwrite the contents:
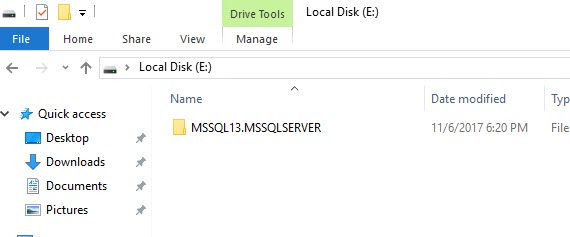
And then online the disk in the VM and we see the contents: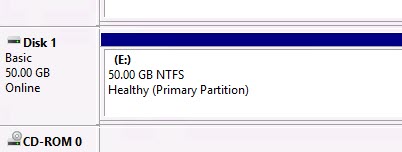
This is a nice option for array like AFAs such as the FlashArray that can do metadata copies between volumes (meaning no data is actually moved or copied, instead just some metadata pointers, making it 100% deduped and instantaneous).
Pros of this method:
Fastest option–the least downtime. Easily scriptable.
Cons of this method:
Need to delete the old RDM. Need to use the array tools and VMware tools. May not work with all array vendors implementations of VVols. Semi-offline–you don’t need to shut the VM down, but the data being copied can’t be accessed through the process.
Option 2: Offline Migration
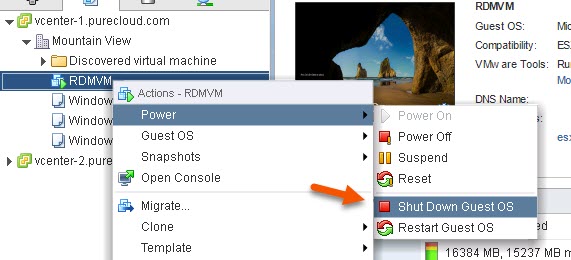
This is the most array agnostic (with the exception of the last option) and can be done mainly inside of VMware tools (with the exception of deleting the old RDM). This does involve shutting the VM down though.
When a VM is shut down and there is a physical mode RDM presented to the VM, ESXi can actually copy the data from the RDM and create a virtual disk from it and remove the RDM and replace it with the virtual disk.
Then choose to migrate the VM and choose the storage option:
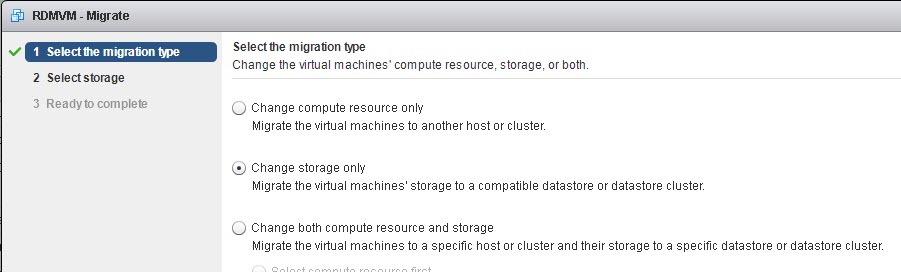
Then choose your target datastore, which for VVols should be a VVol datastore. But note you will get an error at first:
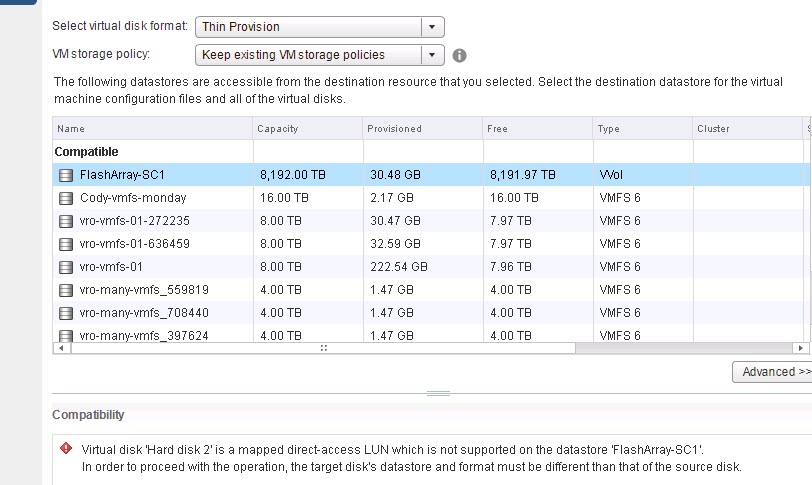
This is because the target datastore doesn’t support RDMs. You need to change the VM storage policy to something else. So the default VVol policy, or any VVol-based policy you create yourself. You can specify this policy for all virtual disks (like I did below) or individually by clicking advanced.

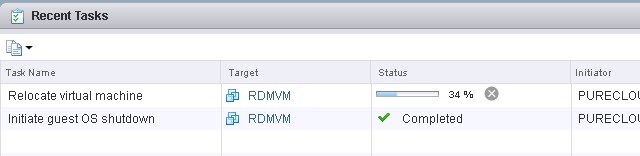
Once done, the migration will occur. Depending on the size of your RDM this can take some time.
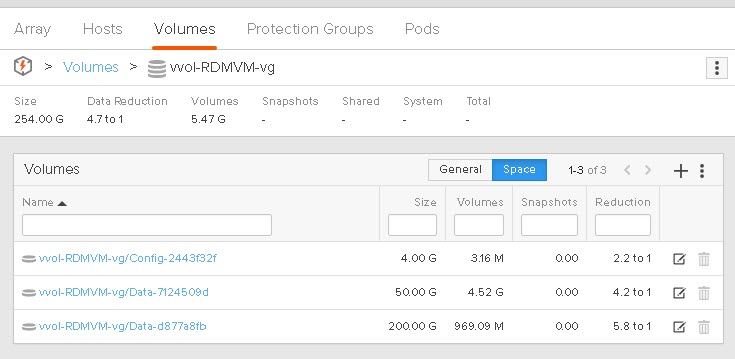
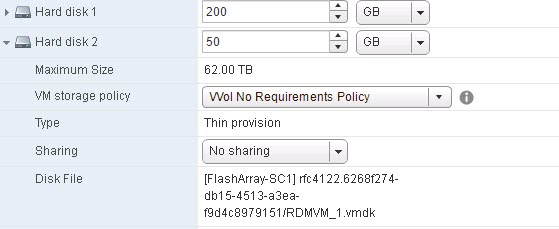
Once done, the VM is converted entirely to VVols. Both the boot virtual disk I have and the RDM. The 200 GB virtual disk is now a 200 GB VVol and the 50 GB RDM is now a 50 GB VVol!
On my array:
In the VM settings:
Now the old RDM has not been deleted–it is just no longer presented to the VM. So you can dispose of the RDM volume as you normally would.
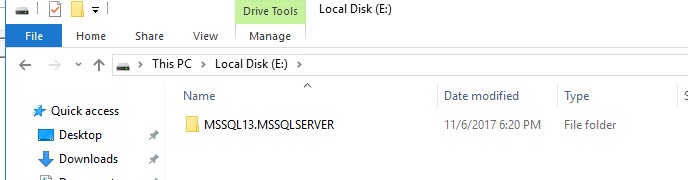
You can now power-on the VM and log back in. Since the boot VMDK was a virtual disk before and goes through the vSCSI stack, it will look the same as before. The RDM though is now a new volume, with the same data on it, so you will need to online it, in the case of Windows. Different OSes will have different processes:

Make it online:
Now the E: drive is automatically back and ready to go!
Pros of this method:
All migration done in VMware. Migration in this way will work with all storage vendors that support VVols. No need to add or remove any storage manually to the VM.
Cons of this method:
Might take the longest. Still need to delete the RDM(s). Totally offline process.
Option 3: Convert the RDM to a VVol
The next option is the cleanest, but also may or may not work with all VVol implementations. This requires turning the RDM into a VVol.
A VVol is not really a special volume. A VVol is really only defined by two things: how it is accessed via LUN IDs (it is a sub-lun). And that it has a VVol UUID. But this means that if the array allows you to connect any volume as a sublun and you can assign any volume a UUID, any array volume can be a VVol.
So to turn a RDM into a VVol, you just need to disconnect it from the host, assign it a UUID and then tell VMware that it exists. VMware will then (as needed) connect the volume up to a host as sub-lun and disconnect it as needed.
I wrote a blog post on this process here.
In short, VMware has a SDK operation that can take an existing volume and “turn” it into a VVol. All that means is creating a VMDK pointer file that tells VMware what underlying volume is to host the data written by the guest. When that volume is needed by a VM, ESXi tells the array to connect it as needed.
There is a method called importUnmanagedSnapshot under the virtualDiskManager in vCenter that allows you to do this.
This method takes in three parameters:
- Virtual disk path. So datastore in brackets [mydatastore] and then the path folder/folder/mydisk.vmdk
- Datacenter. If you are connecting to a single ESXi host this is optional, but otherwise you need to specify this. The SDK call needs to MoRef (managed object reference) of the datacenter
- VVol ID. vCenter needs to know the actual VVol you want to import and you specify this via the VVol ID, which is a unique identifier for a given VVol.
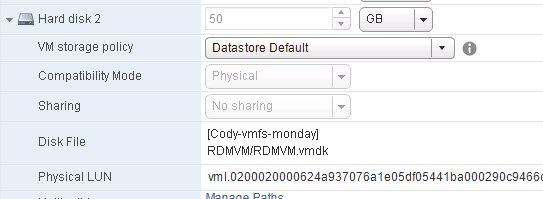
So I am back to having my pRDM:
The first step is to remove the RDM:
Then disconnect it as a standard LUN:
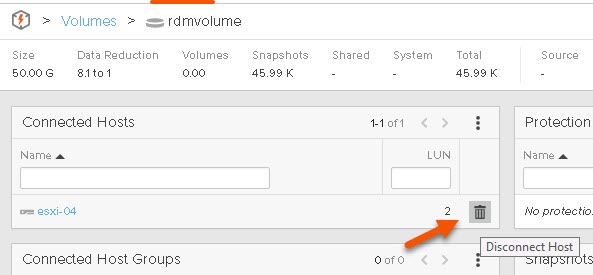
Confirm the disconnect: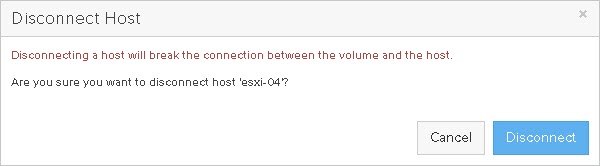
The next step is to assign a UUID. Valid VVol UUIDs are in one of the following formats:
- RFC 4122 format, “rfc4122.xxxxxxxx‐xxxx‐xxxx‐xxxx‐xxxxxxxxxxxx”
- NAA 128‐bit UUID, “naa.xxxxxxxxxxxxxxxxxxxxxxxxxxxxxxxx”
- NAA 64‐bit UUID, “naa.xxxxxxxxxxxxxxxx”
- EUI 64‐bit UUID “eui.xxxxxxxxxxxxxxxx”
Talk to your array vendor for what they use and how it can be assigned. I assigned my volume that was formerly used as a RDM a RFC 4122 UUID:
rfc4122.9ab7efe9-6121-4080-b05c-456ca11d1212![]()
I used this site to do it https://www.uuidgenerator.net/, though most scripting tools have the ability to do it for you too.
Now I can use the importUnmanagedSnapshot SDK call to import it in.
If I look at the home directory of my VVol VM I see one VMDK pointer file to its boot VVol.
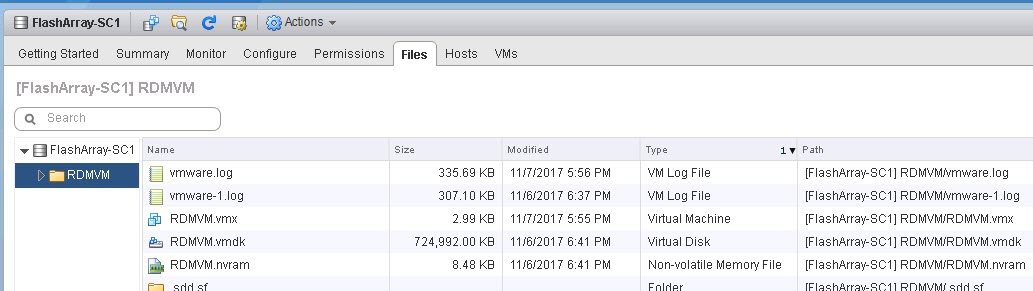
It’s path/name is [FlashArray-SC1] RDMVM/RDMVM.vmdk. So I will make my new one [FlashArray-SC1] RDMVM/RDMVM_1.vmdk.
I ran the following PowerCLI (after connecting to my vCenter):
$virtualDiskManager = Get-View (Get-View ServiceInstance).Content.virtualDiskManager
$vvolpath = "[FlashArray-SC1] RDMVM/RDMVM_1.vmdk"
$dc = get-datacenter "Mountain View"
$uuid = "rfc4122.9ab7efe9-6121-4080-b05c-456ca11d1212"
$virtualDiskManager.ImportUnmanagedSnapshot($vvolpath,$dc.ExtensionData.MoRef,$uuid)

If I refresh my VM directory I see a VMDK:
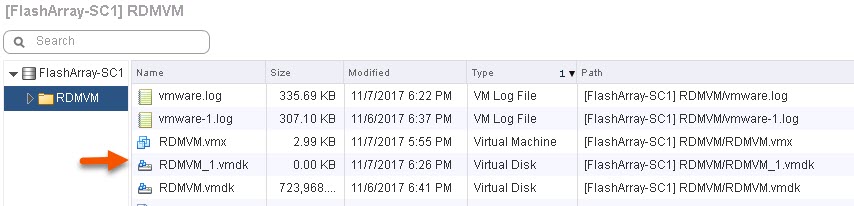
Because remember, in a VVol world all a VMDK is is a pointer to the physical volume.
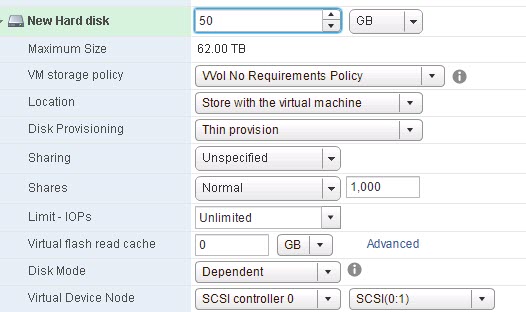
So now I can connect my VVol to my VM by just adding it as an existing virtual disk in the VM settings:

Then navigating to my VVol datastore and choosing that VMDK in the directory I placed it:

Once again we will see my file system available on that volume in my VM:

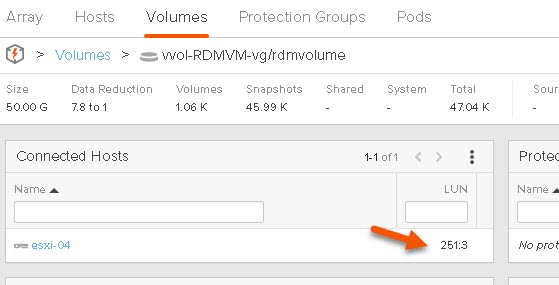
Now since it is in use by a powered-on VM, we can see on the array it is connected automatically to that host as a sub-lun:
Pros of this method:
Fast option–just a few more operations than the previous. Easily scriptable. No need to delete the RDM–you can re-use it.
Cons of this method:
Your array may not have a method to assign an existing volume a UUID. You need to figure out how to generate one. You still need to disconnect and remove the RDM from the VM. Requires use of both VMware tools and array tools. Semi-offline–you don’t need to shut the VM down, but the data being copied can’t be accessed through the process.
Option 4: Host-based Copying
This is the last resort. You can simply have both present and copy the files using host tools. Though this could potentially be the only fully online method too. If the application using those files has some way of relocating files on the fly–this could be the only option if you want to move it online. Though if the files are large it could be slow and resource intensive.
Conclusion
I think my vote is for option 1. This is this simplest and easiest to script. But in the end all of them work great–and there are plenty of options for moving RDMs to VVols. Once it is a VVol, you can now clone, Storage vMotion, snapshot etc, etc.
you only have the first method listed as “option 1”, all the others are not. You might want to add Option X to each of the methods so that when you say you prefer option 2 at the end, we can find which one you mean easily.
wait….. you already did….. my bad
Yeah sorry I originally posted it that way and realized it after I published and fixed it later. Sorry for the confusion
Thank you for the great write-up! One question, when using option two I had success but now I am unable to change the storage policy on my vmdk’s for said VM. Any ideas?
You’re welcome! Hmm not sure. Let me look into it. Let me see if I can reproduce. Stay tuned.
Ok great, I appreciate it! I am in vCenter 6.5 and I moved a 30GB linux VM with a 12TB RDM, vm powered off. I used VVOL No Requirements Policy and it took awhile but as you said it moved. I can see the VMDK on the VVOL SC, everything looks good in vCenter, VMDK’s come up and all is well. I just cannot, for whatever reason, change the storage policy to my Gold policy like the rest of our VM’s.
So I tried this and it worked fine. Odd. What is the error that you are getting?
Hmm interesting. See below different methods and errors.
Just now I tried another storage migration (same VVOL storage just change policy in migration wizard) and I almost immediately get: “A general system error occurred: PBM error occurred during PreMigrateCheckCallback: modl.fault.InvalidArgument;”
If I right-click the vm and go to vm storage policies and then change them all to a new profile I get: “Invalid virtual machine configuration”
If I try to edit settings on the vm and change the vm storage policy of each disk I get: “Storage policy change failure: The virtual disk requires a feature not supported by this program.”
I am doing this in the Flash client of 6.5 build 7515524 with HPE esxi custom images running 6.5 5969303. I am using this gold storage policy on other vm’s without issue and all the array features active on this profile appear to be functioning just fine.
Something is definitely up. I would recommend looking at the vmware-sps log to see what is going on in vCenter. Though, if you don’t mind, could you open up a support ticket with Pure? Have them loop me in?
Hi Cody,
First, thanks a lot for all your vvols articles: so interesting and inspiring reading!
VVOLs looked great and promising…
VVOLs could have been the RDM-killer, especially with the support of WSFC in vSphere 6.7…
VVOLs could have saved me from the burden of the “perennially reserved” flag…
BUT now I feel trapped in a dead end, with a SQLServer Cluster where I cannot extend any data volume without having to shut down the two nodes, and VMware support telling me (I couldn’t believe it) that I should get back to Physical RDMs if I want this flexibility.
I feel SO disappointed 🙁
Do you confirm that VVOLs + CAB Physical Bus Sharing = No more online disk extension ?
Thanks by advance,
Best regards
You’re welcome! Unfortunately this seems to be the case…I am going to work with VMware to see if this can be changed. The issue is that from a VMware management perspective VVols look like virtual disks–the size is indicated in the VMDK pointer file–not really controlled by the physical size of the disk. It is the same reason you cannot resize a VVol from the array–it has to be done from the VMware side. Something else I would like to change. I am sorry–I will do what I can to see if this can be changed.