
About four years ago, we (Pure Storage) released support for our asynchronous replication and Site Recovery Manager by releasing our storage replication adapter. In late 2017, we released our support for active-active synchronous replication called ActiveCluster.
Until SRM 6.1, SRM only supported active-passive replication, so a test failover or a failover would take a copy of the source VMFS (or RDM) on the target array and present it, rescan the ESXi environment, resignature the datastore(s) then register and power-on the VMs in accordance to the SRM recovery plan.
The downside to this of course is that the failover is disruptive–even if there was not actually a disaster that was the impetus for the failover. But this is the nature of active-passive replication.
In SRM 6.1, SRM introduced support for active-active replication. And because this type of replication is fundamentally different–SRM also changed how it behaved to take advantage of what active-active replication offers.
The FlashArray introduced support for active-active replication in late 2017 with a feature called ActiveCluster. Support for ActiveCluster has been added to our SRA in version 3.0.x. This is now certified by VMware for use:
Download here:
https://marketplace.vmware.com/vsx/solutions/pure-storage-flasharray-storage-replication-adapter-3-0
In this blog post series, I will walk through setting up ActiveCluster, configuring vCenter, configuring SRM and then walk through the failover and test failover process.
This post will be on setting up ActiveCluster and configuring vCenter and your datastores/VMs for use in SRM stretched storage support.
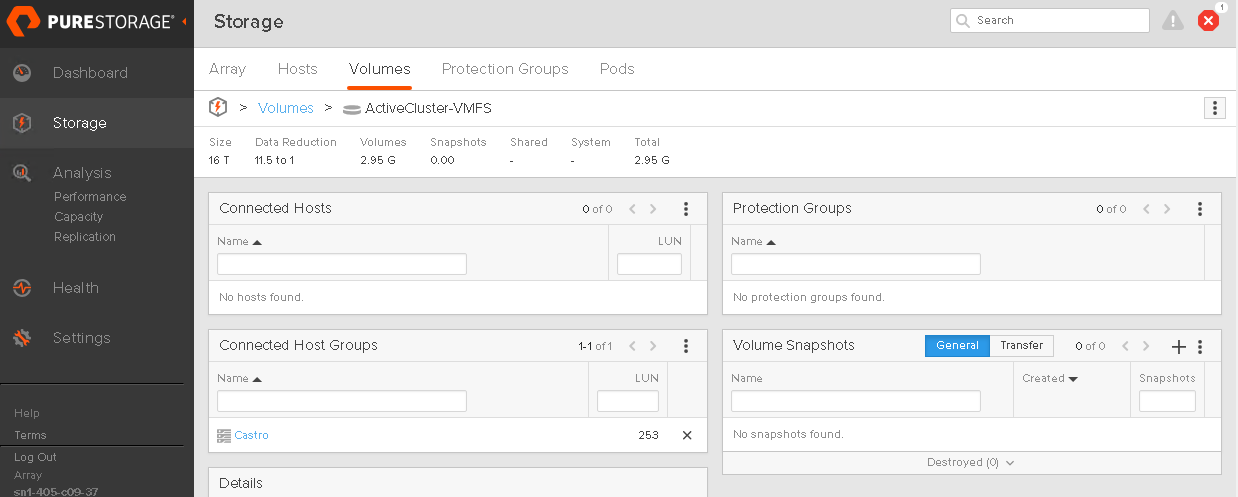
I currently have a volume that is hosting VMFS with 5 VMs:
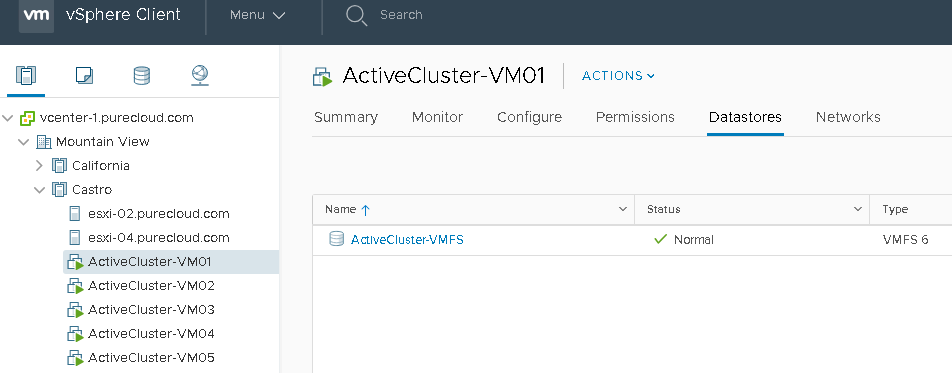
That volume is currently not replicated on my FlashArray.
So let’s walk through setting it up. Starting with ActiveCluster itself.
Setup ActiveCluster
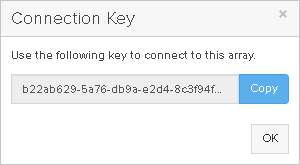
The first step is to enable a synchronous connection. Pick one of the two arrays (doesn’t matter which) and login.
Side note: you can certainly do this via the REST, PowerShell, the CLI, or any other scripting method, but I will walk through in this case with the GUI.
Create the connection in the GUI by going to Storage > Array > Connected Arrays. Click on the plus symbol.

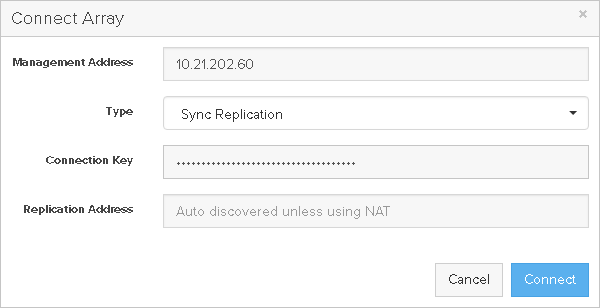
Then populate the fields. You need the virtual IP of the remote FlashArray and a connection key–both of which can be retrieved from the other FlashArray.
Enter the information into the window and click Connect.
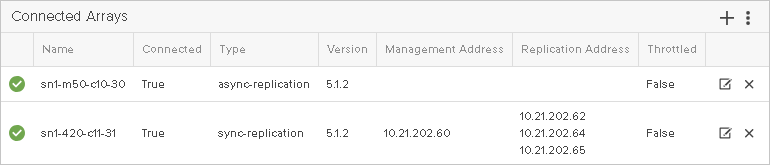
If the arrays can talk to one another the connection will be created and will be green:
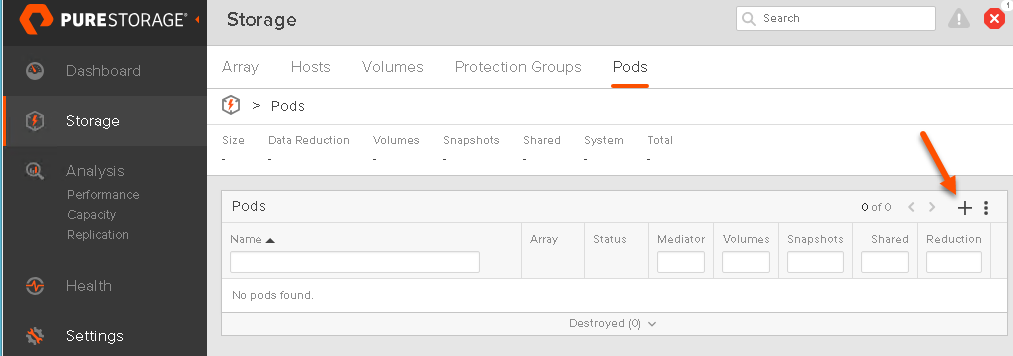
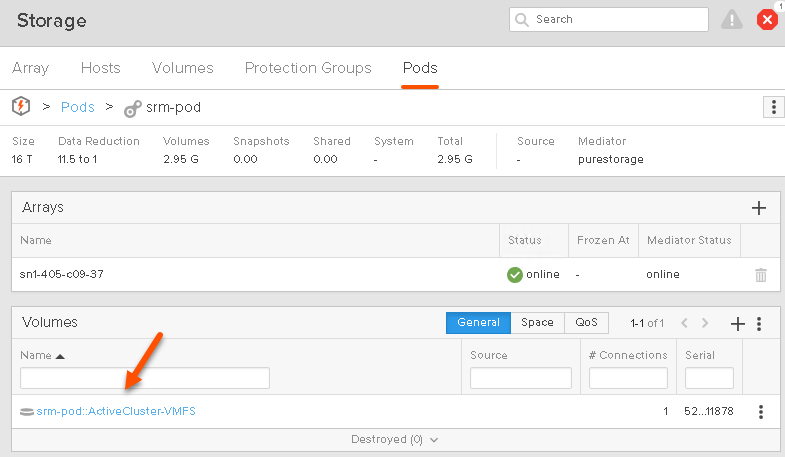
The next step is to create a pod. A pod is a namespace/consistency group for volumes you would like to replicate with ActiveCluster. Go to Storage > Pods then click on the plus sign under Pods.
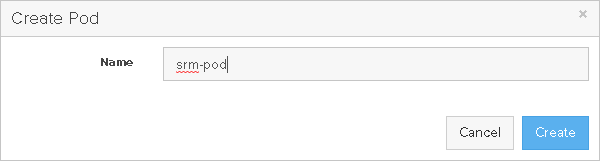
Then give the pod a name and click Create.
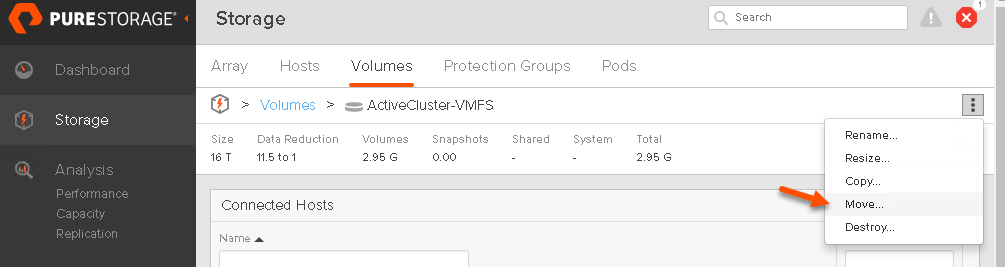
The pod is not yet enabled for replication–before we do that though let’s put our volume in it. So identify any volumes you would like to replicate and add them in. Go to the volume and click the vertical ellipsis and then choose Move.
Choose your pod and click Move.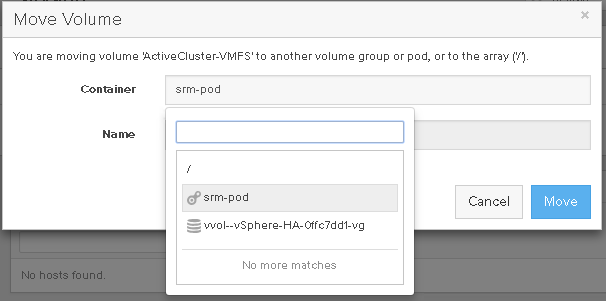
This will put the volume into the pod. The main difference is that you will see it has been renamed with the prefix of the pod name.
As of Purity 5.1.2, you cannot move volumes into a pod that is already replicating, which is why I moved the volume first. So identify volumes you want to replicate and add them in. Once the pod is stretched, you cannot move any more existing volumes into it. Though you can create new volumes in the pod after it has been enabled for replication.
If you want to put volumes in the pod after you have enabled it for replication, your options are:
- Temporarily disable replication, add the volumes in and then re-enable replication. Doing so will NOT require a full re-sync.
- Create a new pod and put them in there and enable the new pod for replication.
- Create a new volume in the pod and put VMFS on it, then Storage vMotion VMs into the new VMFS and delete the old one when it is empty.
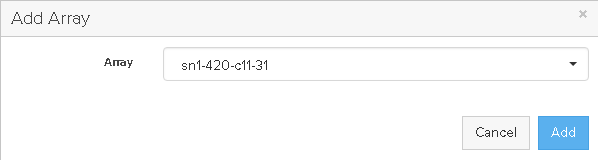
The last step is to enable the pod for replication. We call this “stretching” the pod. Click the plus sign in the Arrays box and choose the array you want to replicate this pod to.

Choose the array and click Add.
The arrays will now sync the data. The state will be resyncing until it is complete. The array will send over the data while still maintaining dedupe and compression across the wire.
When complete, the status for both arrays will be listed as online. The pod and its volumes are now on both arrays and both arrays can now serve reads/writes simultaneously for the included volumes. Furthermore, you can manage the pod and the volumes from either array. If you resize a volume, it is resized on both arrays, if you take a snapshot, that snapshot exists on both arrays.

You’ve now fully set up ActiveCluster!
Let’s set up vCenter now.
Configuring vCenter
Site Recovery Manager with stretched replication behaves slightly different than it does with active/passive replication.
In active/passive setups, SRM automatically groups volumes into what it calls datastore groups. Volumes are grouped together according to the following rules:
- If the array advertises consistency groups and the volumes are in the same group, SRM will put them together
- If a VM spans multiple datastores, SRM will group them together
- If a VM has a RDM, that volume will be included in the group with the VMFS that hosts the VM.
SRM with active/active replication does not use these type of groups. Instead it follows tagging and VM storage policies–these are called Storage Profile Protection Groups (SPPGs). A great presentation that goes into details about these can be found here:
In short, you don’t really choose datastores, or really directly VMs, you choose a VM Storage Policy and then any VM in that policy will be included in the SRM protection group. This makes it easier to dynamically add and remove VMs or datastores as SRM really functions at the profile level, not the datastore level.
Though remember the same rules still do exist–all of the datastores in that policy need to be replicated or else failover will, well… fail.
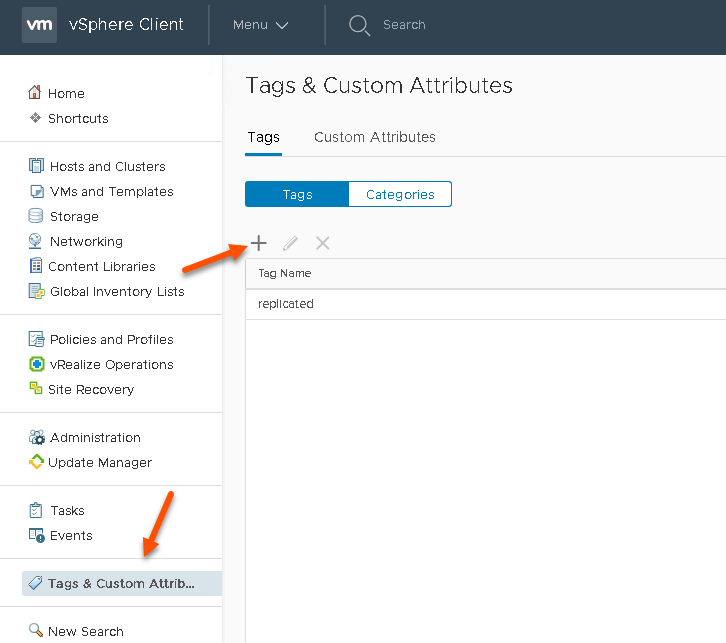
First step is to create a tag and tag group. I will show the process in the HTLM-5 client, but the process is fairly similar in the flash/flex vSphere Web Client.
Creating Tags
In the vSphere Client, go to Tags & Custom Attributes and click the plus sign to create a new tag.
Next give your tag a name. Generally make it somewhat clear about what is replicating. Use the name and the description to your advantage. Make it clear it is for SRM and generally I would recommend indicating some replication configuration there too.
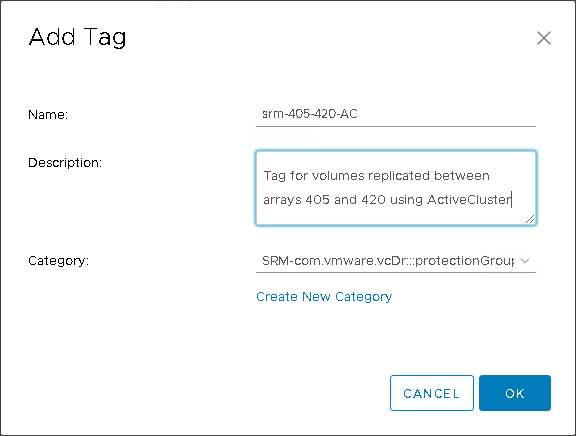
The next step is to choose a category, if you already created one, then choose it. If not, create a new one.
Click Create New Category.
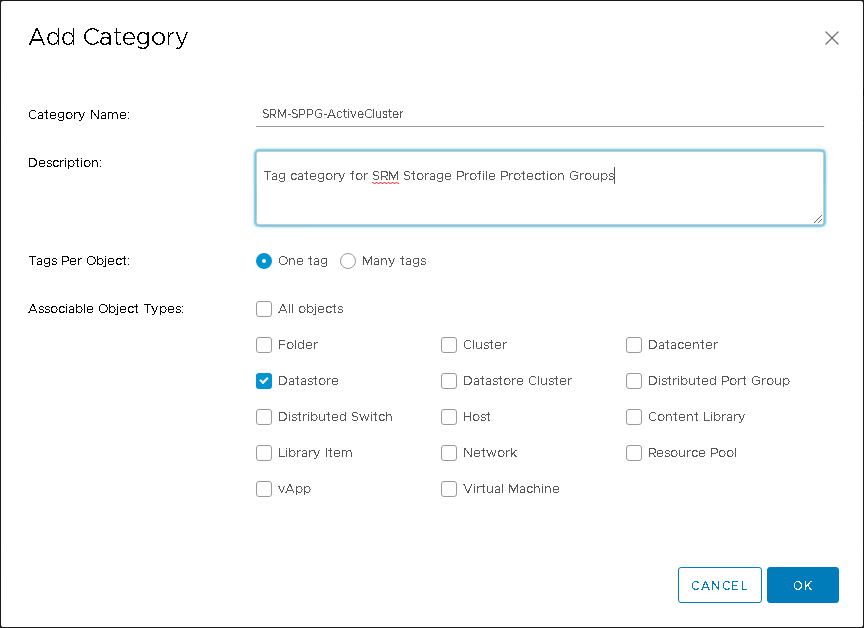
Give the category a name–usually include SPPG in it so it is obvious this group is for SRM groups. Choose One Tag as you only want one of these per datastore and choose type datastore. Click OK.
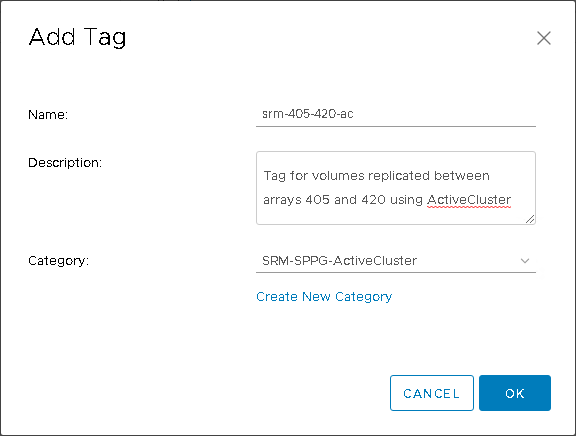
Change the category for the tag to the newly created one (or your pre-existing one as the case may be) and click OK.
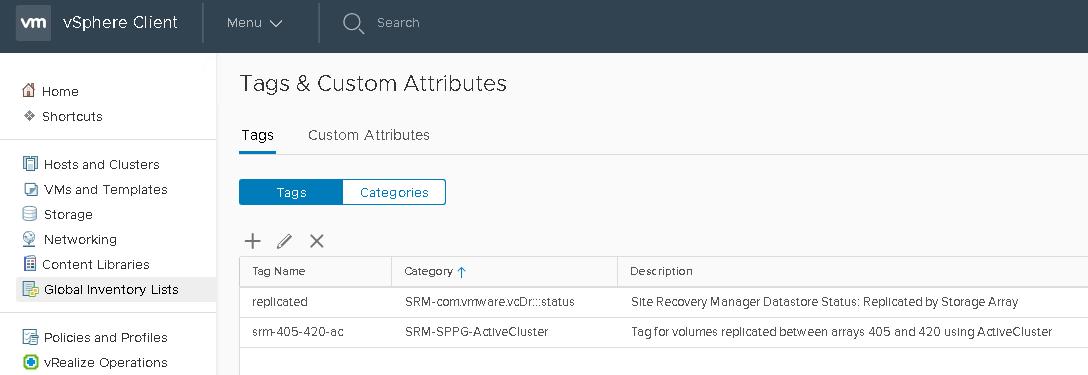
The tag and tag category are now created. To use stretched storage with SRM, both vCenters must be in Enhanced Linked Mode. This is to allow SRM to run cross-vCenter vMotions. In ELM, when you create a tag and a tag category–it will be replicated automatically to both vCenters–so you only need to create these once.
The next step is to assign the tag to your datastore(s). Go to the Storage view and find your datastore(s). Click on your datastore and then the Summary tab and then click Assign… in the Tags box.

Find your tag and select it and click Assign.
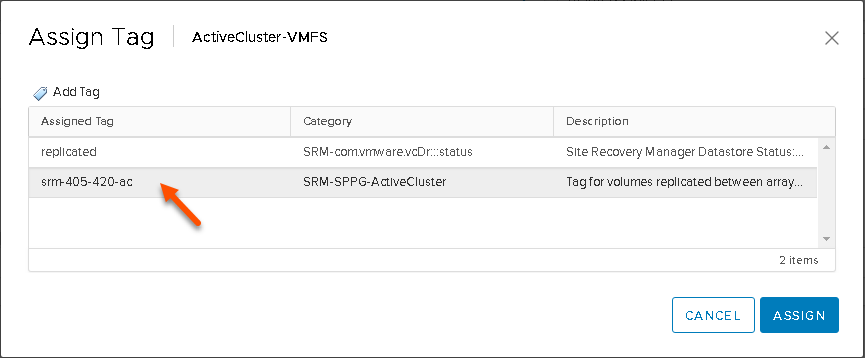
Repeat this as necessary for any datastore you want SRM to control.
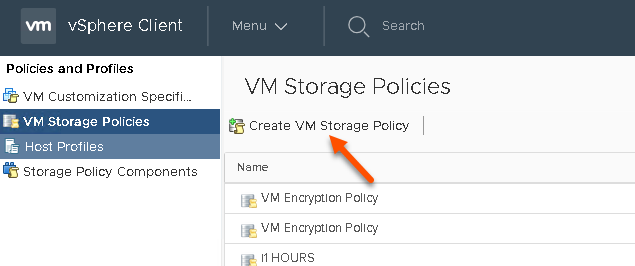
Create a Storage Policy
The next step is to create a VM Storage Policy. VM Storage Policies are the unit of failover, so all VMs in a policy will be failed over together.
Go to Policies and Profiles, then VM Storage Policies and click Create VM Storage Policy.
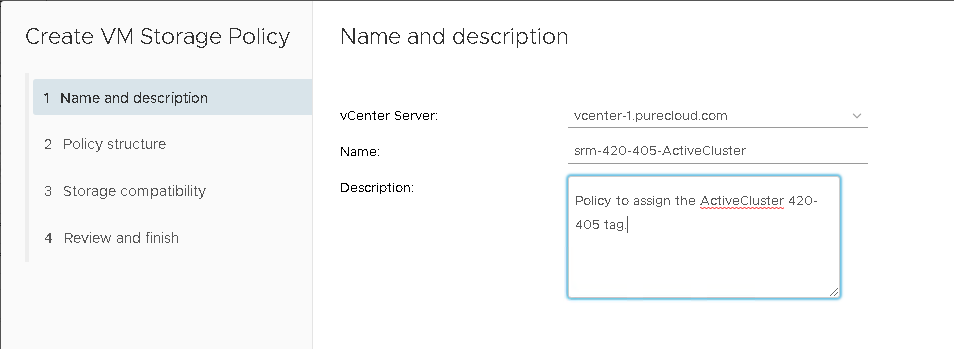
Choose the vCenter and then give it a name and description. I would recommend making it very similar (in name and description) to the tag you want to include in the policy.
Click next, then choose “Enable tag based placement rules” as this will be a tag-based policy.
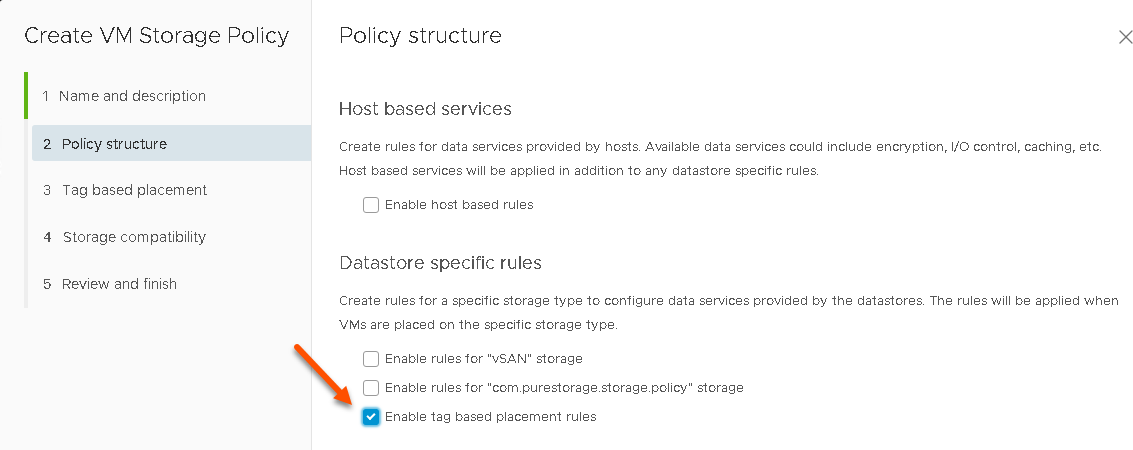
Note for VVol users, you likely recognize VM Storage Policies, but use SPBM policies instead, a good blog post talking about the differences is here: https://blogs.vmware.com/virtualblocks/2018/07/19/how-is-spbm-different-to-tag-based-placement/
Click Next again.
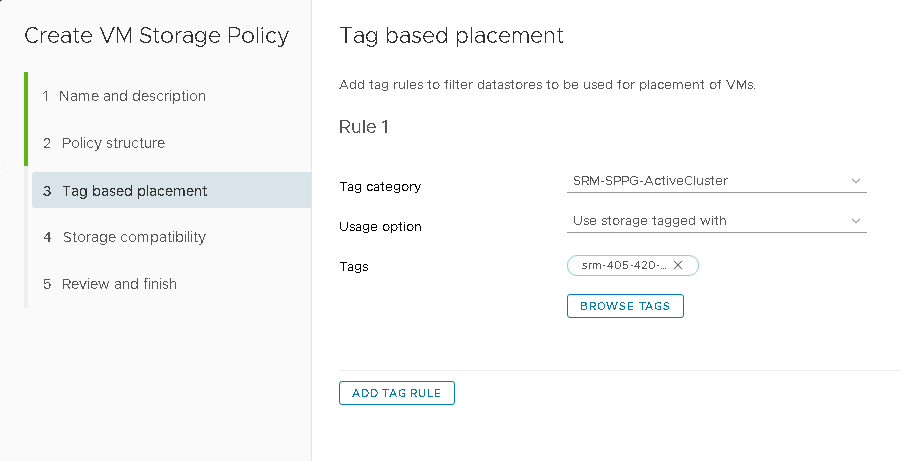
Now choose the category and keep “Use storage tagged with” as the selection. Then click Browse Tags.
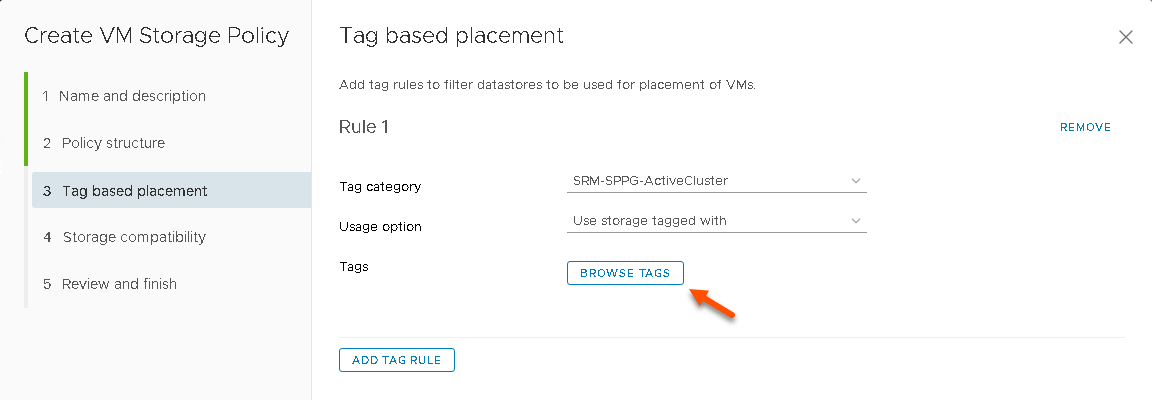
Now choose the tag you want…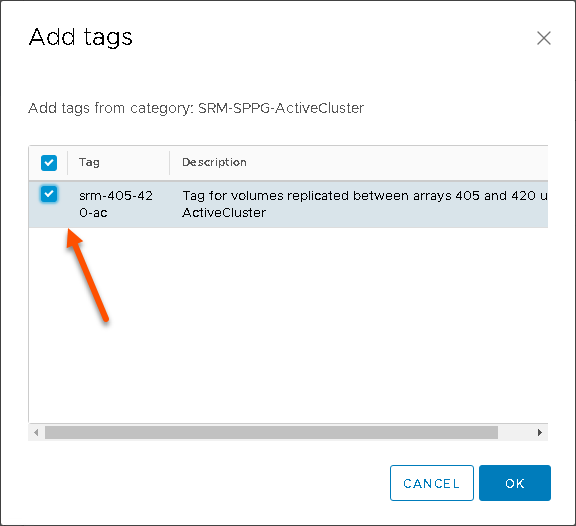
Click OK, then Next on the original screen.
 The next screen will show you if you have any compatible datastores. If you tagged a datastore with the selected tag, it will appear here.
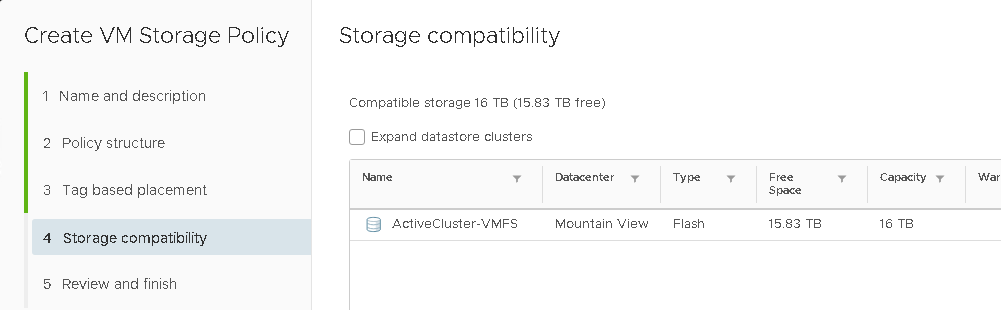
If none show up, or you are missing one, it means either you didn’t tag the datastore, or you chose the wrong tag, or you are creating the policy on a vCenter that does not see that datastore.
Note that you need to create this policy on both the source and target vCenters! Unlike tags, policies do not get replicated between vCenters–you must explicitly create them on both.
To make this easier, you can copy your rules very easily with PowerCLI. Connect to both vCenters and then pull the rule you created and then create a new one with the same properties (of course you can create them entirely in PowerCLI too!):
connect-viserver -Server vcenter-1
connect-viserver -Server vcenter-2

$policy = Get-SpbmStoragePolicy -Server vcenter-1 -Name srm-420-405-ActiveCluster

New-SpbmStoragePolicy -Server vcenter-2 -name $policy.Name -Description $policy.Description -AnyOfRuleSets $policy.AnyOfRuleSets
Assign the Policy
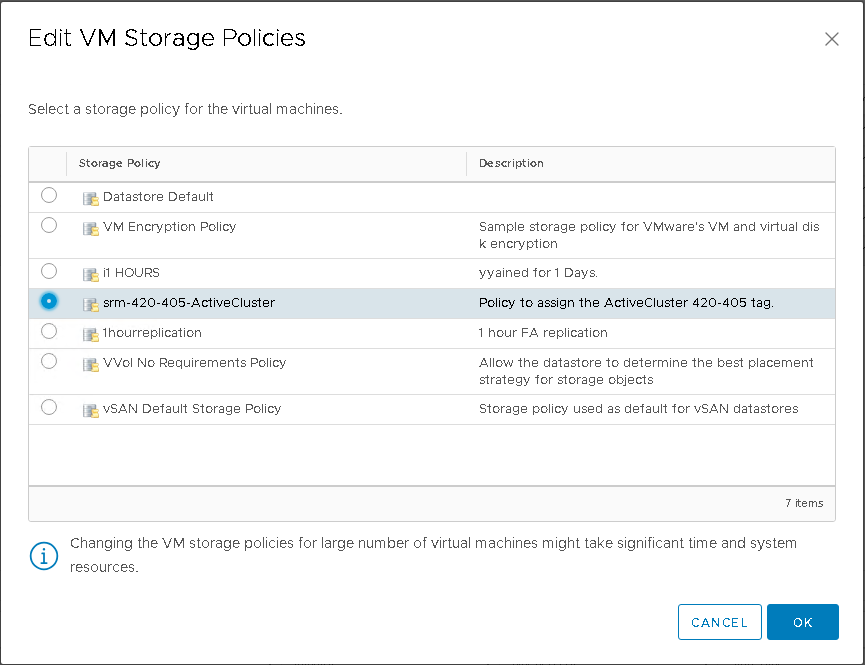
The last step is to assign the policy to your VMs. There are a few ways of doing this. If you have them all in one list, you can hold the CTRL key and click the VMs you want, then right-click and choose VM Policies then Edit VM Storage Policies.
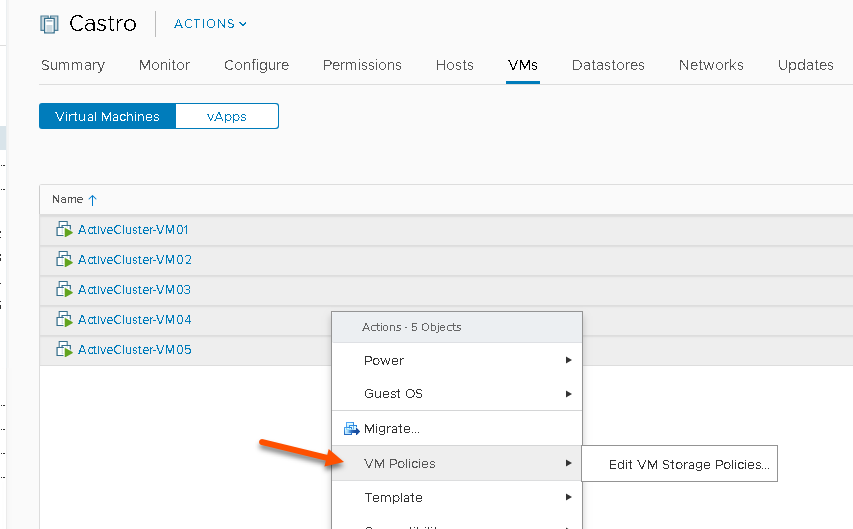
Choose the right policy and click OK.
You’re all set!
The next part of this will be how to configure Site Recovery Manager itself to use ActiveCluster and these policies.
Hello Cody,
I have tested same active active setup in environment.
My test Environment:
I had 1 ESXi at PR and 1 ESXi at DR. vCenter is configured in the ELM mode.
I tested vMotion is working fine on the stretched volume [Pod Volume] and ever tested with SRM as the blog mention and it was smooth.
If I loose the ESXi on PR then what will trigger the VM to get active on the DR ESXi ?
I understand the mediator will ensure the data access incase of 1 array failure [ It is array side protection to ensure avilability]
Detailed Question:
What configuration need to be perform on the Vcenter Client in ELM mode so that even if complete ESXi cluster at PR goes down then the PR VM present on the stretched Datastore remain active ?
Hello! If you are using SRM, then nothing will trigger and automatic failover–you will need to initiate it with SRM by running a failover operation. This is a benefit of doing stretched clusters instead of SRM–it will automatically failover affected VMs if compute resources go down.
Hi Cody
We are planning to move a data center. We are planning to use Pure Active-cluster for data center migration. We have our LAN stretched (L2), but SAN and ESXi cluster is not stretched. Few questions
1. Can we do Live vmotion between our two data center to future data center for a VM which is running on ?
Yeah you can do that as long as your vCenter is 6.0 or later. It supports cross vCenter vMotion. Here is a good KB https://kb.vmware.com/s/article/2106952
Hi Mahajan,
Does your ESX cluster stretched between Primary and DR site when you did live vmotion using Pure Active cluster?