In the world of SCSI, a storage device is generally addressed by two things:
LUN–Logical Unit Number. This is a number used to address the device down a specific path to a specific array, for a specific host. So it is not a unique number really, it is not guaranteed to be unique to an array, to a host, or a volume. So for every path to a volume there could be a different LUN number. Think of it like a street address. 100 Maple St. There are many “100 Maple Streets”. So it requires the city, the state/province/etc, the country to really be meaningful. And a street name can change. So can other things. So it can usually get you want you want, but it isn’t guaranteed.
Serial number. This is a globally unique identifier of the volume. This means it is entirely unique for that volume and it cannot be change. It is the same for everyone and everything who uses that volume. To continue our metaphor, look at it like the GPS coordinates of the house instead of the address. It will get you where you need, always.
So how does this change with NVMe? Well these things still exist, but how they interact is…different.
Now, first, let me remind that generally these concepts are vendor neutral, but how things are generated, reported, and even sometimes named vary. So I write this for Pure Storage, so keep that in mind.
So in the previous post, I wrote about deploying a Tanzu Kubernetes Grid management cluster.
VMware defines this as:
A management cluster is the first element that you deploy when you create a Tanzu Kubernetes Grid instance. The management cluster is a Kubernetes cluster that performs the role of the primary management and operational center for the Tanzu Kubernetes Grid instance. This is where Cluster API runs to create the Tanzu Kubernetes clusters in which your application workloads run, and where you configure the shared and in-cluster services that the clusters use.
In other words this is the cluster that manages them all. This is your entry point to the rest. You can deploy applications in it, but not usually the right move. Generally you want to deploy clusters that are specifically devoted to running workloads.
These clusters are called Tanzu Kubernetes Cluster. Which VMware defines as:
After you have deployed a management cluster, you use the Tanzu Kubernetes Grid CLI to deploy CNCF conformant Kubernetes clusters and manage their lifecycle. These clusters, known as Tanzu Kubernetes clusters, are the clusters that handle your application workloads, that you manage through the management cluster. Tanzu Kubernetes clusters can run different versions of Kubernetes, depending on the needs of the applications they run. You can manage the entire lifecycle of Tanzu Kubernetes clusters by using the Tanzu Kubernetes Grid CLI. Tanzu Kubernetes clusters implement Antrea for pod-to-pod networking by default.
Note: This is another guest blog by Kyle Grossmiller. Kyle is a Sr. Solutions Architect at Pure and works with Cody on all things VMware.
In VMware Cloud Foundation (VCF) version 4.1, vVols have taken center stage as a Principal Storage type available for Workload Domain deployments. This inclusion in one of VMware’s premier products reinforces the continued emphasis on vVols and all the benefits that they enable from VMware. vVols with iSCSI is particularly exciting to us as this is the first instance of the iSCSI protocol being supported as a Principal Storage type within VCF. We at Pure Storage are honored to have had a little bit of influence over this added functionality by serving as a design partner for this new feature and we are confident you are going to like what you see!
Someone who is using VMFS datastore with VCF today might ask themselves ‘why vVols’? This is a great question deserving of an expansive answer beyond this blog post. Fundamentally, though, using vVols enables you to fully use the FlashArray in the way it was intended. By leverage VASA (VMware API for Storage Awareness) you gain far more granular control and monitoring abilities over your individual VMs. Native FlashArray capabilities such as snapshots and replication are directly executed against the underlying array via policy-driven constructs. Further information on these and other benefits with vVols are available here.
Using vVols as Principal Storage is a lot like the methods VCF customers are used to for pre-existing Principal Storage options. Image an ESXi host, apply a few prerequisites to it, commission it to SDDC manager and create Workload Domains. Deploying Workload Domains with VMware Cloud Foundation automates and takes all the guesswork out of deploying vCenter and NSX-T for modern use cases such as Kubernetes via Workload Management.
Stepping into some specifics for a moment; here’s the process on how to use FlashArray iSCSI and vVols for VCF Workload Domains:
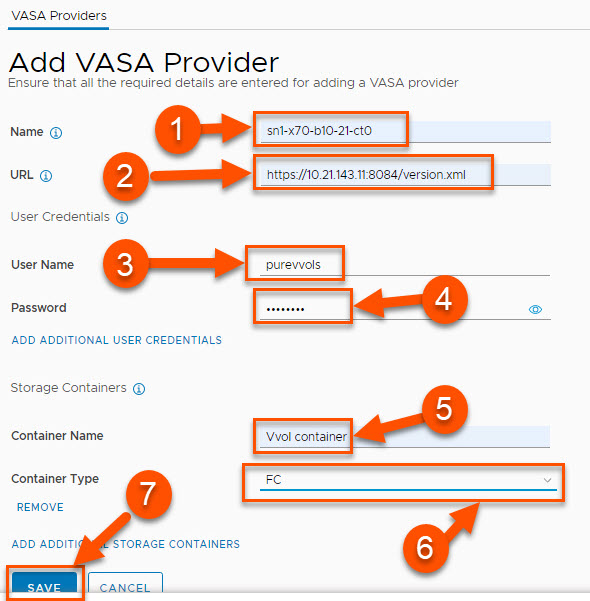
The most fundamental update to SDDC Manager to allow vVols is the capability to register a VASA Provider. In the below screenshot and following detailed information, we show an example of how you can add a FlashArray using another block protocol: Fibre Channel:
Provide a descriptive name for the VASA provider. It is recommended to use the FlashArray name and append it with -ct0 or -ct1 to denote which controller the entry is associated with.
Provide the URL for the VASA provider. This cannot be the management VIP of the array. Instead this field needs to be the management IP address associated with one of the controllers. The URL also is required to have the VASA port and version.xml appended to it. The format for the URL is: https://<IP of FlashArrayController>:8084/version.xml
Give a FlashArray user name with the arrayadmin role. The procedure for how to create such a user can be found here. While the pureuser account can be used, we recommend creating and using a separate FlashArray user for VASA operations.
Provide the password for the FlashArray username to be used.
Container Name must be Vvol container. Note that this value is case-sensitive.
For Container Type, select FC from the drop-down menu to use Fibre Channel.
Once all entries are completed, click Save.
Obviously, there’s a lot more to share here so we will be expanding on this substantially in the very near future on our VMware Platform Guide site.
Rounding out this post, I’m happy to show a demo video of just how easy it is to deploy a FC+vVols-based Workload Domain with VMware Cloud Foundation.
We just released our latest version of our Storage Replication Adapter, version 4.0 for VMware Site Recovery Manager. There are a lot of enhancements in this release and improvements–if you are on 3.1 (or certainly earlier) I recommend an upgrade when you get a chance.
For all the need-to-know information (release notes, user guide, videos, download link, etc.) see here:
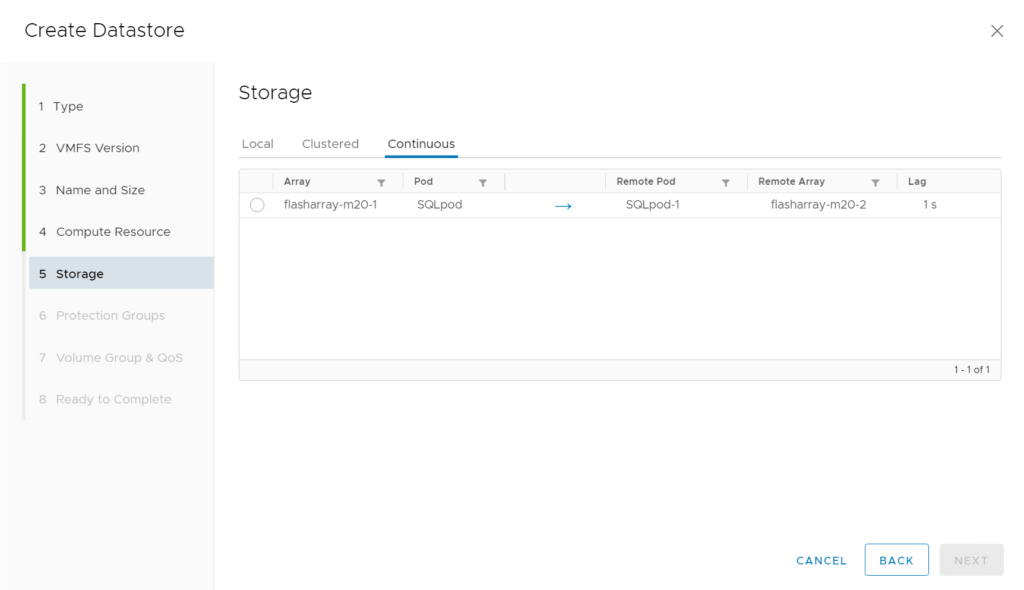
Datastores can now be provisioned to ActiveDR pods via the plugin:
There is a new tab “Continuous” which is where you will find ActiveDR-enabled pods. The fields show the source pod (where the volume would go), the target pod (where the volume will be replicated to), the source and target arrays (which currently own those pods), the replication direction, and the “lag”. The lag is how far behind the target pod is from the source pod.
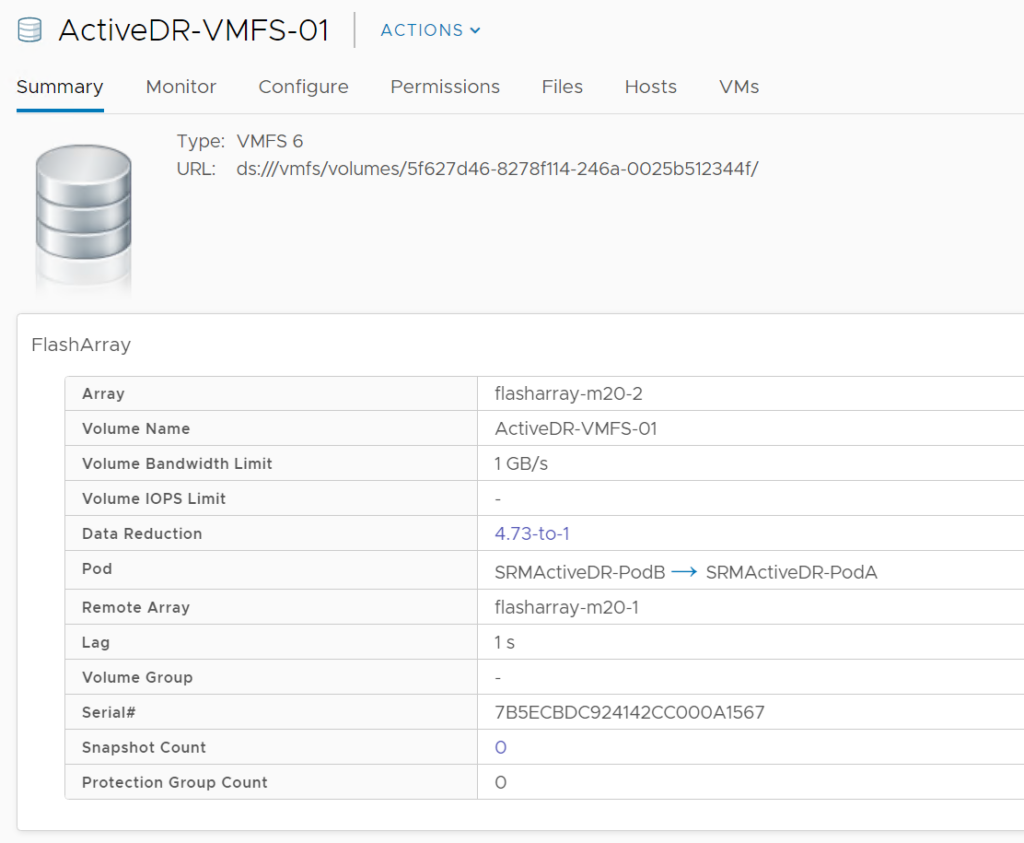
When you click on a datastore, you will see a few more pieces of information in the FlashArray summary panel:
This will show the ActiveDR information if the volume of course is in an enabled ActiveDR pair. The plugin also supports all of the usual features with ActiveDR datastores: resize, rename, QoS, snapshot, refresh from snapshot, copy from snapshot.
Demo of provisioning and ActiveDR datastore:
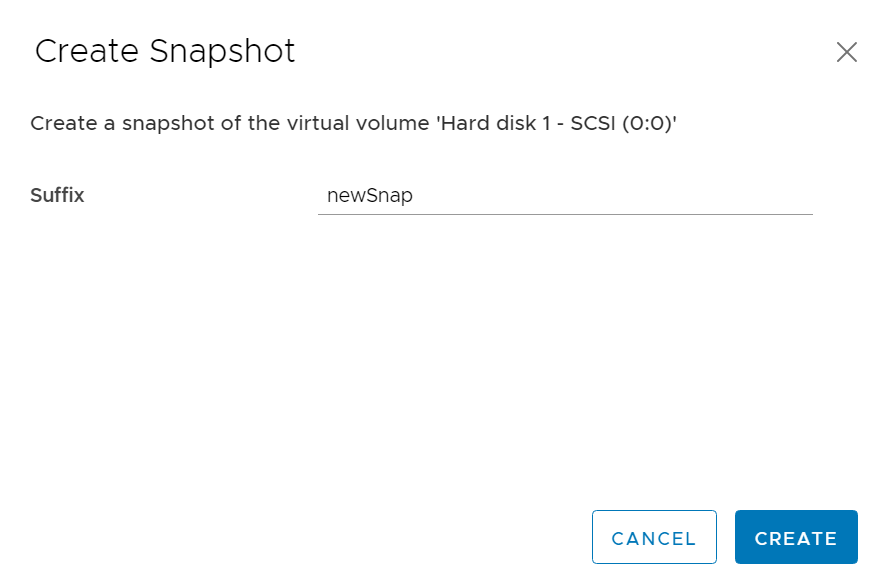
vVol Snapshots
You can create a snapshot of a VM using the standard VMware snapshot tool, but that snapshots every single virtual disk–which you may not want/need. We used to have the ability in the plugin to create a one-off snapshot of a vVol, but removed it due to some early issues that have since been resolved. This feature has been reintroduced:
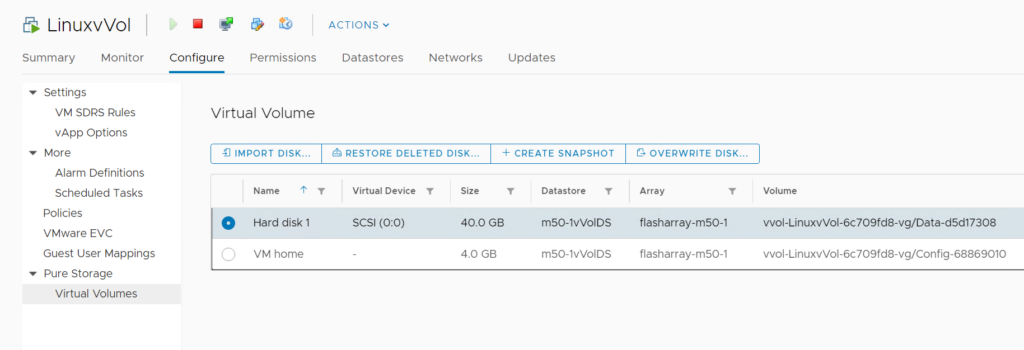
Now you can click on a vVol-type VM and navigate to the Configure tab and click on Pure Storage – > Virtual Volumes.
You can select a single vVol disk and click Create Snapshot.
This will create a new single snapshot of the volume that is that vVol. You can then restore from it, or copy from it with the other tools.
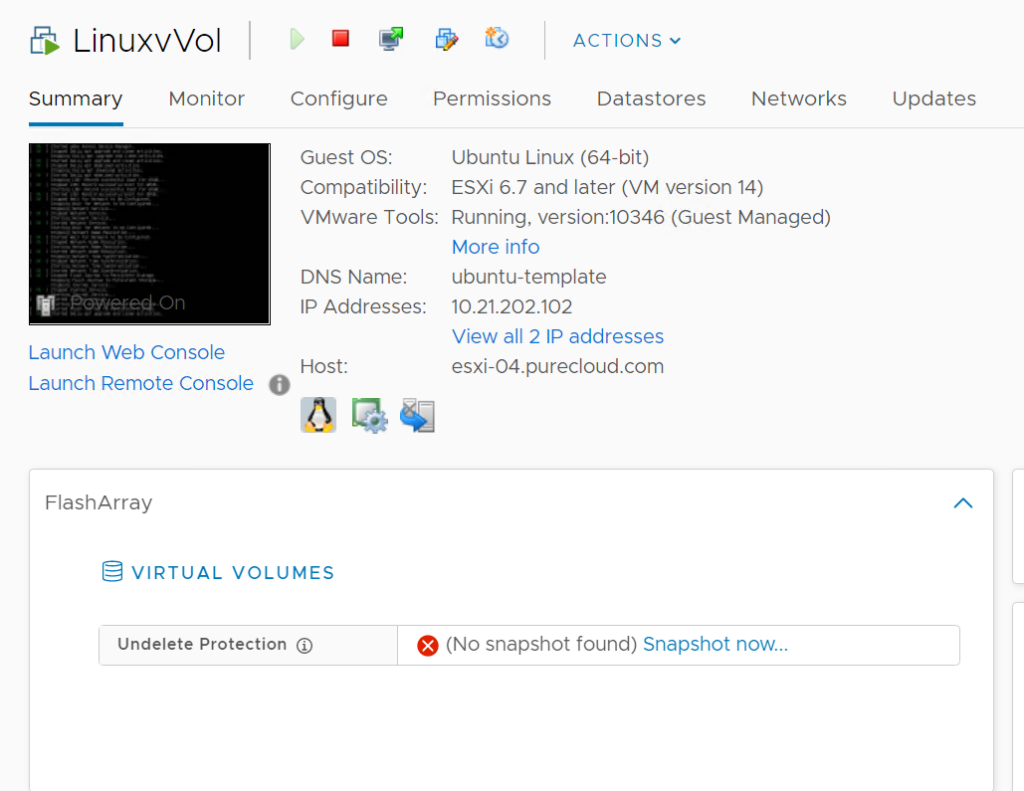
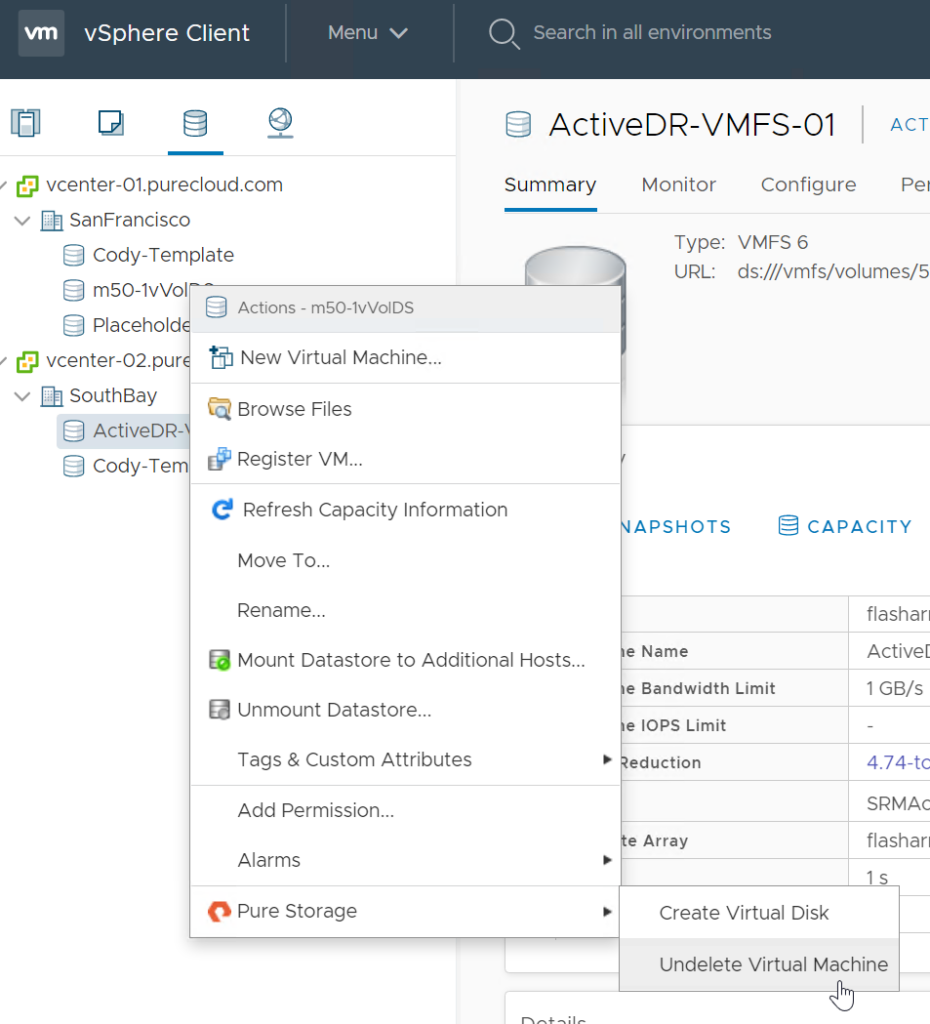
You can also do this with the home directory (config) vVol. Why would you want to snapshot this? Well because protects your virtual machine configuration. The pointer files, the VMX file, snapshot hierarchies, logs, etc. If you accidentally make a change to the VMX file that breaks your VM (or you made a lot and don’t know what you did) the restore can restore the config without having to restore the entire VM.
The other reason, is “undelete” protection. When you delete a VM, ESXi first deletes all of the files from the config vVol, then it tells the array to delete the volumes. When we delete volumes, we put the volumes in the destroyed volumes folder, then they get permanently deleted in 24 hours (by default) or manually by an admin (unless safemode is turned on and then manual eradication is not possible).
The problem here, is that if you delete a VM, we can restore the config volume itself, but VMware wiped the data from it. So it is blank. VMware does not wipe the data from the virtual disks, so those can be “undeleted” and the original data is still there. So to fully restore an undeleted VM, we need a snapshot of the config vVol. This will restore all of the files.
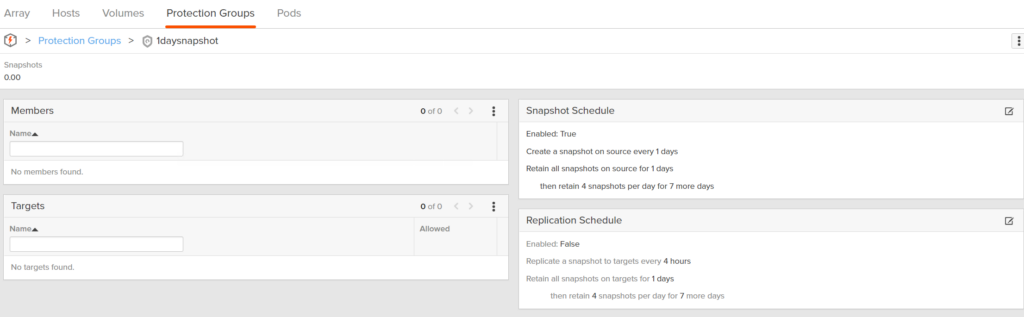
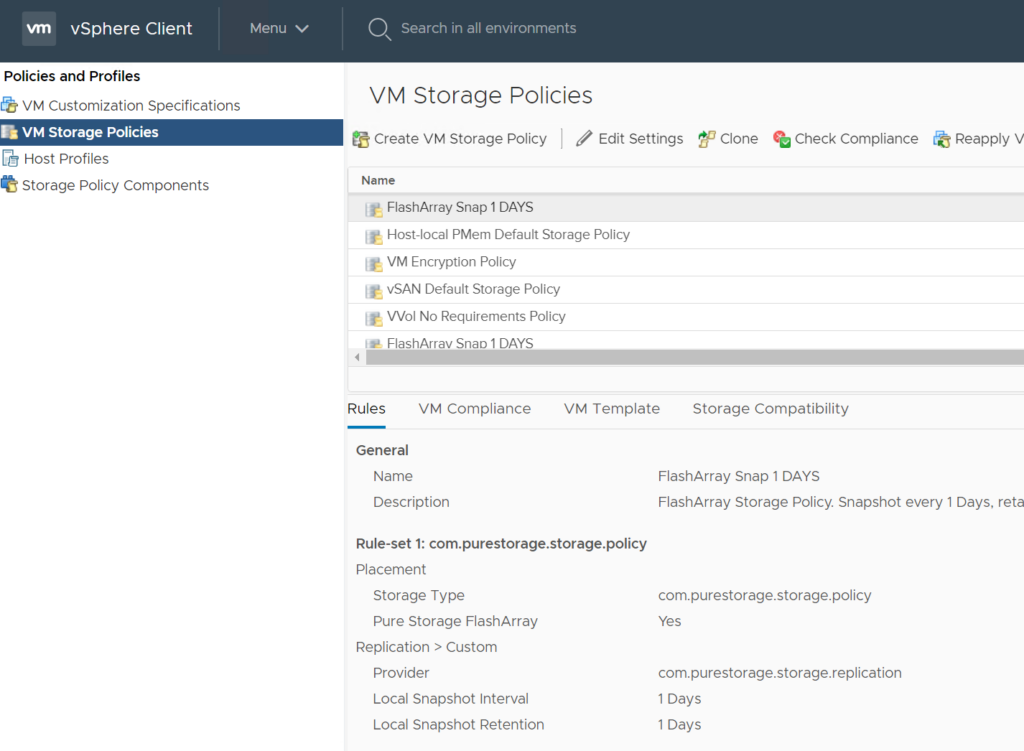
The ideal option here, is to assign a snapshot storage policy to the home vVol (or even more ideally all of the vVols) to have the array snapshot on a schedule:
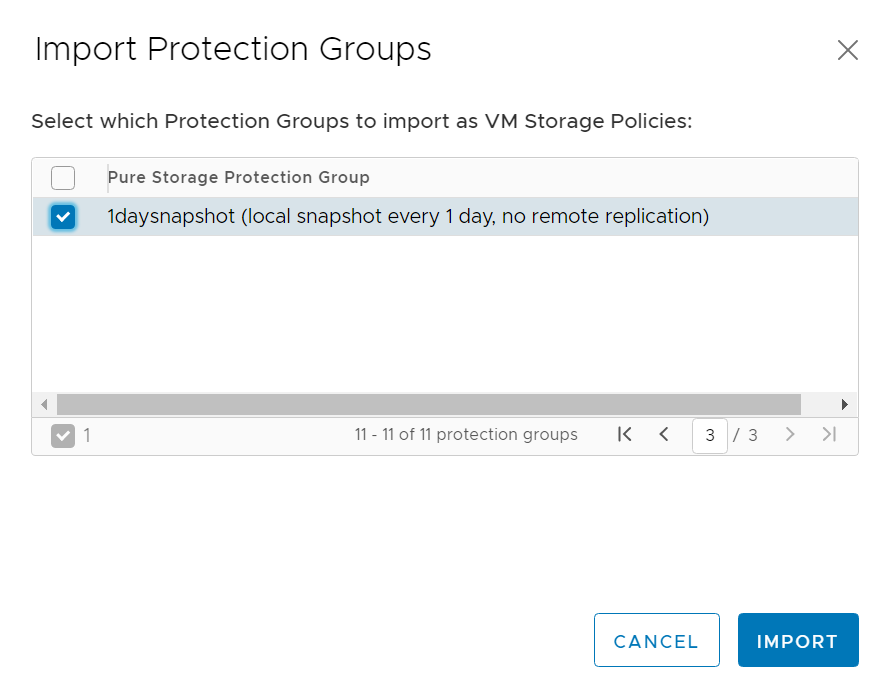
So to do this, create a 1 hour snapshot protection group on the FlashArray:
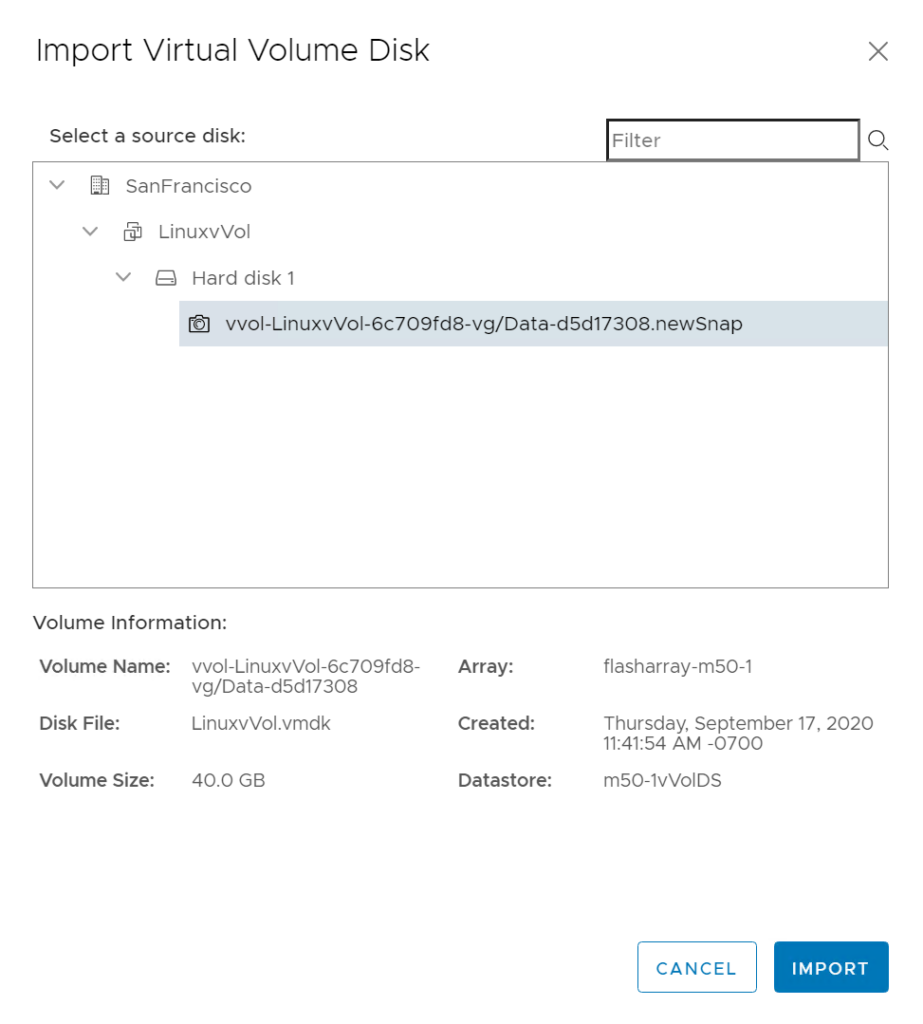
Import the protection group into vSphere as an SPBM policy:
Select and import:
And it is now a policy:
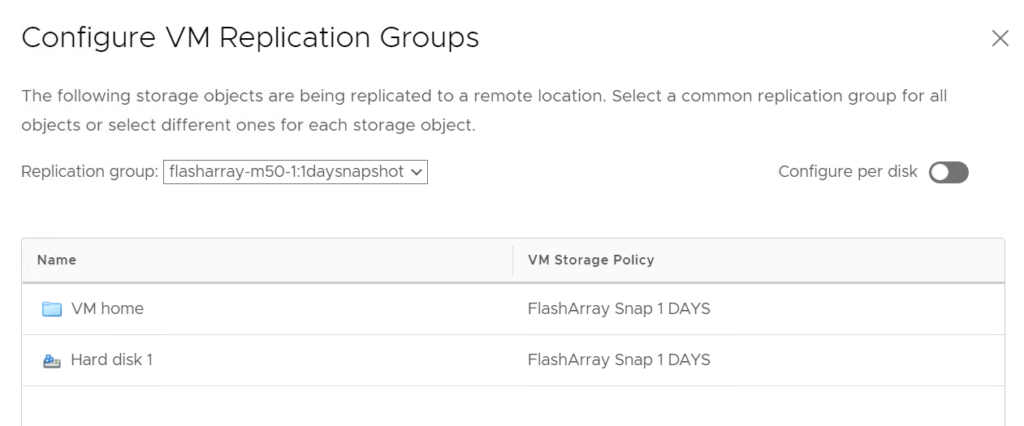
Then assign the policy and the group to the VM (or just the VM home to protect the config).
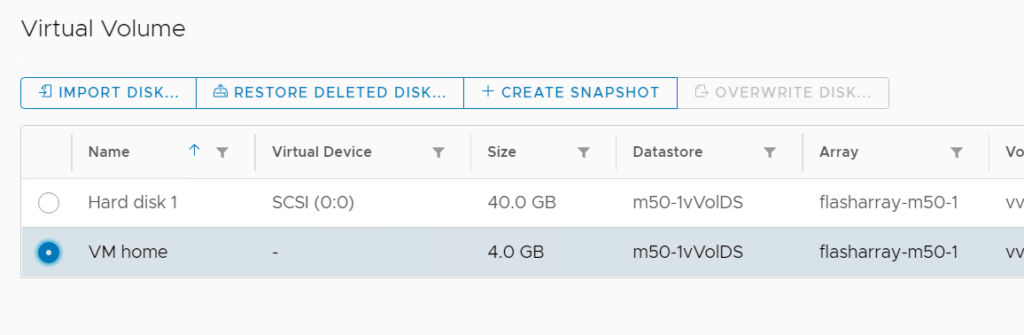
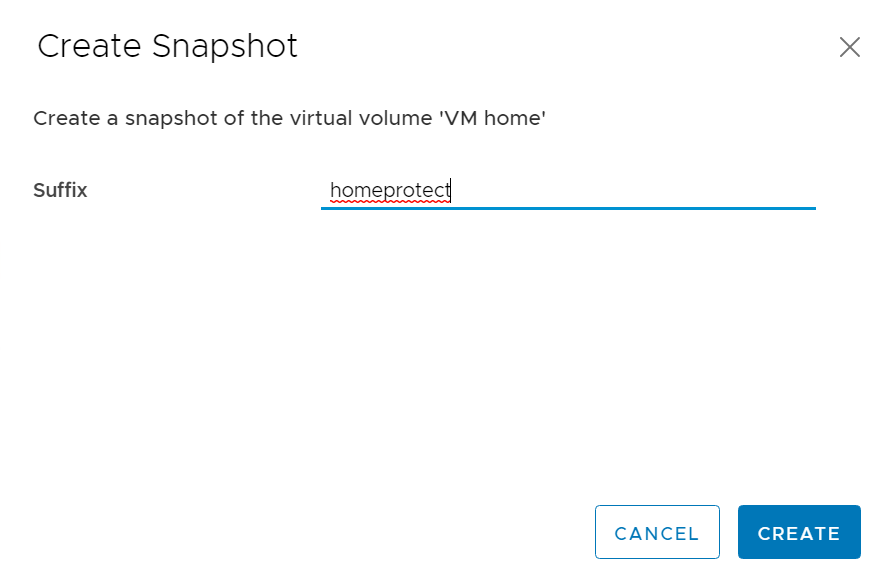
If you don’t need frequent snapshots of the config vVol and just one will do (or whenever you want), this is what we added. You can select the VM home and click the Create Snapshot button:
Alternatively we have another place to do this. If you click on the VM summary tab and look at the FlashArray panel, there is an Undelete Protection box. If we do not see any snapshots for the config vVol, we will show a warning like below:
What this means, is that we cannot fully restore this VM if it is accidentally deleted. The data, yes. But the VM configuration, no. You can create a snapshot from here too, by clicking Snapshot now…
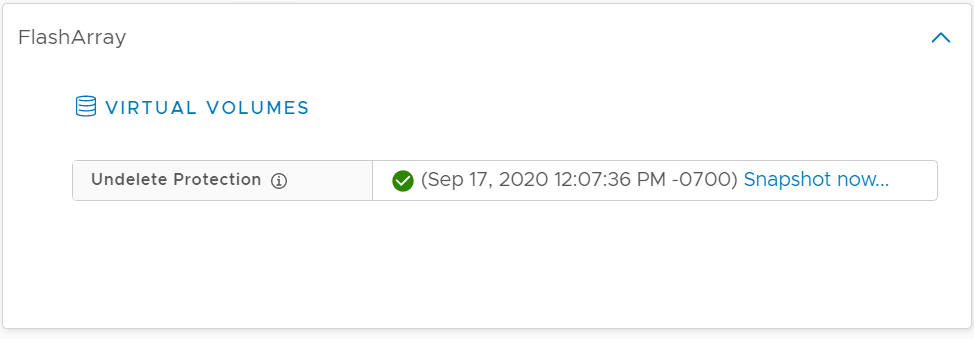
If it is protected, we will show the timestamp of the latest discovered snapshot:
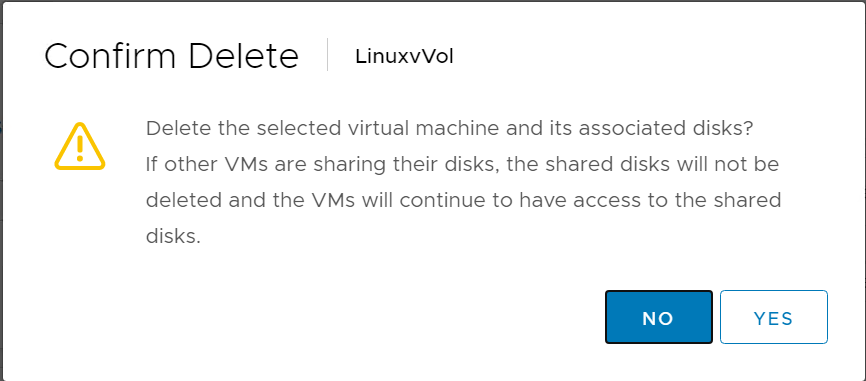
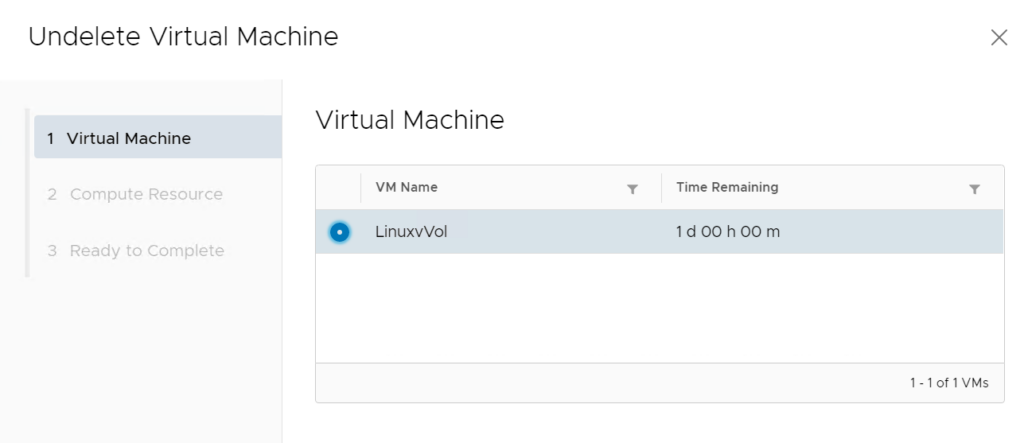
So if you delete it:
You can restore via the plugin easily:
If the VM configuration is changing a lot–you probably want to protect via schedule. If the VM does not change a lot, then one off snapshots will work fine.
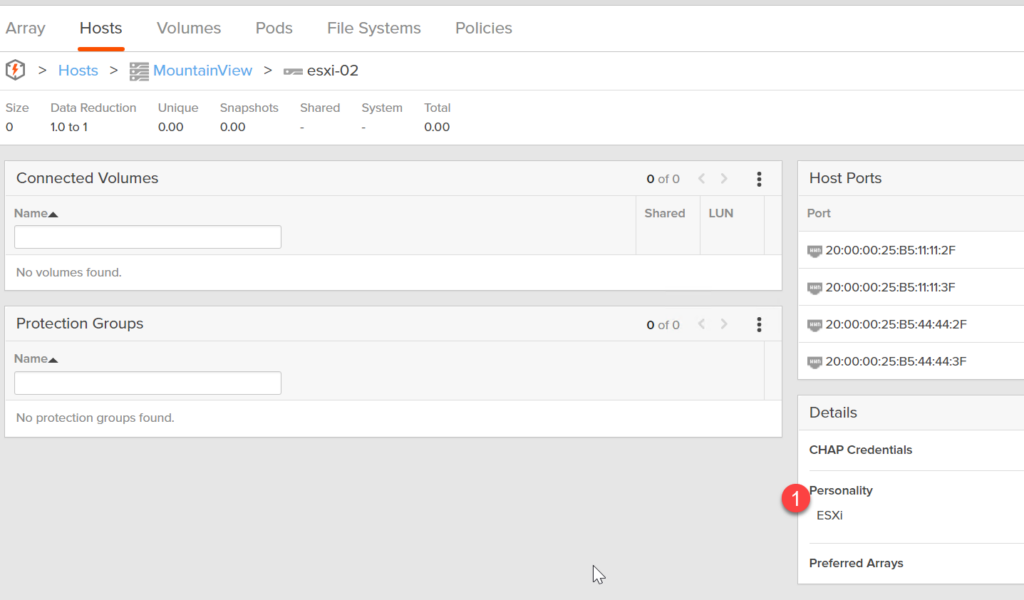
ESXi Host Personality
Also, we now set the ESXi host personality when creating new clusters:
This is important for some ActiveDR and ActiveCluster scenarios, so it is our best practice by default.
Note: This is another guest blog by Kyle Grossmiller. Kyle is a Sr. Solutions Architect at Pure and works with Cody on all things VMware.
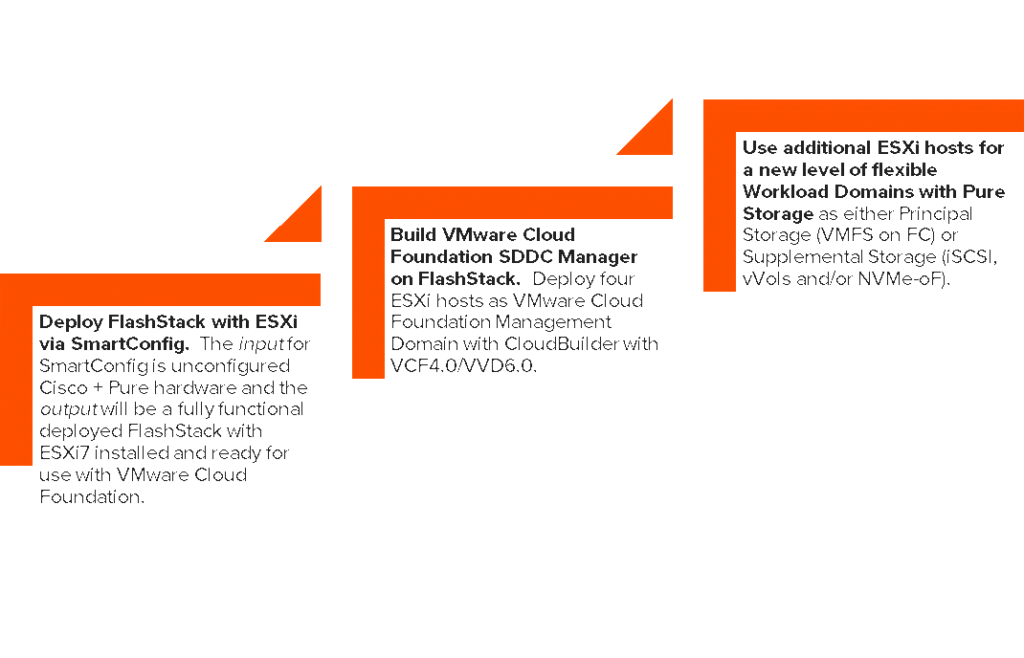
One of the (many) fun things we get to work on at Pure is researching and figuring out new ways to streamline things that are traditionally repetitive and time-consuming (read: boring). Recently, we looked at how we could go about automating the deployment of FlashStack™ end-to-end; since a traditional deployment absolutely includes some of these repetitive tasks. Our goal is to start off with a completely greenfield FlashStack (racked, powered, cabled and otherwise completely unconfigured) and automate everything possible to end up with a fully-functional VMware environment ready for use. After some thought, reading and discussion, we found that this goal was achievable with the combination of SmartConfig™ and VMware Cloud Foundation™.
Automating a FlashStack deployment makes a ton of sense: From the moment new hardware is procured and delivered to a datacenter, the race is on for it to switch from a liability to a money producing asset for the business. Further, using SmartConfig and Cloud Foundation together is really combining two blueprint-driven solutions: Cisco Validated Designs (CVDs) and VMware Validated Designs (VVDs). That does a lot to take the guesswork out of building the underlying infrastructure and hypervisor layers since firmware, hardware and software versions have all been pre validated and tested by Cisco, VMware and Pure Storage. In addition, these two tools also go through setting up these blueprints automatically via a customizable and repeatable framework.
Once we started working through this in the lab, the following automation workflow emerged:
Along with some introduction to the key technologies in play, we have divided the in-depth deployment guide into 3 core parts. All of these sections, including product overviews and click-by-click instructions are publicly available here on the Pure Storage VMware Platform Guide.
Deploy FlashStack with ESXi via SmartConfig. The input of this section will be factory reset Cisco hardware and the output will be a fully functional imaged/zoned/deployed UCS chassis with ESXi7 installed and ready for use with VMware Cloud Foundation.
Build VMware Cloud Foundation SDDC Manager on FlashStack. The primary input for CloudBuilder is, not ironically, the output of the work in part 1. Specifically, ESXi hosts and their underlying infrastructure, from which we will automatically deploy a Management Domain with CloudBuilder.
The last section will show how to deploy a VMware Cloud Foundation Workload Domain with Pure Storage as both Principle Storage (VMFS on FC) and Supplemental Storage (vVols). Options such as iSCSI are covered in additional KB articles in the VMware Cloud Foundation section of the Pure Storage support site.
Post-deployment, customers will enjoy the benefits of single-click lifecycle management for the bulk of their UCS and VMware components and the ability to dynamically scale up or down their Workload Domain deployment resources independently or collectively based upon specific needs (e.g. compute/memory, network and/or storage) all from SDDC Manager.
For those who prefer a more interactive demo, I’ve recorded an in-depth overview video of this automation project followed by a four-part demo video series that shows click-by-click just how easy and fast it is to deploy a FlashStack with VMware from scratch.
Craig Waters and I gave a Light Board session on this subject:
And this is an in-depth PowerPoint overview of the project:
Finally, this is a video series showing the end-to-end process in-depth broken into a few parts for brevity.
One of the major advantages we have seen with VVols is making a virtual disk a first class citizen on the array. We can restore, copy, replicate them (and their VMs) as storage objects were meant to be restored, copied, replicated etc.
Though one thing about virtual disks is that by default–they are not first class citizens in vSphere, VVols or otherwise. To create one, it has to be associated with a VM.
To retrieve one in PowerCLI (for example) get-harddisk requires a datastore or a VM to return a result:
Today, vRO 7.6 was released, and one feature I was most looking forward to was a fully usable web client for creating/editing workflows! Time to finally ditch the java client!