This is certainly a post that has been a long time in coming. As many customers were probably aware we only supported one vVol datastore per FlashArray from the inception of our support. Unlike VMFS, this doesn’t hinder as much as one might think: they datastore can be huge (up to 8 PB), features are granular to the vVol (virtual disk), and a lot of the adoption was driven by the VMware team who didn’t often really need multiple datastores.
Sure.
Before you start arguing, of course there are reasons for this and is something we needed to do. But as with our overall design of how we implement vVols on FlashArray (and well any feature) we wanted to think through our approach and how it might affect later development. We quickly came to the conclusion that leveraging pods as storage containers made the most sense. They act as similar concept as a vVol datastore does–provide feature control, a namespace, capacity tracking, etc. And more as we continue to develop them. Purposing these constructs on the array makes array management simpler: less custom objects, less repeated work, etc.
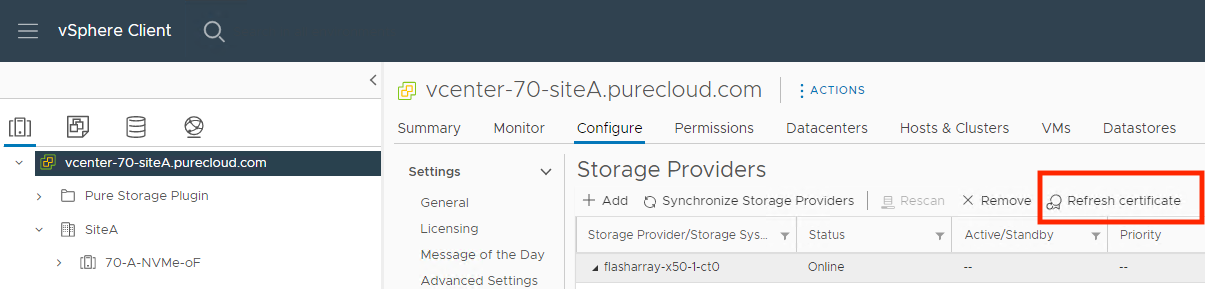
This will be a short blog, partially because my teammate Alex Carver already wrote a great blog that covers one workaround for this button not working that uses vCenter’s MOB.
If you have been using self-signed certificates in your vVols environment since vCenter 6.7 and updated to vCenter 7.0, you might have noticed something frustrating when trying to refresh those certificates manually: the button was greyed out! If you were like me, you were probably wondering why this useful functionality was removed and thought maybe it was for security reasons; your concerns might have been validated when searching VMware’s KB system and finding this KB that read like it was functionality that was removed on purpose (recently updated to reflect the current situation better).
Turns out my guess was wrong and that KB was a little misleading. VMware has brought this button’s functionality back in vCenter 7.0U3d and higher. You might say to yourself “that’s great Nelson, but I don’t upgrade my production vCenter whenever a new vCenter version comes out”. If you want a simpler workflow than re-creating the storage providers before you upgrade to newer versions of vCenter when the certificates expire eventually, Alex Carver has the method for you which uses vCenter’s MOB to refresh the storage providers without re-creating them.
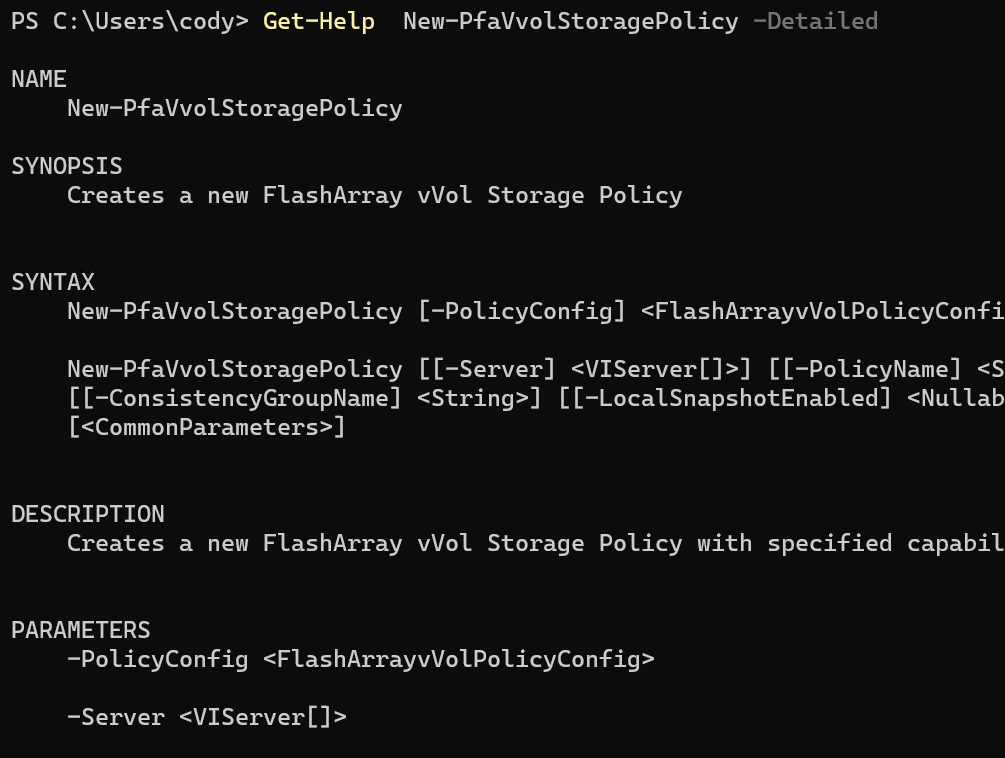
Also in that release are a few more cmdlets concerning storage policy creation, editing, and assignment. They were built to make the process easier–the original cmdlets and their use is certainly an option–and for very specific things you might want to do they might be necessary, but the vast majority of common operations can be more easily achieved with these.
As always, to install run:
Install-Module PureStorage.FlashArray.VMware
Or to upgrade:
Update-Module PureStorage.FlashArray.VMware
These modules are open source, so if you just want to use my code or open an RFE or issue go here:
The next step here is storage. I want to configure an ability to provision persistent storage in Tanzu Kubernetes. Storage is generally managed and configured through a specification called the Container Storage Interface (CSI). CSI is a specification created to provide a consistent experience in an orchestrated container environment for storage provisioning and management. There are a ton of different storage types (SAN, NAS, DAS, SDS, Cloud, etc. etc.) from 100x that in vendors. Management and interaction with all of them is different. Many people deploying and managing containers are not experts in any of these, and do not have the time nor the interest in learning them. And if you change storage vendors do you want to have to change your entire practice in k8s for it? Probably not.
So CSI takes some proprietary storage layer and provides an API mapping:
Vendors can take that and build a CSI driver that manages their storage but provides a consistent experience above it.
At Pure Storage we have our own CSI driver for instance, called Pure Service Orchestrator. Which I will get to in a later series. For now, lets get into VMware’s CSI driver. VMware’s CSI driver is part of a whole offering called Cloud Native Storage.
This has two parts, the CSI driver which gets installed in the k8s nodes, and the CNS control plane within vSphere itself that does the selecting and provisioning of storage. This requires vSphere 6.7 U3 or later. A benefit of using TKG is that the various CNS components come pre-installed.
Note: This is another guest blog by Kyle Grossmiller. Kyle is a Sr. Solutions Architect at Pure and works with Cody on all things VMware.
In VMware Cloud Foundation (VCF) version 4.1, vVols have taken center stage as a Principal Storage type available for Workload Domain deployments. This inclusion in one of VMware’s premier products reinforces the continued emphasis on vVols and all the benefits that they enable from VMware. vVols with iSCSI is particularly exciting to us as this is the first instance of the iSCSI protocol being supported as a Principal Storage type within VCF. We at Pure Storage are honored to have had a little bit of influence over this added functionality by serving as a design partner for this new feature and we are confident you are going to like what you see!
Someone who is using VMFS datastore with VCF today might ask themselves ‘why vVols’? This is a great question deserving of an expansive answer beyond this blog post. Fundamentally, though, using vVols enables you to fully use the FlashArray in the way it was intended. By leverage VASA (VMware API for Storage Awareness) you gain far more granular control and monitoring abilities over your individual VMs. Native FlashArray capabilities such as snapshots and replication are directly executed against the underlying array via policy-driven constructs. Further information on these and other benefits with vVols are available here.
Using vVols as Principal Storage is a lot like the methods VCF customers are used to for pre-existing Principal Storage options. Image an ESXi host, apply a few prerequisites to it, commission it to SDDC manager and create Workload Domains. Deploying Workload Domains with VMware Cloud Foundation automates and takes all the guesswork out of deploying vCenter and NSX-T for modern use cases such as Kubernetes via Workload Management.
Stepping into some specifics for a moment; here’s the process on how to use FlashArray iSCSI and vVols for VCF Workload Domains:
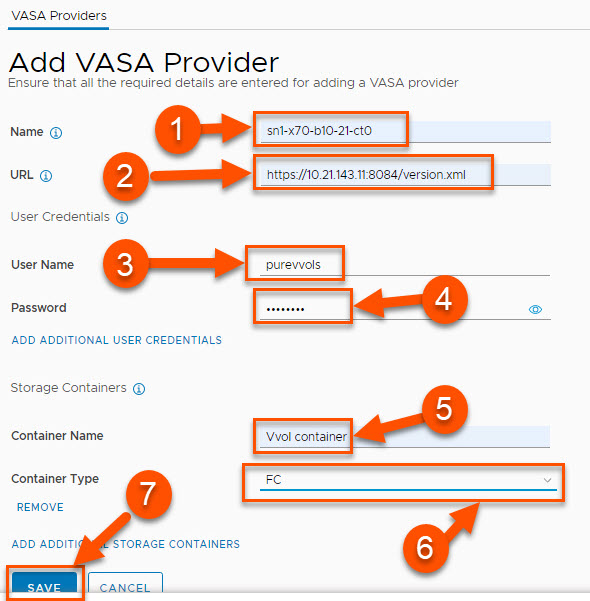
The most fundamental update to SDDC Manager to allow vVols is the capability to register a VASA Provider. In the below screenshot and following detailed information, we show an example of how you can add a FlashArray using another block protocol: Fibre Channel:
Provide a descriptive name for the VASA provider. It is recommended to use the FlashArray name and append it with -ct0 or -ct1 to denote which controller the entry is associated with.
Provide the URL for the VASA provider. This cannot be the management VIP of the array. Instead this field needs to be the management IP address associated with one of the controllers. The URL also is required to have the VASA port and version.xml appended to it. The format for the URL is: https://<IP of FlashArrayController>:8084/version.xml
Give a FlashArray user name with the arrayadmin role. The procedure for how to create such a user can be found here. While the pureuser account can be used, we recommend creating and using a separate FlashArray user for VASA operations.
Provide the password for the FlashArray username to be used.
Container Name must be Vvol container. Note that this value is case-sensitive.
For Container Type, select FC from the drop-down menu to use Fibre Channel.
Once all entries are completed, click Save.
Obviously, there’s a lot more to share here so we will be expanding on this substantially in the very near future on our VMware Platform Guide site.
Rounding out this post, I’m happy to show a demo video of just how easy it is to deploy a FC+vVols-based Workload Domain with VMware Cloud Foundation.
Note: This is another guest blog by Kyle Grossmiller. Kyle is a Sr. Solutions Architect at Pure and works with Cody on all things VMware.
One of the (many) fun things we get to work on at Pure is researching and figuring out new ways to streamline things that are traditionally repetitive and time-consuming (read: boring). Recently, we looked at how we could go about automating the deployment of FlashStack™ end-to-end; since a traditional deployment absolutely includes some of these repetitive tasks. Our goal is to start off with a completely greenfield FlashStack (racked, powered, cabled and otherwise completely unconfigured) and automate everything possible to end up with a fully-functional VMware environment ready for use. After some thought, reading and discussion, we found that this goal was achievable with the combination of SmartConfig™ and VMware Cloud Foundation™.
Automating a FlashStack deployment makes a ton of sense: From the moment new hardware is procured and delivered to a datacenter, the race is on for it to switch from a liability to a money producing asset for the business. Further, using SmartConfig and Cloud Foundation together is really combining two blueprint-driven solutions: Cisco Validated Designs (CVDs) and VMware Validated Designs (VVDs). That does a lot to take the guesswork out of building the underlying infrastructure and hypervisor layers since firmware, hardware and software versions have all been pre validated and tested by Cisco, VMware and Pure Storage. In addition, these two tools also go through setting up these blueprints automatically via a customizable and repeatable framework.
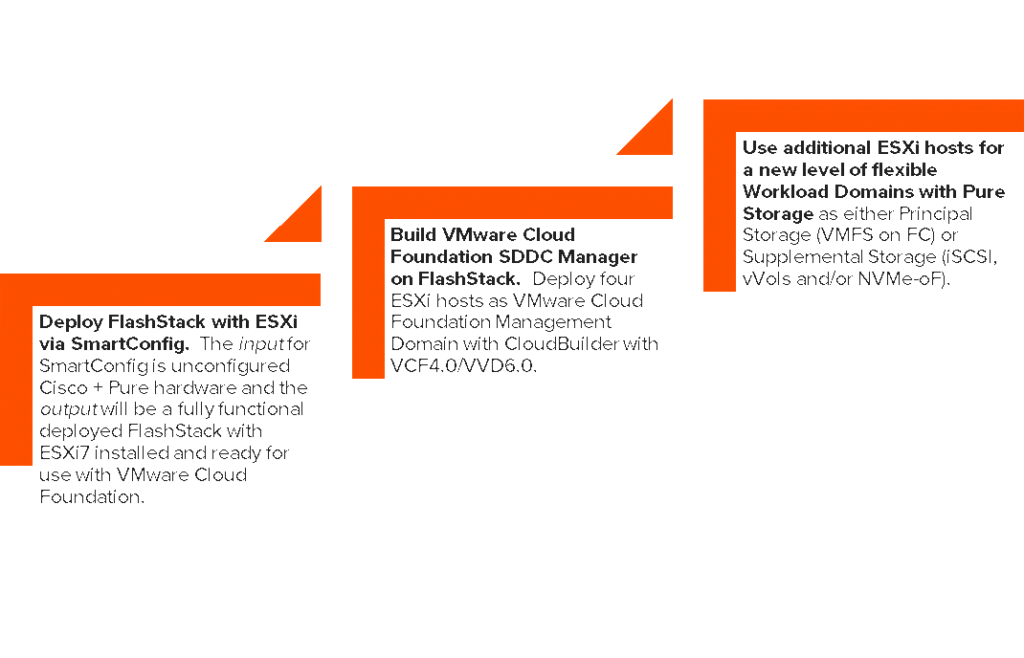
Once we started working through this in the lab, the following automation workflow emerged:
Along with some introduction to the key technologies in play, we have divided the in-depth deployment guide into 3 core parts. All of these sections, including product overviews and click-by-click instructions are publicly available here on the Pure Storage VMware Platform Guide.
Deploy FlashStack with ESXi via SmartConfig. The input of this section will be factory reset Cisco hardware and the output will be a fully functional imaged/zoned/deployed UCS chassis with ESXi7 installed and ready for use with VMware Cloud Foundation.
Build VMware Cloud Foundation SDDC Manager on FlashStack. The primary input for CloudBuilder is, not ironically, the output of the work in part 1. Specifically, ESXi hosts and their underlying infrastructure, from which we will automatically deploy a Management Domain with CloudBuilder.
The last section will show how to deploy a VMware Cloud Foundation Workload Domain with Pure Storage as both Principle Storage (VMFS on FC) and Supplemental Storage (vVols). Options such as iSCSI are covered in additional KB articles in the VMware Cloud Foundation section of the Pure Storage support site.
Post-deployment, customers will enjoy the benefits of single-click lifecycle management for the bulk of their UCS and VMware components and the ability to dynamically scale up or down their Workload Domain deployment resources independently or collectively based upon specific needs (e.g. compute/memory, network and/or storage) all from SDDC Manager.
For those who prefer a more interactive demo, I’ve recorded an in-depth overview video of this automation project followed by a four-part demo video series that shows click-by-click just how easy and fast it is to deploy a FlashStack with VMware from scratch.
Craig Waters and I gave a Light Board session on this subject:
And this is an in-depth PowerPoint overview of the project:
Finally, this is a video series showing the end-to-end process in-depth broken into a few parts for brevity.
Note: This is a guest blog by Kyle Grossmiller. Kyle is a Sr. Solutions Architect at Pure and works with Cody on all things VMware.
As we’ve covered in past posts, VMware Cloud Foundation (VCF) offers immense advantage to VMware users in terms of simplifying day 0 and 1 activities and streamlining management operations within the vSphere ecosystem. Today, we dive into how to use the Pure Storage leading vVols implementation as Supplemental storage with your Management and Workload Domains.
First though, a brief description of the differences between Principal Storage and Supplemental Storage and how it relates to VCF is in order to set the table. Fortunately, it is very easy to distinguish between the two storage types:
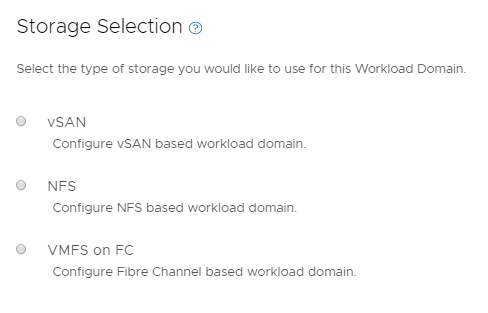
Principal Storage is any storage type that you can connect to your Workload Domain as a part of the setup process within SDDC Manager. Today, that’s comprised of vSAN, NFS and VMFS on Fibre Channel, pictured below. We’ve shown how to use VMFS on FC previously.
Supplemental Storage simply means that you connect your storage system to a Workload Domain after it has been deployed. Examples of this storage type today include iSCSI and the focus of this blog: vVols.
One of the major advantages we have seen with VVols is making a virtual disk a first class citizen on the array. We can restore, copy, replicate them (and their VMs) as storage objects were meant to be restored, copied, replicated etc.
Though one thing about virtual disks is that by default–they are not first class citizens in vSphere, VVols or otherwise. To create one, it has to be associated with a VM.
To retrieve one in PowerCLI (for example) get-harddisk requires a datastore or a VM to return a result:
In the previous post in this series I explored how to run a VVol-based test failover of a virtual machine. Now I will walk through running an actual failover.
There are two types of failovers; a planned migration (everything is up an running) and a disaster recovery failover (part or all of the original site is down).
For this post, I will start with running a planned migration.
This post I will talk about using PowerCLI to run a test failover for VVol-based virtual machines. One of the many nice things about VVols is that in the VASA 3.0 API this process is largely automated for you. The SRM-like workflow of a test failover is included–so the amount of storage-related PowerShell you have to manually write is fairly minimal.