
In my last post, I spoke about the ins and outs of using the Pure1 REST API–but it was a fairly manual process. Which of course is not how you really want to use a REST API. So the first part of this series will be using it with one of my favorite tools: PowerShell!
I will separate this into five parts:
- Creating your certificate
- Adding your public key into Pure1
- Creating your JWT
- Authenticating with Pure1
- Making REST calls after authentication
UPDATE!!!! I made this much easier, you can use my module to connect to Pure1 which is on the PowerShell gallery.
You can find more information on it here:
https://www.codyhosterman.com/scripts-and-tools/pure1-rest-api/pure1-powershell-module/h
Creating your Certificate
The first step is creating your certificate. If you plan on using PowerShell–the best way to create your certificate is also through PowerShell. You can of course use the GUI-based MMC certificate snap-in, but for more PowerShell fun let’s use that.
The command New-SelfSignedCertificate can be used to do this.
Note–you must be using Windows 2016 or Windows 10 or later for the below to work. New-selfsignedcertificate is fairly primitive in older versions.
$policies = [System.Security.Cryptography.CngExportPolicies]::AllowPlaintextExport,[System.Security.Cryptography.CngExportPolicies]::AllowExport

$CertObj = New-SelfSignedCertificate -certstorelocation cert:\localmachine\my -HashAlgorithm "SHA256" -KeyLength 2048 -KeyAlgorithm RSA -KeyUsage DigitalSignature  -KeyExportPolicy $policies -Subject "codyCert"
The above commands will create the correct certificate and private key. It is a bare minimum (meaning you will likely want to add more information into yours, location etc.) but it will work as above. The cert will be loaded into the local machine personal certificate store–once again you can put it wherever. You will also probably want to use a different Subject name.
If you have already created your certificate, you will want to load it. There are a variety of ways to do this, but the simplest is to use the cmdlet “get-childitem” and pass in the pass to your certificate store and then store the right one.
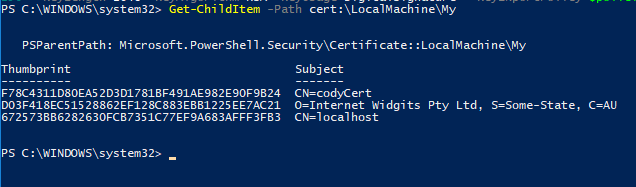
Once you found the certificate you want, you can use get-childitem again and pass in the store/thumbprint:
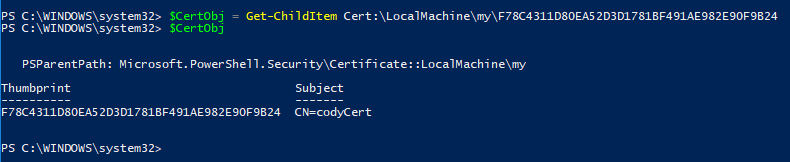
So now we have our certificate created and stored in an object called $CertObj.
Note you will want to assign who ever will be using this key read access, otherwise you need to run it as admin. See info on doing that here:
Adding your public key into Pure1
Before we can add it to Pure1, we need to export it into a pfx file. This can be done easily in PowerShell. If you have it stored in a PowerShell object (like above in $CertObj), you can pass that into the cmdlet export-pfxcertificate.
First store a password (it is required to export the key). Feel free to store it wherever, I am putting it on the root of C:\.
 $mypwd = ConvertTo-SecureString -String "mypassword" -Force -AsPlainText

$CertObj | Export-PfxCertificate -FilePath C:\mypfx.pfx -Password $mypwd 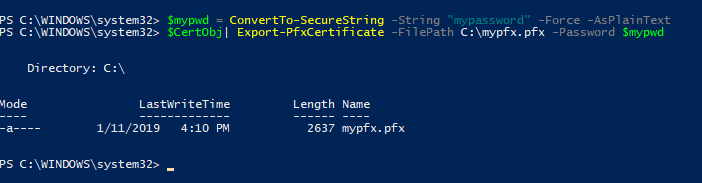
Great. Let’s move on.
Now, this is the slightly goofy part, but luckily it is only a one-time thing. Getting your public key into Pure1. The above format is not what Pure1 wants for a public key, so it needs to be converted into the correct PEM-encoded public key. I have not yet figured out a way to do this with native PowerShell.
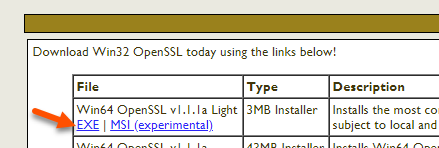
You need to download the Windows version of openssl. There are many options here, but I used https://slproweb.com/products/Win32OpenSSL.html
The “light” version worked for me great, download and install the exe.
Once installed, you can still run this from the PowerShell prompt. Either CD into the bin directory, or add that path to your environmental variable.

The first step is the convert the pfx file:
./openssl pkcs12 -in c:\mypfx.pfx -nocerts -nodes -out c:\converted.keyThis will ask you for your password from before. If you run this from the PowerShell prompt, you will need to be ./ before the openssl command.

Now pull out your public key:
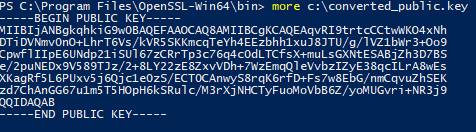
./openssl rsa -in c:\converted.key -pubout -out c:\converted_public.key
If for whatever reason you want your private key too (maybe you want to use it from Python or something, you can run
./openssl rsa -in c:\converted.key -out c:\converted_private1.key
Now take that and enter it into the Pure1 web site and retrieve your application ID. For instructions on how to do that, just refer back to the original post:
My application ID is pure1:apikey:wBAF3MZF5fVVl9LM
Creating your JWT
Now back to PowerShell. Once you have put the public key into Pure1, you never need to leave PowerShell again. Yay!
Before I continue on, I should mention that I have done the work for you, you can basically ignore the rest and go to this post:
https://www.codyhosterman.com/2019/01/using-the-pure1-powershell-module/
Anyways, let’s build our JWT.
First our header:
$Header = '{"alg":"RS256","typ":"JWT"}' Now we need to get the current time and a future time to expire the JWT.
$curTime = (Get-Date).ToUniversalTime()
$curTime = [Math]::Floor([decimal](Get-Date($curTime) -UFormat "%s"))
$expTime = $curTime + 1000Now store your application ID in some variable.
$appID = "pure1:apikey:wBAF3MZF5fVVl9LM"Then put it all together to form the JSON.
$PayloadJson = '{"iss":"' + $appID + '","iat":' + $curTime + ',"exp":' + $expTime + '}'
Now we need to base64 URL encode them:
$encodedHeader = [Convert]::ToBase64String([System.Text.Encoding]::UTF8.GetBytes($Header)) -replace '\+','-' -replace '/','_' -replace '='$encodedPayload = [Convert]::ToBase64String([System.Text.Encoding]::UTF8.GetBytes($PayloadJson)) -replace '\+','-' -replace '/','_' -replace '='The combine them together to make the first two parts of the JWT.
$toSign = $encodedHeader + '.' + $encodedPayloadThe next part is to actually convert them into byte format, which is what the signature process requires in this case.
$toSignEncoded = [System.Text.Encoding]::UTF8.GetBytes($toSign)Now we need to pull the key from the certificate:
$key = [System.Security.Cryptography.X509Certificates.RSACertificateExtensions]::GetRSAPrivateKey($CertObj)That is the part that needs to be run as admin. If you get a cryptic error, that is likely your issue. Now to create the signature–which is just a one-liner:
$signature = [Convert]::ToBase64String($key.SignData($toSignEncoded,[Security.Cryptography.HashAlgorithmName]::SHA256,[Security.Cryptography.RSASignaturePadding]::Pkcs1)) -replace '\+','-' -replace '/','_' -replace '='The last step is to form the full JWT, by adding that to the end.
$jwt = $toSign + '.' + $signature
Now we have the JWT!

Authenticating with Pure1
Now let’s authenticate!
What happens now is we actually send the JWT to the Pure1 REST and receive an access token. Run the following to build the request:
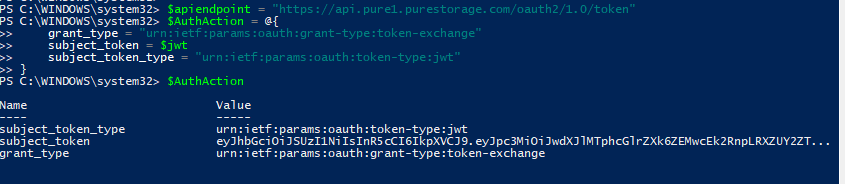
$apiendpoint = "https://api.pure1.purestorage.com/oauth2/1.0/token"$AuthAction = @{ grant_type = "urn:ietf:params:oauth:grant-type:token-exchange"
subject_token = $jwt
subject_token_type = "urn:ietf:params:oauth:token-type:jwt"
}
Then we can use invoke-restmethod to actually make the REST call:
$token = Invoke-RestMethod -Method Post -Uri $apiendpoint -ContentType "application/x-www-form-urlencoded" -Body $AuthActionI have stored the response in a variable called $token.

We can use that now to pull information from Pure!
Making REST calls after authentication
So, to finish, let’s just do something simple. Pull all of my arrays out of Pure1. This is a simple GET call.
So I set the URI:
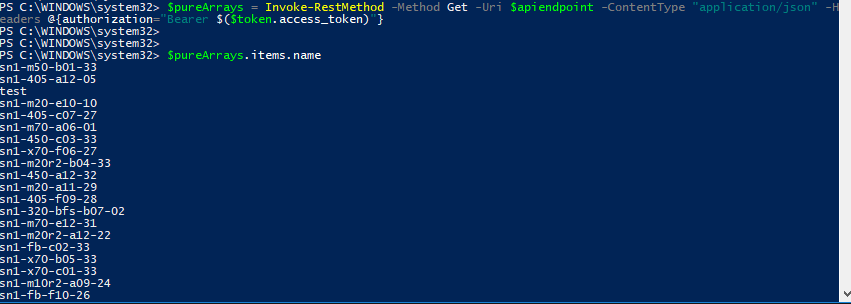
$apiendpoint = "https://api.pure1.purestorage.com/api/1.0/arrays"Then run the invoke-restmethod again:
$pureArrays = Invoke-RestMethod -Method Get -Uri $apiendpoint -ContentType "application/json" -Headers @{authorization="Bearer $($token.access_token)"}For all calls, just make sure the header is as shown above. That token will be good for 10 hours.
Now with the response I can go through all of the arrays. In this case, I just pulled the names from the response.
So that’s the basics. I plan on pulling this into my PowerShell module so it will be much simpler. Stay tuned for that. But this should get you going.
Very good tutorial. this api needes some clarification. looking forward for part 2.
Than you so much.
Cody, is there a method to get “installation” or “born on” dates from the Pure1 Api with powershell ?
thanks
As far as I can tell that information is not in the Pure1 REST, so therefore it wouldnt be able to be retrieved from PowerShell. If you tag the arrays with that information though it could then be pulled through, but you’d have to of course tag it first.
This is all awesome info but just running the commands isnt really enough. To make good use of this data, we need to automate it.
when I use ISE, it almost looks like I’ve got to create a new RSA key every time the script runs.
This is data we would use heavily but the simple process of just automating the acquisition of busy data seems like such an unnecessarily tedious process.
Can we get more posts on this? Maybe some videos and examples of how to start collecting this data in a more strait forward method?
This is an old post when I was writing it from first principles, there is now a module for this https://www.codyhosterman.com/pure1-rest-api/pure1-powershell-module/ with the details here. Authentication is MUCH more straight forward and there are default PowerShell functions for pulling data etc. https://support.purestorage.com/Pure1/Pure1_Manage/013_Pure1_Manage_-_REST_API/Pure1_Manage_-_REST_API__Reference
So if we want to run a scheduled Powershell script, is there some documentation on this?
I can authenticate via this method but it fails in any automated attempt I’ve tried.
Wanting to get this busy data out & pump into some sort of data indexer like splunk but so far, I dont see with all this documentation how to be able to pull these metrics in an automated method.. just a manual setup that is meant to expire