With the release of Purity 6.4.1, FlashArray now has the capability to provision multiple vVol storage containers on the same FlashArray. Cody covered this well in his previous blog post.
When Purity 6.4.4 was launched, we introduced the ability to resize these storage containers! This might have snuck by you when reading this note because it’s not clear until the end of the note that this also improves things for vVols:
“Supports setting an upper limit on the data a pod can contain. When a pod quota limit is in place, the limit prevents creating volumes (in the pod) that would require more logical space than the quota limit. With this feature, custom limits can now be configured for vVol datastores, and organizations can place consumption limits for application groups and business groups. Use the purepod create --quota-limit and purepod setattr --quota-limit CLI commands to create and manage a pod quota limit. These quota limits also apply to vVol datastores.“
Hello- this is part 4 in the series of blogs on ActiveDR + NFS datastores. In part 3, I covered how to configure vSphere for a test failover and then how to perform a test failover. In this blog I’ll be covering how to perform a failover and failback.
FlashArray Failure – ActiveDR Failover
What happens if an array fails? I’m going to forcefully stop Purity on both controllers of the source FlashArray (flasharray-x50-1) to simulate this situation. In this case, the workflow is the same as during the failover test except disconnecting the networking from the VMs you are about to power on. It is probably not a good idea to disconnect that so in general, you’ll want to leave these VMs as-is for this scenario. The requirements of your environment might require something else here. So you’ll promote the surviving array and power on the VMs based on the last-replicated state of the VMs.
If this is a test you are doing in a test/proof of concept deployment, to replicate what I’m doing, simply unplug the power cables on the FlashArray. Please do not pull power on your production FlashArrays :-). Here’s a table of articles in this series:
Hello- this is part 3 in the series of blogs on ActiveDR + NFS datastores. In part 2, I covered how to connect ActiveDR to an NFS file system that’s backing an NFS datastore. In this blog, I’ll be covering how to connect the target NFS export in vSphere and how to run a test failover. The reason for covering test failovers before production failovers and failbacks is that I strongly recommend performing or scheduling a test failover immediately after configuring any disaster recovery solution. It is possible to not have the necessary requirements for a failover when it is critical that the failover happens quickly; testing failing over your environment before needing it in a production down scenario will reduce or eliminate this possible pain.
For the purposes of this blog, I am using Pure Storage’s remote vSphere plugin. In general, I strongly recommend installing and using this plugin to manage your FlashArray(s) more easily from the vSphere GUI. Additionally, I’ve made a demo video that covers the steps covered here. Here’s a table of articles in this series:
This environment already has a mounted NFS file system from the source FlashArray. The steps to mount the NFS file system from the source array are the same as the steps for the target array except you won’t have to promote the pod on the source array.
When you perform failovers, do test failovers or are cleaning up your objects from these operations you’ll want to ensure that you follow the steps outlined here.
I’m going to be writing a series of blogs on ActiveDR (Active Disaster Recovery) with NFS datastores over the next couple of posts. Some of the other posts I have planned in the near future are:
Failover scenarios where the ESXi hosts are connected to both arrays
Failover scenarios where the ESXi hosts are only connected to one array
In this blog I will do an introduction to the technologies and I will give some high level information on how you might want to use them together.
Replication Options on FlashArray
This post will be covering FlashArray specific replication techniques that you may or may not be familiar with. If it is the latter, my colleague Cody Hosterman has a great primer on our technologies that might be worth a read for you. Here’s a table of articles in this series:
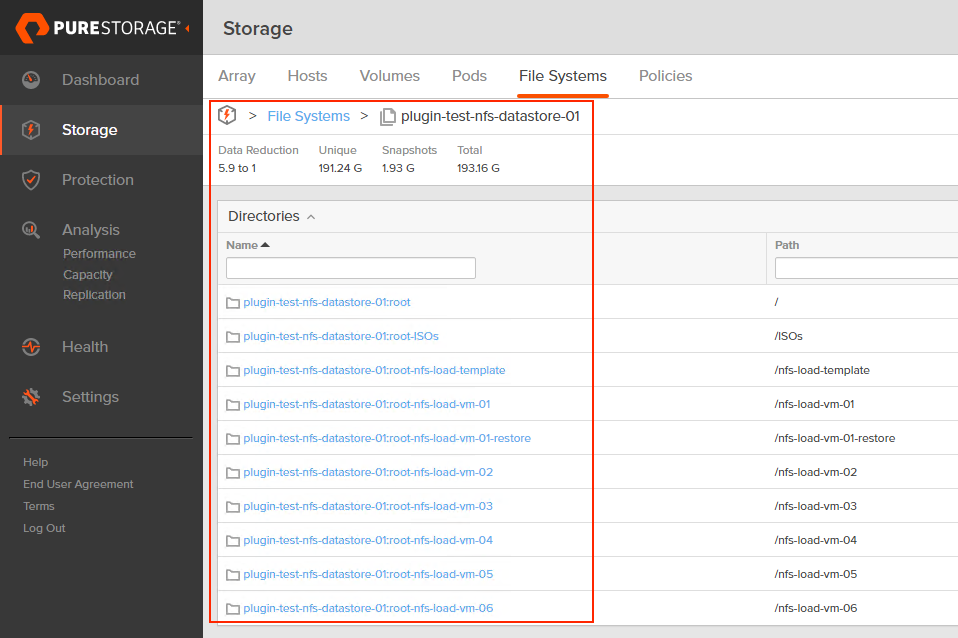
Hello- Nelson Elam here. I wanted to go over the reasons why I think you should enable automatic directory management (autodir) if you are planning to use NFS datastores on FA File. A quick note before we get started- autodir is not restricted to ESXi hosts but ESXi hosts will be the focus of this blog.
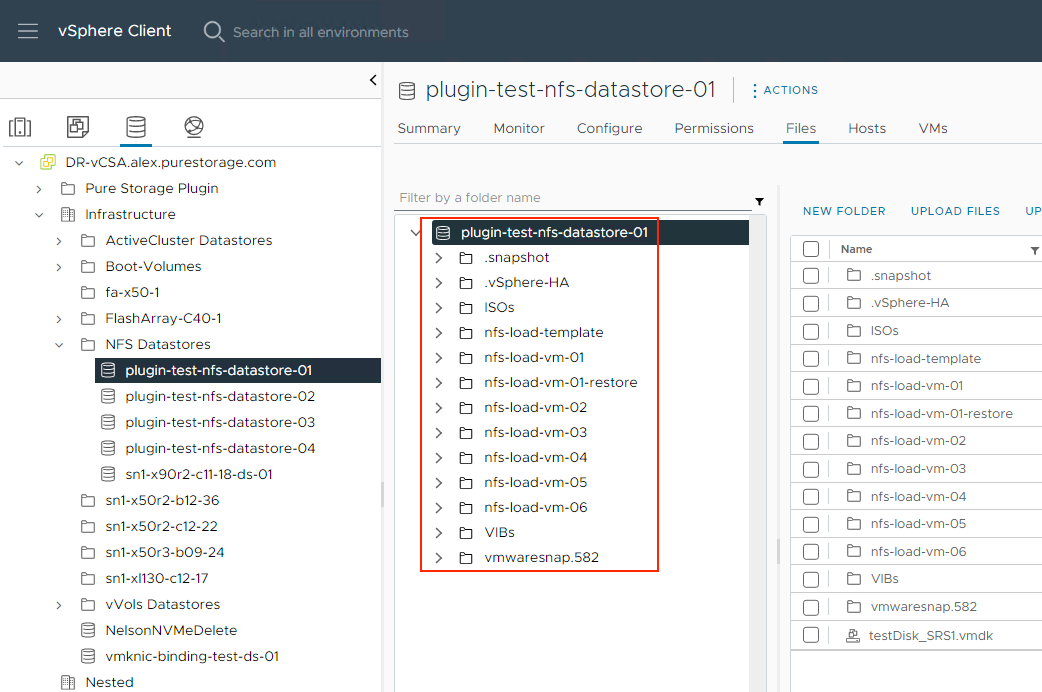
What is autodir? Autodir is a way for FlashArray to reflect the current directory structure on an NFS datastore that’s managed by a connected host- a managed directory. What does this mean for ESXi? Whenever a VM gets created on an NFS datastore, a new directory (folder) gets created for the VM on the datastore. When a VM gets deleted from disk, the directory gets destroyed. Note that directories you create or destroy manually on an NFS datastore in vCenter get reflected in FlashArray as well. Simple enough!
If you’ve read the FA File launch blogs or have seen some of the webinars we’ve done about FA File or NFS datastores, you’ve likely seen or heard us talk about VM granular management being part of FA File. Autodir enables VM granular management. Let’s dive into VM granular management in the context of NFS datastores.
With autodir enabled, these changes are reflected on FlashArray and enable FlashArray administrators to be able to see the current state of the NFS file system from a directory perspective.
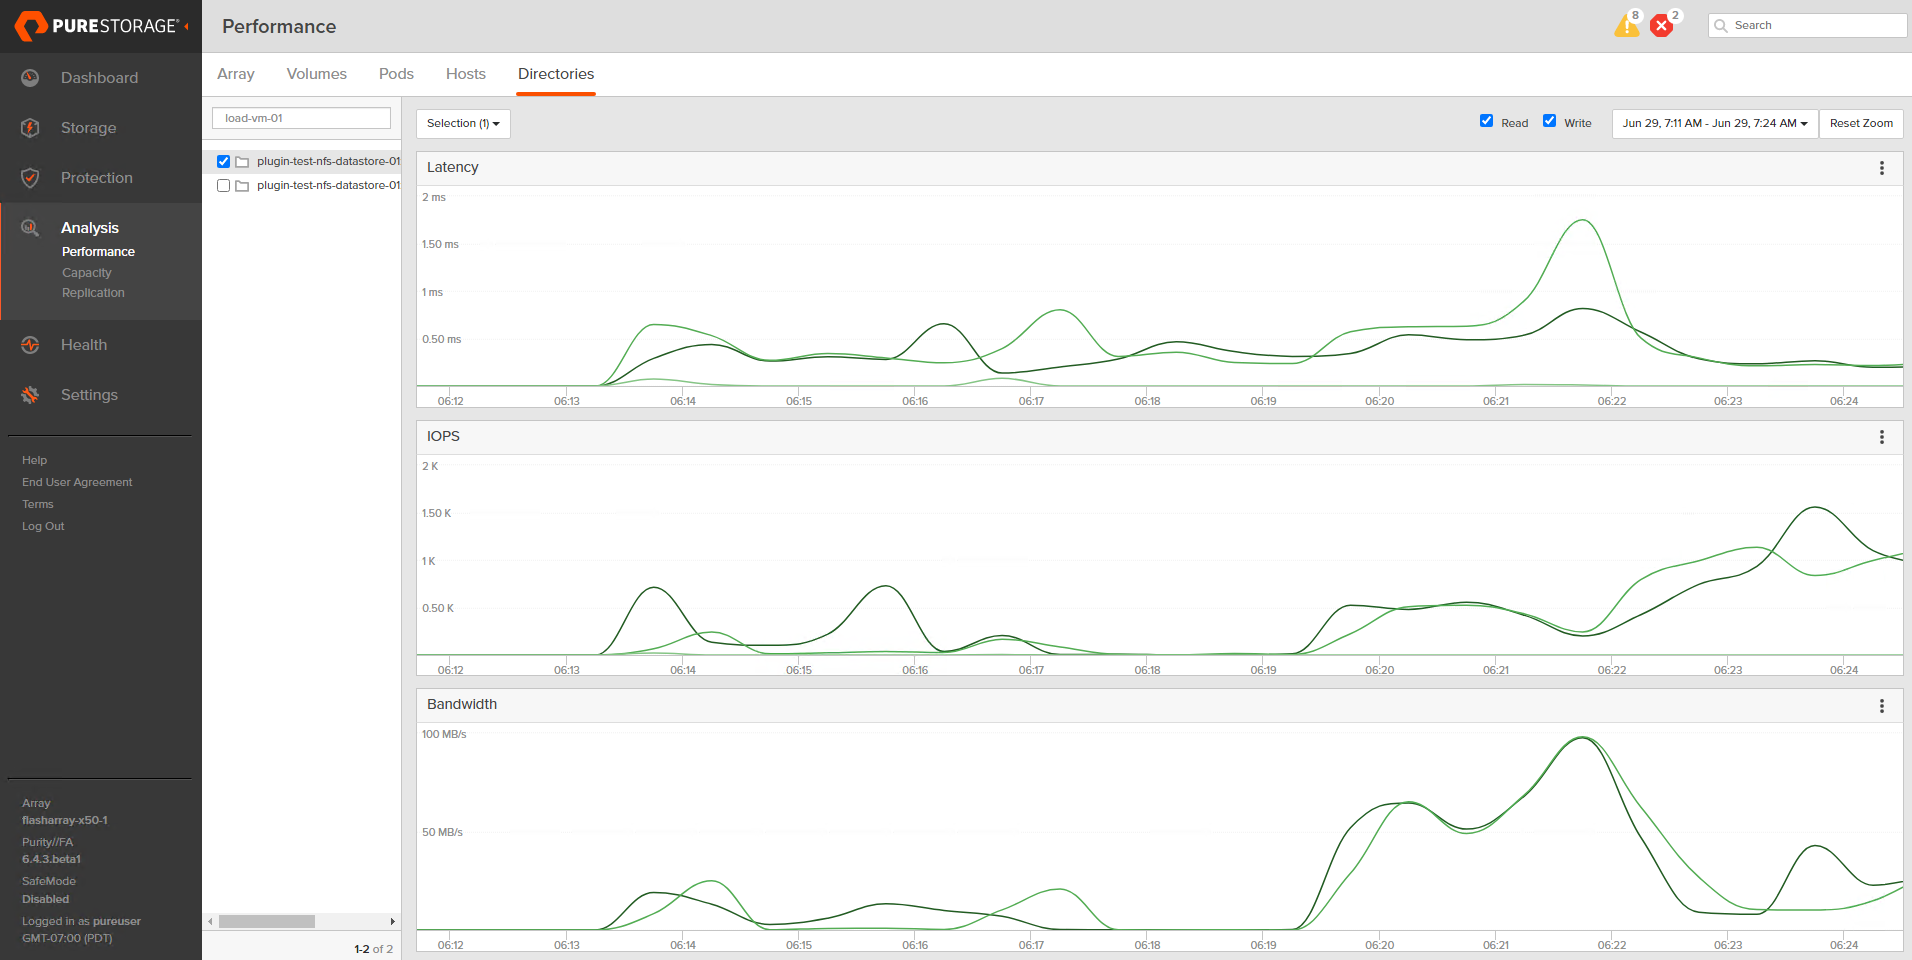
Want to figure out why the data reduction ratio of a file system dropped so significantly? Now you can see that at a per-VM basis on FlashArray.
Want to see which VMs are spiking in load at inopportune times? You can use the FlashArray GUI to help figure that out. Worth mentioning this info is more easily consumed in Pure1 when using the VM analytics collector.
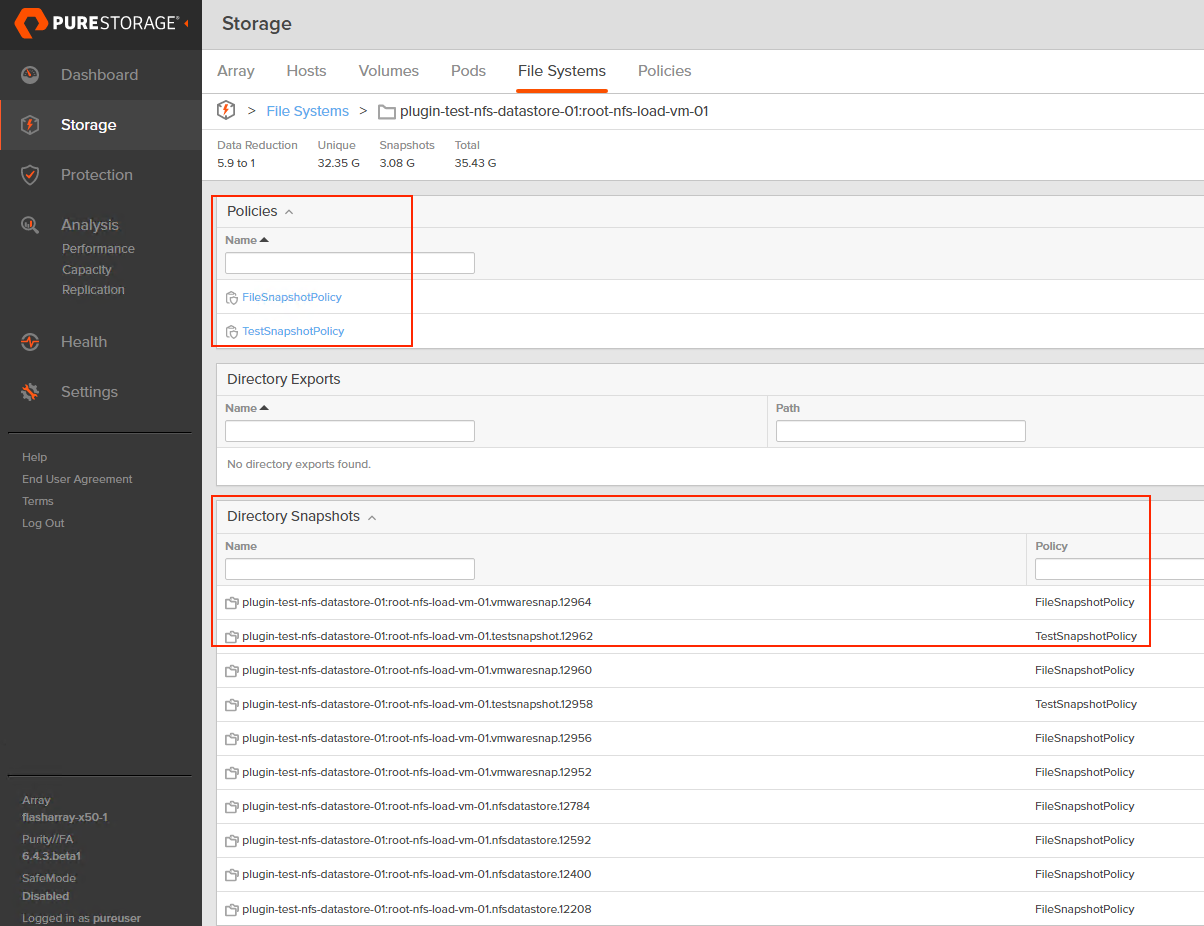
Want to have a special snapshot schedule for a certain group of VMs on a FlashArray-backed NFS datastore? With autodir, you can create snapshot policies and apply them to specific directories, allowing you to get around having to snapshot an entire NFS datastore like it’s a VMFS datastore. You can still snapshot the entire NFS file system if you want! Autodir enables you to have other options.
Your mission critical VMs likely have more complex snapshot retention and frequency requirements than your test VMs. With autodir, you can also apply multiple snapshot policies to the same directory (VM).
That’s sounds great Nelson, but surely autodir isn’t a good option for every NFS datastore on FlashArray. What are the reasons you wouldn’t want to enable autodir?
The main circumstance where autodir doesn’t make sense is if the scale limits of autodir are less than the directory count in your NFS datastore. Those can be found in this KB under “Managed Directories per array“.
If you want to see a demo of how autodir is configured on FlashArray, this video goes over it.
If you want to get detailed written instructions for how to configure autodir on FlashArray, this KB article is a good resource.
Today I want to tell to you about what I use the vSphere plugin for regularly in my lab to hopefully help you get more value out of your existing Pure array and tools. The assumption of this guide is that you already have the vSphere plugin installed (follow this guide if you don’t currently have it installed or would like to upgrade to a more feature-rich remote plugin version). Our vSphere plugin release notes KB covers the differences between versions. If you aren’t sure what version you want, use the latest version.
Why should you care about the vSphere plugin and why would I highlight these workflows for you? Pure’s vSphere plugin can save you a significant amount of time in the configuration/management of your vSphere+FlashArray environment. It can also greatly reduce the barriers to success in your projects by reducing the steps required of the administrator for successful completion of a workflow. Additionally, you might currently be using the vSphere plugin for a couple of workflows but didn’t realize all of the great work our engineers have put into making your life easier.
I am planning to write more blogs on the vSphere plugin and the next one I plan to write is on the highest value features that exist in current vSphere plugin versions.
Create and Manage FlashArray Hosts and Host Group Objects
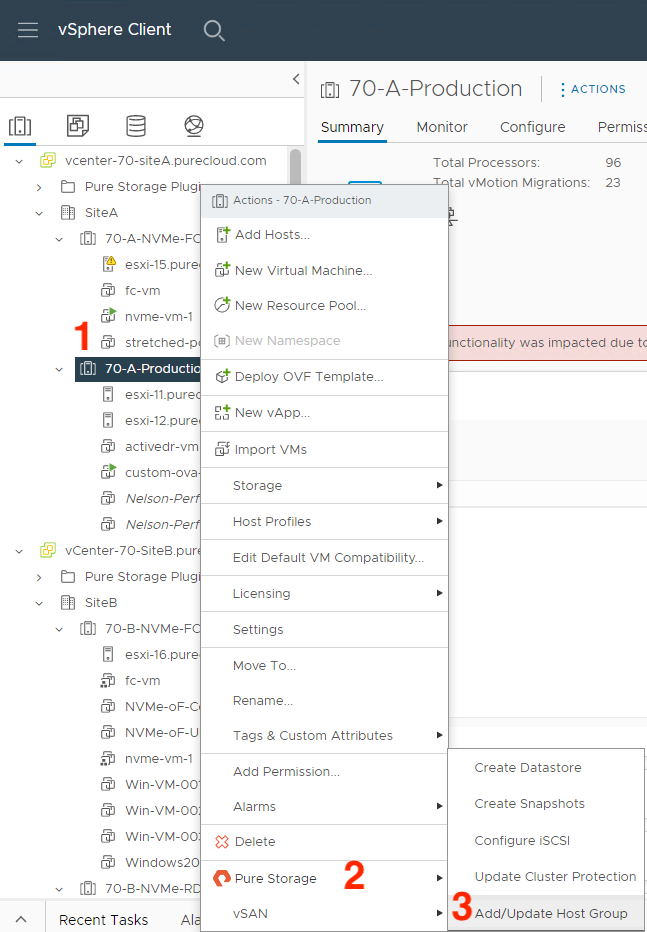
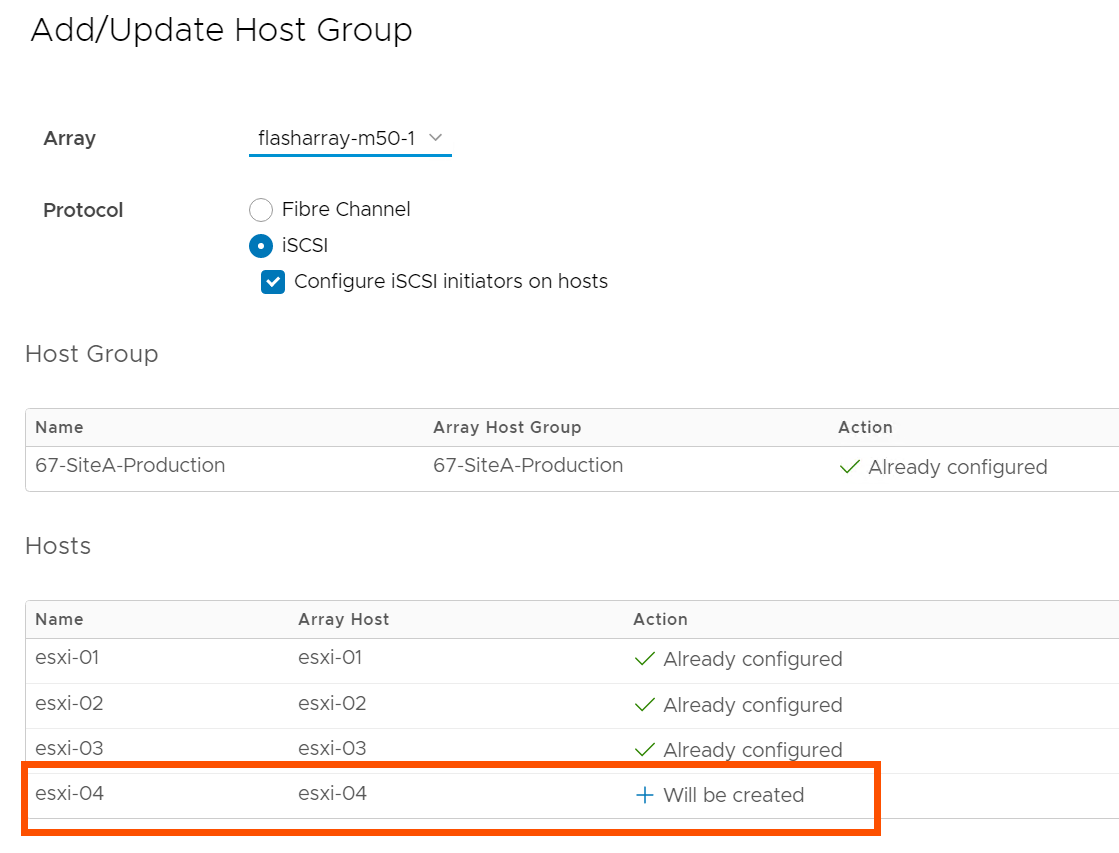
If you’re currently a Pure customer, you have likely managed your host and host group objects directly from the array. Did you know you can also do this from the vSphere plugin without having to copy over WWNs/IPs manually? (1) Right-click on the ESXi cluster you want to create/manage a host or host group object on, (2) hover over Pure Storage, then (3) left-click on Add/Update Host Group.
In this menu, there are currently Fibre Channel and iSCSI protocol configuration options. We are currently exploring options here for NVMe-oF configuration; stay tuned by following this KB. You can also check a box to configure your ESXi hosts for Pure’s best practices with iSCSI, making it so you don’t have to manually configure new iSCSI ESXi hosts.
FlashArray VMFS Datastore and Volume Management(Creation and Deletion)
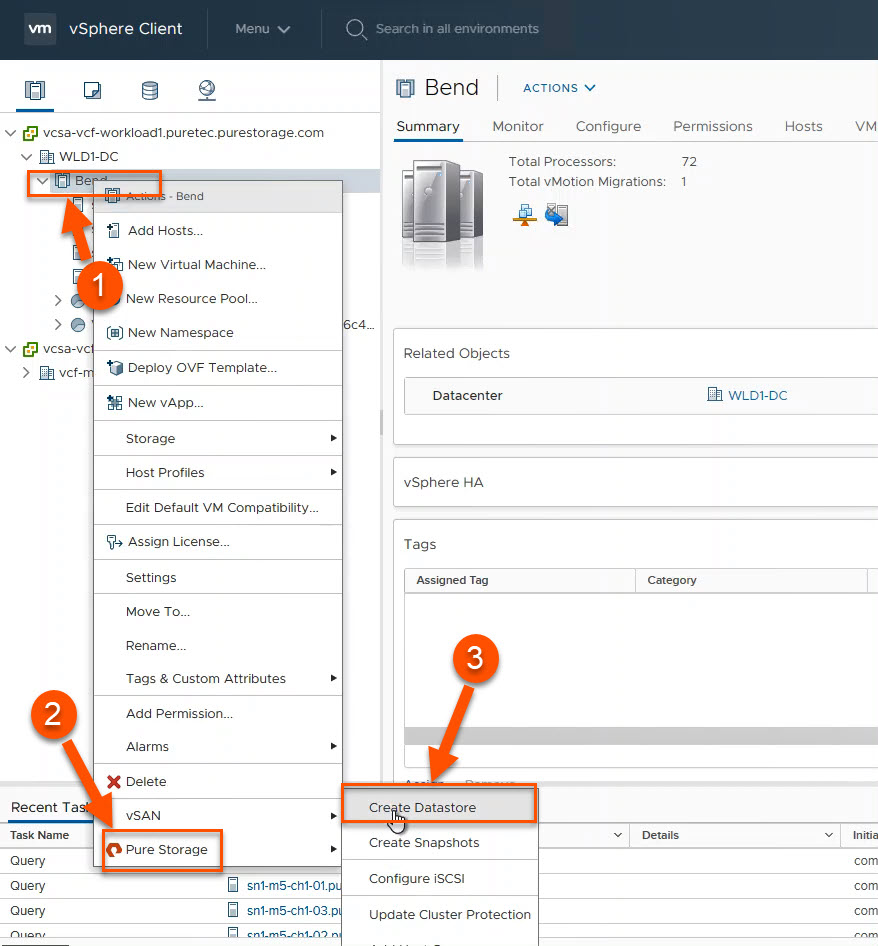
When you use the plugin for datastore creation, the plugin will create the appropriate datastore in vSphere, the volume on the FlashArray, and it will connect the volume to the appropriate host(s) and host group objects on the FlashArray. (1) Right-click on the pertinent cluster or host object in vSphere, (2) hover over Pure Storage and finally (3) left-click on Create Datastore. This will bring up a wizard with a lot of options that I won’t cover here, but the end result will be a datastore that has a FlashArray volume backing it.
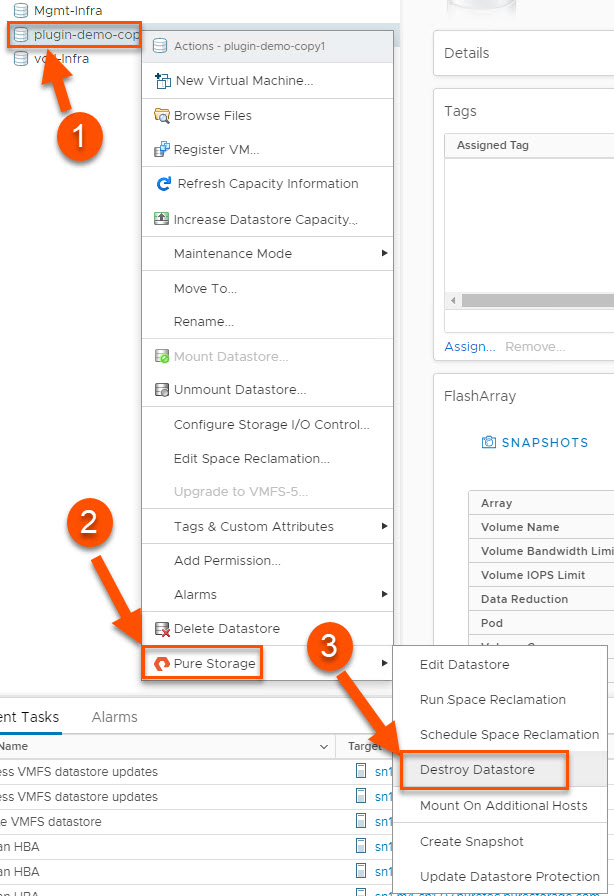
The great thing about deleting a datastore from the plugin is that there are no additional steps required on the array to clean up the objects. This is the most satisfying workflow for me personally because cleanup in a lab can feel like it’s not a good use of time until I’ve got hundreds of objects worth cleaning up. This workflow enables me to quickly clean up every time after I’ve completed testing instead of letting this work pile up.
(1) Right-click the datastore you want to delete, (2) hover over Pure Storage and (3) left-click on Destroy Datastore. After the confirmation prompt, the FlashArray volume backing that datastore will be destroyed and is pending eradication for whatever that value is configured on the FlashArray (default 24 hours, configurable up to 30 days with SafeMode). That’s it!
FlashArray Snapshot Creation
One of the benefits of FlashArray is its portable and lightweight snapshots. The good news is that you can create these directly from vSphere without having to log into the FlashArray. It’s worth mentioning that although the snapshot recovery workflows built into the vSphere plugin (vVols and VMFS) are far more powerful and useful when you really need them, I’m covering what I use regularly and I rarely have to recover from snapshots in my lab. I try to take snapshots every time I make a major change to my environment in case I need to quickly roll-back.
There are two separate workflows for snapshot creation: one for VMFS and one for vVols. The granularity advantage with vVols over VMFS is very clear here- with VMFS, you are taking snapshots of the entire VMFS datastore, no matter how many VMs or disks are attached to those VMs. With vVols, you only have to snapshot the volumes you need to, as granular as a single disk attached to a single VM.
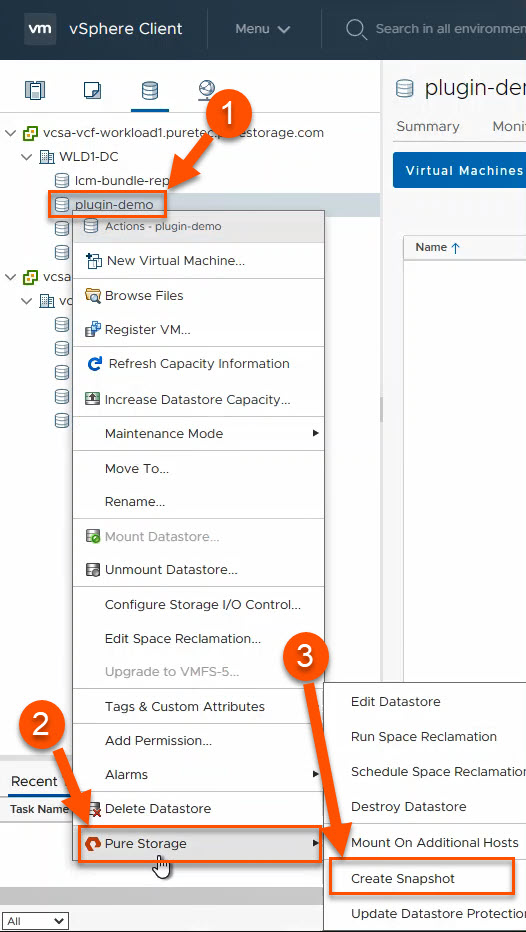
With VMFS, (1) right click on the datastore, (2) hover over Pure Storage and (3) left click on Create Snapshot.
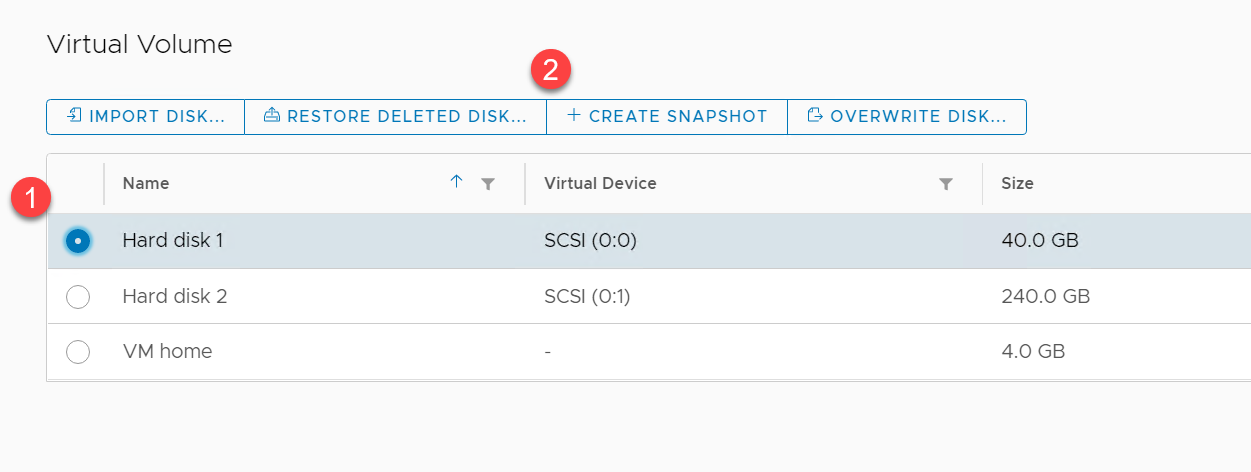
For a vVols backed disk, from the Virtual Machine Configure tab, navigate to the Pure Storage – Virtual Volumes pane, (1) select the disk you would like to snapshot and (2) click Create Snapshot.
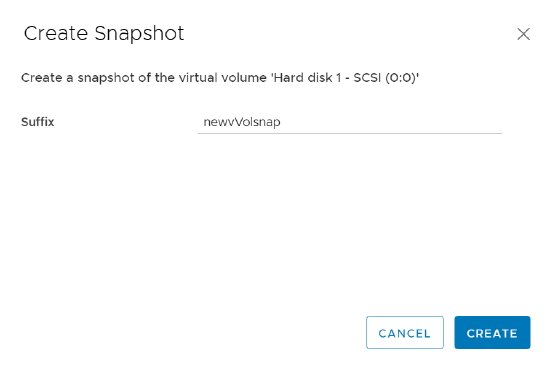
A prompt will pop up to add a suffix to the snapshot if you’d like; click on create and you’ve got your FlashArray snapshot of a vVols backed disk created!
Stay tuned for a blog on the vSphere plugin features you might not know about that, like the above, can save you a significant amount of time and effort.
This is going to be broken up into two parts- first, a live migration where no VMs get powered off during the migration; second, a migration where you temporarily power off VMs attached to the SCSI datastore.
Why would you want to do it one way or another?
Pros of live migration:
No VM downtime
Simpler configuration changes and overlap. Less to go wrong or mess up
Pros of powering off VMs:
The total migration time will be significantly less because no data will have to be moved. Currently VMware doesn’t support XCOPY (even on the same array) for NVMe-oF
Virtual Volumes provide a great many benefits, some large, some small. Depending on the VM, recovering a deleted VM could be either of those.
With traditional VMFS, once you have selected “delete from disk” restoring that VM could have been a process. Either restoring from backup or hoping you had a snapshot of the VMFS on the array. Either way, you are probably going to incur data loss, as the last backup or snapshot is unlikely to be from the time right before the deletion.
Let me be VERY clear here. Regardless to the rest of this post, I am not saying once you move to VVols you do not need backup! You absolutely still do. VVols just give you a nice way to do an immediate recovery of the latest point-in-time without having to lose anything, assuming your array support it.
“Wait, did you say delete VM “AD” or VM “80”?”
“Um… definitely not AD that’s our active directory…”
This is a blog post I have been waiting to write for quite some time. I cannot even remember exactly how long ago I saw Satyam Vaghani present on this as a concept at VMworld. Back when the concept of what is now called a protocol endpoint (more on that later) was called an I/O Demultiplexer. A mouthful for sure. Finally it’s time! With pleasure, I’d like to introduce VVols on the FlashArray!