
Virtual disk oversubscription is becoming increasingly common and so is allowing people to provision their own VMs. So increasing a datastore capacity is also an increasingly common operation. Because of the performance of flash, merged with ESXi features like VAAI ATS. Expanding a VMFS is easy. Expanding a storage volume these days is easy. But you still have to actually do it. What if I want to automate the process to respond to datastore capacity threshold limits? There are a variety of ways to achieve this. Let’s look at it via vCenter SNMP alerts and vRealize Orchestrator workflows.
Configuring SNMP in vCenter
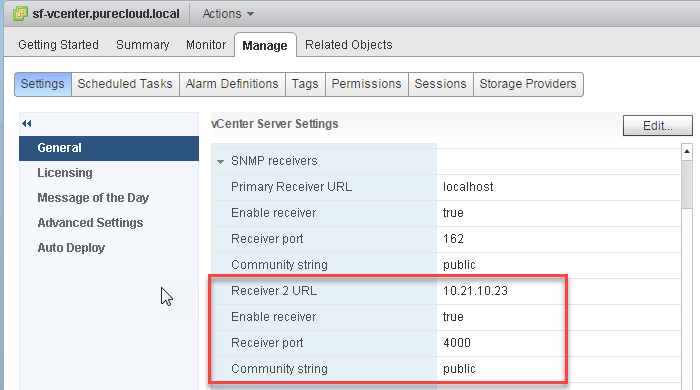
This is the simplest part. Go to your vCenter and click on the vCenter object you want in your inventory. Choose “Manage” then “Settings” then “General”. Click “Edit” and then configure the “SNMP Receivers”. Add an entry for your vRealize Orchestrator instance (your vRO IP or FQDN). Enable the receiver and enter a port of 4000. You can use other ports, but you need to change some defaults in vRO. Might as well stick with this one unless you need to change for whatever reason. Choose a community name and remember this, I went with the basic “public”.
By the way, there is a blog post here from VMware that shows this and the next few steps, it is 5 years old, but mostly still accurate.
Creating the vCenter Alarm
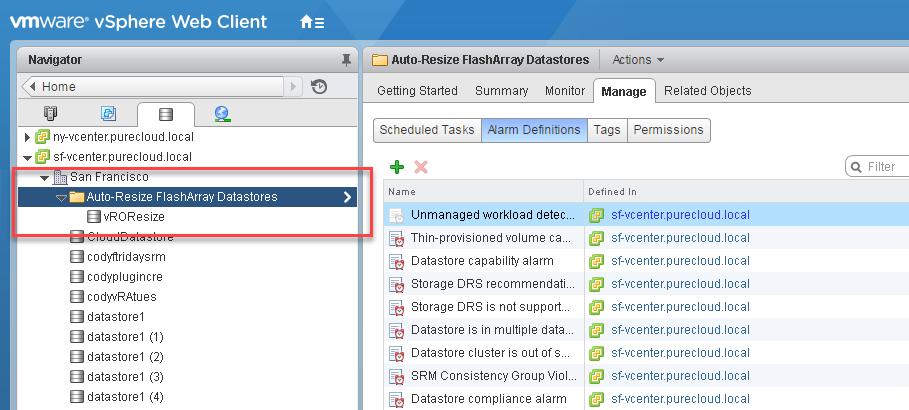
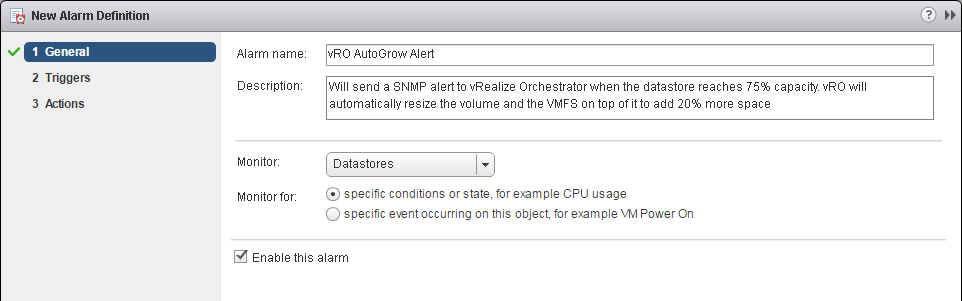
So now, let’s create a datastore alarm for capacity alerts. There are a variety of places to do this. You could put it at the vCenter level. But I am not a huge fan of that. I don’t want all of my datastores to be resized automatically and in fact many cannot, like my local datastores. So you can apply it at an individual datastore level, but that means you need to create a new alarm for every datastore you want this feature for. So a better option is to create a datastore folder and assign it on the folder. Move the datastores you want to have this into that folder.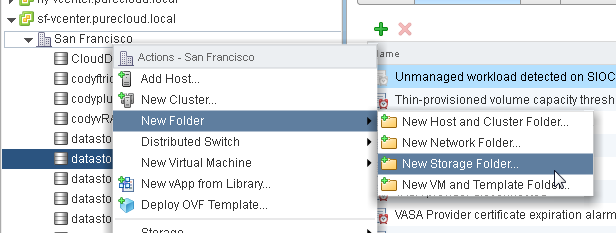
Makes this more flexible.
Now create an alarm on the folder.
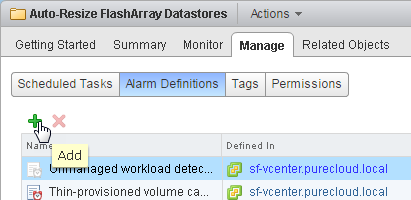
Give it a unique name. This is important, because the alarm name will be used in vRO to help identify the SNMP trap. Description and then enable the alarm. Enabling the alarm will enable it for all of the objects in that folder. Choose “Datastores” and “specific condition…”.
Now add a trigger. Click the green plus sign, and choose “Datastore Disk Usage”, it will likely be the default choice. Keep the “Trigger if” to the default of “All”. I am choosing the warning condition to be 75% full, feel free to choose your own. For our purposes the critical condition is irrelevant as I plan on having it act upon the warning condition, which will prevent the critical from ever occurring.
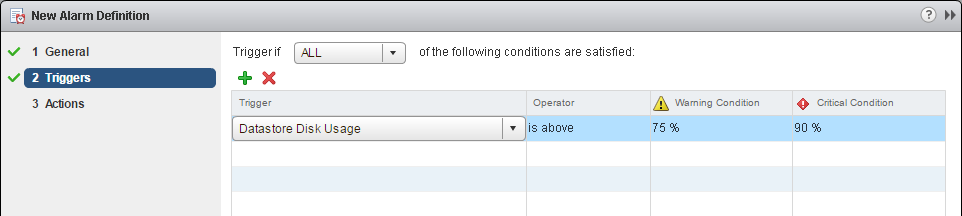
Now add an action. Choose “Send a notification trap” and have it act once upon green to warning condition.

I am only having it act upon a warning. Though upon some reflection, it might be a good idea to have an action upon critical to send you a message, because this means the expand process failed somehow. But I won’t do that here.
Now you are all done with vCenter. Over to vRealize Orchestrator!
Configuring a SNMP device in vRO
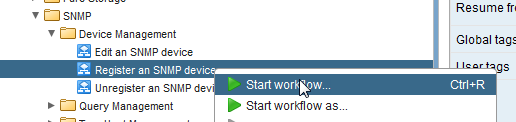
The first thing you need to do is add the vCenter as an SNMP device in vRO. So start the “Register an SNMP device” workflow.
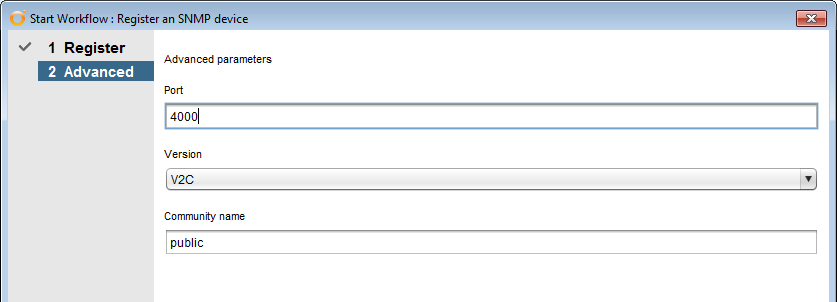
Fill in your vCenter FQDN and a friendly name and choose advanced.
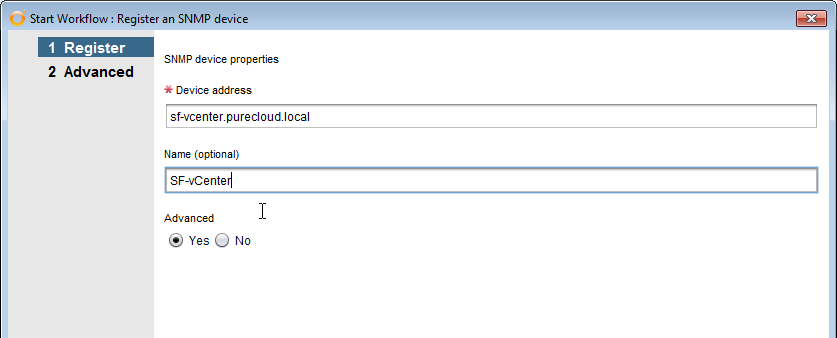
You can choose another port, but I had some issues getting it to work with anything other than 4000, so change it to that. Choose your SNMP version, in my case it is version 2. Make sure the community name is exactly as it is entered in vCenter: “public”.
Finish the wizard. Now time to add a SNMP listener.
Adding an SNMP Listener Policy in vRO
Now go to the “Administer” view tab of vRO and navigate to SNMP Trap and click “Apply Policy” from the right-click menu.
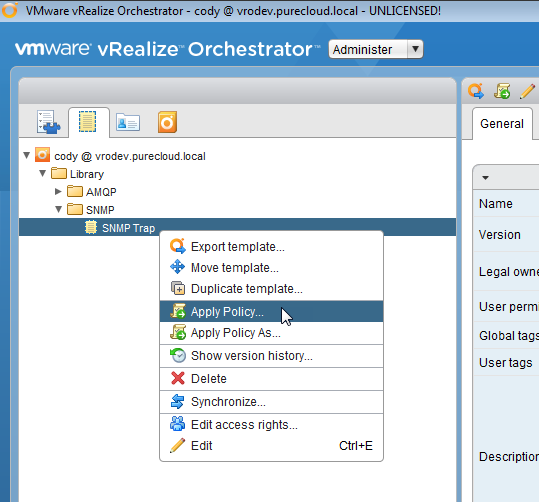
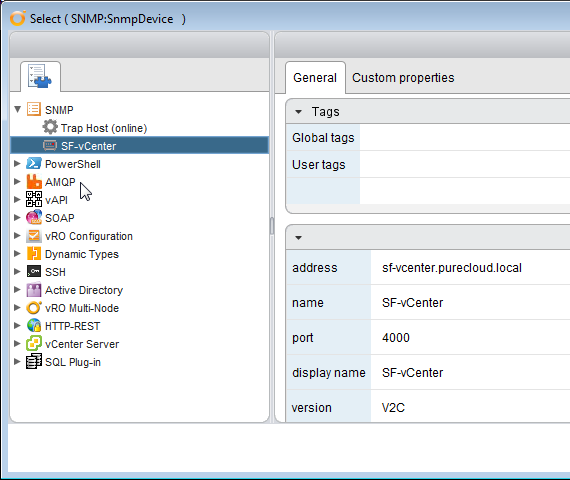
Give it a name and a description and navigate through the inventory to add your vCenter as a SNMP device to be watched.
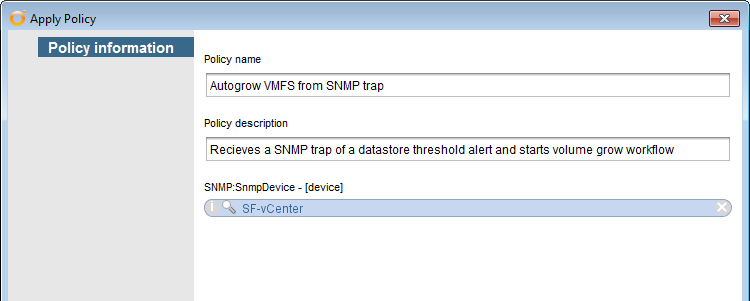
Now a new policy will appear in the “Run” view under your policies.
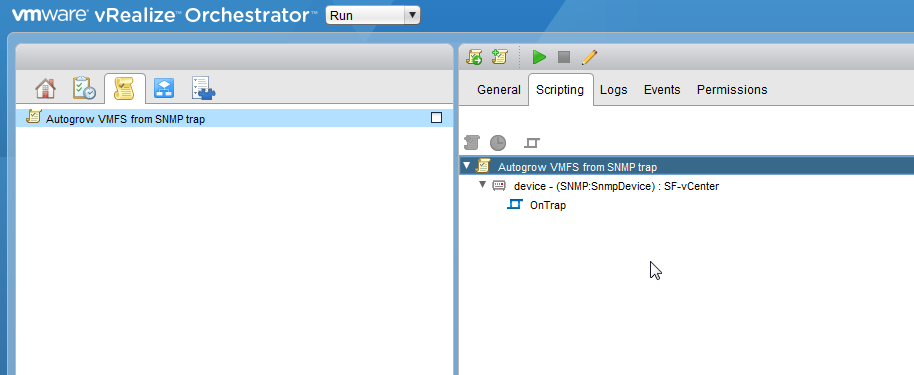
Configuring the SNMP Policy
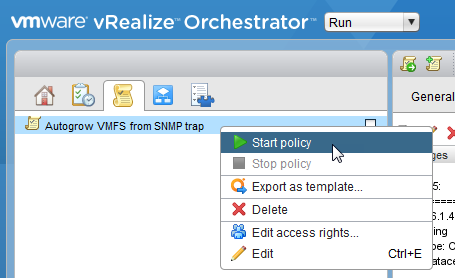
Now that a new policy is there, you can start it. Starting it will make vRO monitor what is being sent to the configured device. By default, the policy will not really do anything other than log any SNMP traps that it gets from that source (my vCenter).
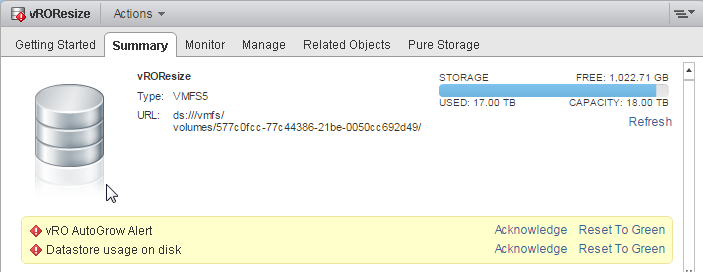
So, I filled my datastore by creating a zeroedthick virtual disk with vmkfstools.
vmkfstools --createvirtualdisk 17408G --diskformat zeroedthick testdisk1.vmdk
This made my datastore fill up and my alarm to be activated:
If we look at the log for my vRO policy we see the following:
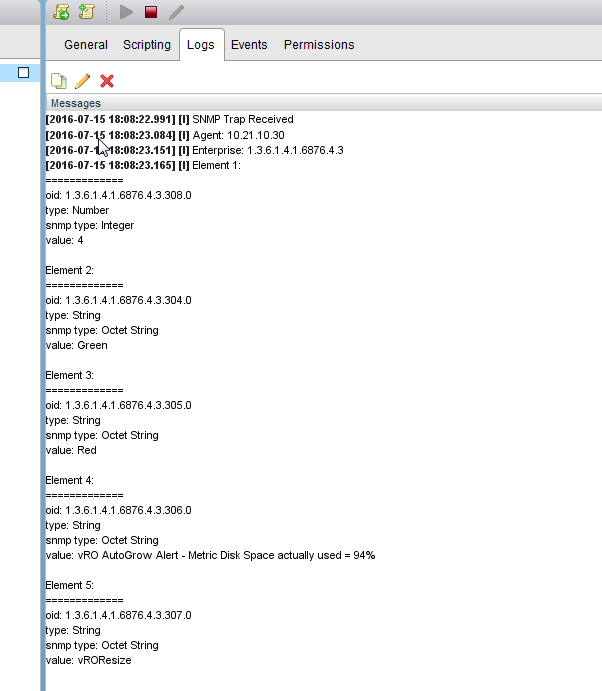
So, great, it is seeing my trap. Let’s edit this to actually do something. As you can see, we have the information we need–the name of the datastore (element 5) and the exact alarm name that has been activated (element 4).
Handling the SNMP response
At this point you need to write the Javascript to identify the right situation/trap and act upon it. Click on your policy and the edit it. Select the “OnTrap” object and go to the script.
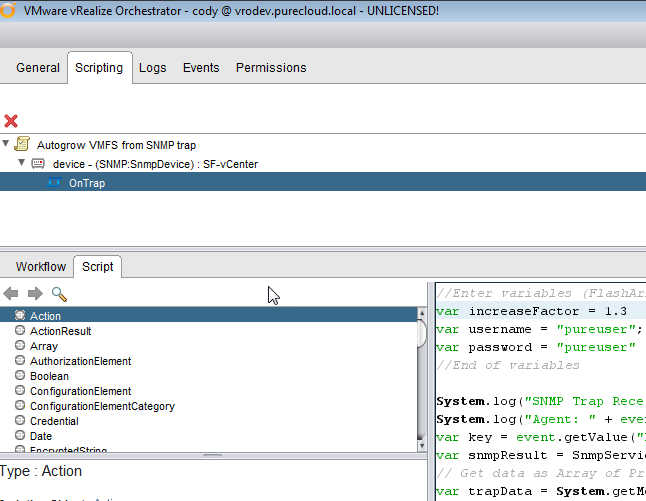
You will see some basic code in there. This code will receive any SNMP trap from that device and log it. But we need to add code to identify the right one and kick off an expansion workflow. I am looking for two different OID (info on that here):
- OID 1.3.6.1.4.1.6876.4.3.306.0 (includes the name of the alert)
- OID 1.3.6.1.4.1.6876.4.3.307.0 (includes the name of the object the alert was sent about)
At this point I will look at the messages to find a response. If i see an alert with the text “vRO AutoGrow Alert” I then also grab the name of the object. Since this is a custom alert, I know I can use the name to expand the volume. The trap data is stored in a variable named “trapData”.
var alertOid = "1.3.6.1.4.1.6876.4.3.306.0";
var datastorealertOid = "1.3.6.1.4.1.6876.4.3.307.0";
var capacityAlert = false;
for (var i=0; i<trapData.length; i++)
{
    var elem = trapData[i];
    if(elem.get("oid") == alertOid)
    {
        var value = elem.get("value");
        if (value.substring(0,18) == "vRO AutoGrow Alert")
        {
           System.log(value + " alert detected");
           capacityAlert = true;
        }
    }
    if(elem.get("oid") == datastorealertOid)
    {
    var dsName = elem.get("value");
    }
}
If i find these I set capacityAlert to true and move on to start the workflow.
So I have a datastore name. Now I made a function to find the datastores and find the one with that name.
var ds = findDs(dsName);
The function:
function findDs(dsName)
{
    var datastores = VcPlugin.getAllDatastores()
    var dsResult = null;
    for(var b=0; b<datastores.length; b++)
    {
       if(dsName == datastores[b].name)
       {
         dsResult = datastores[b];
         break;
       }
    }
    return dsResult;
}
I removed logging and some error handling to make it a bit easier to read. Takes in the datastore name and returns the datastore object. Now if you happen to have a lot of vCenters where there could be a name collision, you will probably want to do some more checking to make sure you have the right one.
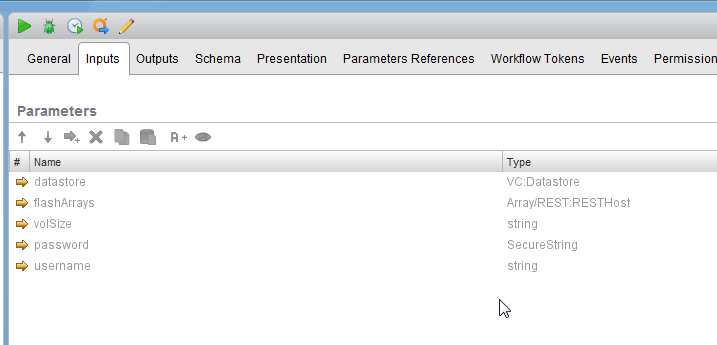
Now I can run my workflow. I have a workflow (in the FlashArray Workflow Package) that takes in a datastore object and however many FlashArrays and identifies which array it is on and then which volume on that array hosts it. So, to launch this workflow, I need to send it some information. I created a function for this.
function runWF(wfid,ds,dsNewCapacity,restHosts)
{
 var workflowToLaunch = Server.getWorkflowWithId(wfid);
 if (workflowToLaunch == null)
 {
 throw "Workflow not found";
 }
 var workflowParameters = new Properties();
 workflowParameters.put("datastore",ds);
 workflowParameters.put("flashArrays",restHosts);
 workflowParameters.put("volSize",dsNewCapacity);
 workflowParameters.put("password",password);
 workflowParameters.put("username",username);
 System.log("Launching Expand VMFS Workflow. Please refer to that workflow for specific logs.");
 var wfToken = workflowToLaunch.execute(workflowParameters);
}
I send one variable with all of the parameters in it as an object type of “properties”. Not all of these variables may be required for you. Depending on the workflow you plan on running and the array that is hosting it. The important thing is make sure you enter in all of the inputs of your workflow in here. They need to be the same names and the same type. Otherwise validation will break. My workflow I want to run asks for the below. Which is exactly what I have above:
So now call the workflow function:
runWF(wfId,ds,dsNewCapacity,restHosts);
That will send in what you need and kick off the expansion.
Save it and start the policy! Now any datastore that has that alert on that vCenter will automatically be expanded.
Here is a video demo of the process once SNMP has been configured.
The policy template can be found here:
Also, this template is included in the Pure Storage FlashArray Workflow Package 1.4 and later.
https://github.com/codyhosterman/orchestrator/blob/master/com.purestorage.codyhosterman.package
Hello from Italy.
Should I also run the “Set SNMP trap port” setting this port to 4000 and subsequently “Start the trap host”?
Otherwise I can’t see any process listening on 4000/UDP, even with the policy started.
Sorry for the (probably) silly question, but I’ve just begun my journey into VRO…
Best regards and thanks in advance
Hello from the US! Not a silly question at all! None of this is documented particularly well–it is a good question. Depends on what you are trying to do, I didn’t do it that way, I just built my own and started it by running a policy. That one will just start a generic listener that doesnt do anything but receive traps. The default port is 4000, so you only need to run the other if you want to change the default port for that trap host.
Ok, I’m simply concerned about conflicts between the “specific” Listener and the “generic” one, if I set both ports to 4000.
I admit of having followed an (outdated) howto found on vcoportal.de (http://www.vcoportal.de/2012/05/integrate-vcops-and-vco/), and it suggests to start the trap host before configuring the policy.