
This is part 1 of this 7 part series. Questions around managing VMFS snapshots have been cropping up a lot lately and I realized I didn’t have a lot of specific Pure Storage and VMware resignaturing information out there. Especially around scripting all of this and the various options to do this. So I put a long series out here about how to do all of this. Let’s start with what an unresolved VMFS is and how to mount it.
The series being:
- Mounting an unresolved VMFS
- Why not force mount?
- Why might a VMFS resignature operation fail?
- How to correlate a VMFS and a FlashArray volume
- How to snapshot a VMFS on the FlashArray
- How to mount a VMFS FlashArray snapshot
- Restoring a single VM from a FlashArray snapshot
A lot of this information is on the web already, probably all of it. But it doesn’t all seem to be in one KB in one place. So here is what I have seen and tested. I am using ESXi 6.0 U1 by the way, but it shouldn’t really matter much after 4.x. The best KB VMware has for this is:
Background
First off, what is an unresolved VMFS? An unresolved VMFS is a VMFS that has been copied (block for block) from one storage device to another. Almost invariably this is going to be SAN-attached storage where array-based snapshots and replication is common.
A VMFS has a UUID which is, in part, related to the serial number (usually a NAA or Network Address Authority ) of the device (LUN, volume, whatever you want to call it) that stores the VMFS. This UUID is created upon initial format of a VMFS along with of course the friendly name/label you specify. This is all stored inside of the VMFS on that device.
When a VMFS is copied, so is that UUID because it is stored in the metadata of the VMFS (just like the VMFS name). In SAN storage, each device has a unique serial number so when that data (the VMFS) is copied to a new one and presented to ESXi, ESXi detects a UUID mismatch and will not mount it by default (well, since after the 3.5 days). It marks it as an unresolved VMFS and just queues it up to be mounted upon user request.
Therefore, when you want to actually mount a snapshot volume, you need to make a decision. Give the unresolved VMFS a new signature or force mount it with the old signature. Giving the VMFS a new signature makes the VMFS look like a unique filesystem and will not be confused with the old one. Once resignatured, there is only a logical relationship between it and its source because it has the same data as some previous point-in-time of that source volume but does not share any identifying information.
The resignature process does two main things:
- Creates a new signature
- Renames the volume by adding a snap-XXXXXX prefix to the original name
Force-mounting allows ESXi to ignore this mismatch and will just mount the VMFS as is. This will allow objects to continue to reference this VMFS as if it were physically the same one as the original source. More on this in the next post and why I think it is a bad idea.
Let’s focus on resignaturing. And for this post, let’s ignore how to create a snapshot on the FlashArray or how that works, lets focus purely on the VMware side. So this is relevant to really any of your SAN storage.
Before we move into “how-to’s” let me set the scene.
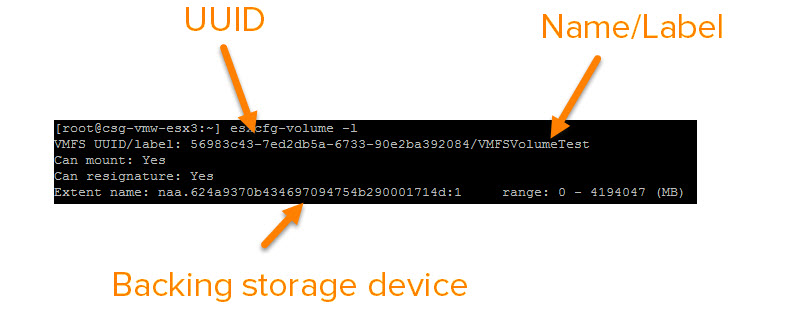
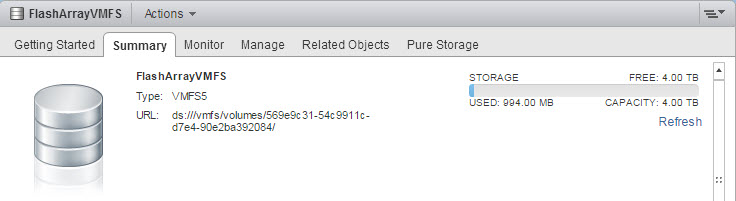
I have a 4 TB VMFS named “FlashArrayVMFS” with the UUID of 569e9c31-54c9911c-d7e4-90e2ba392084.
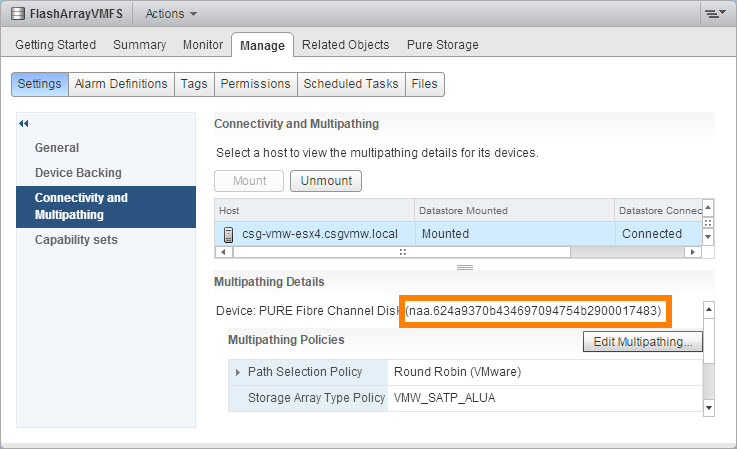
The VMFS resides on a 4 TB FlashArray device with the NAA of naa.624a9370b434697094754b2900017483.
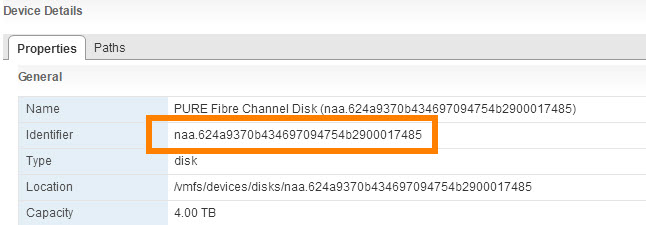
I have taken an array-based snapshot of that volume and presented it via a new FlashArray device. It has yet to be resignatured, so it has the same UUID, but since it is a new physical device, the NAA is different and is naa.624a9370b434697094754b2900017485. Note that the last couple of digits are what differ between the two devices.
We will run under the assumption that the ESXi hosts have already been rescanned and the hosts can see the device. All we need to do is resignature and mount it.
Read the GUI section below first because it has more explantory color about the process. The CLI and then the PowerCLI section are more straight-up instructional.
Option 1: Resignaturing with the vSphere Web Client
The vSphere Web Client is the simplest method to do this, but not the most scalable. A few clicks and you are done. So log into the vSphere Web Client and navigate to the hosts and clusters view. Right-click on a cluster or host object (depending on how the volume is physically presented on the fabric) and then click on “Storage” then “New Datastore”.
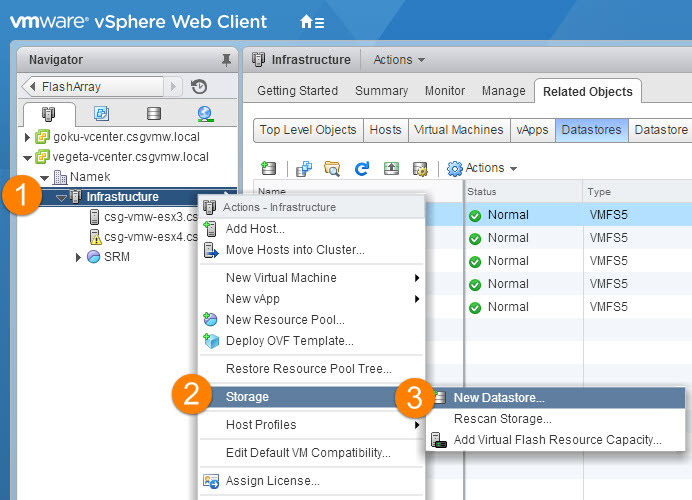
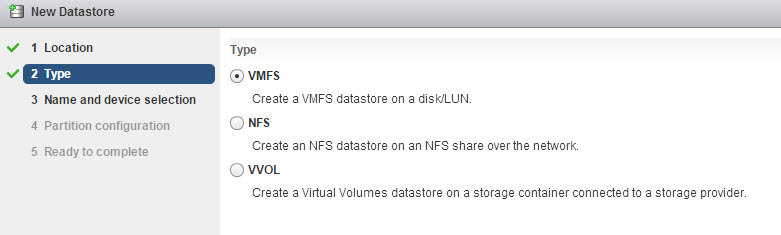
Choose VMFS as your datastore type.
 Now you can choose the device to mount. If you chose a cluster you must first select a host to perform the operation from (ESXi resignatures a volume, not vCenter). If you started this from a host it will be forced to that host. If the volume does not appear, you need to rescan your host(s), and/or check SAN connectivity (zoning, masking etc).
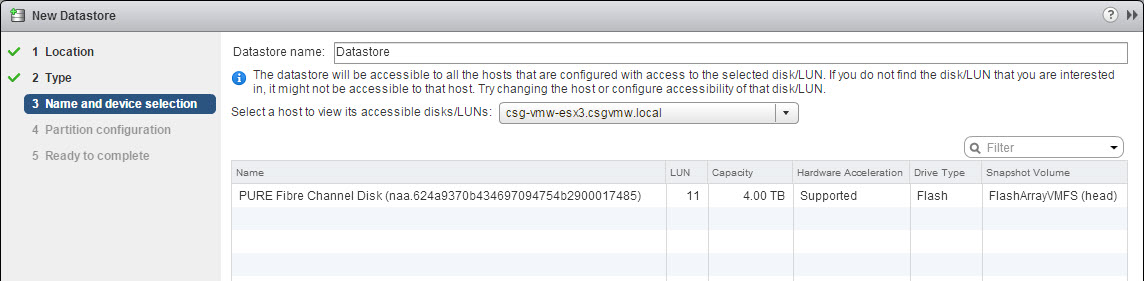 You can see that my NAA appears and to further identify it, you can see under the column “Snapshot Volume” you can note that the ESXi host does see that this device hosts a snapshot copy of a VMFS. But it needs to know how to mount it because it has a UUID mismatch. Select that device.
FYI: Don’t bother giving a new name in the “Datastore name” box. This is only honored for new VMFS volumes, it will be ignored by the resignature operation. If you want to rename it, do it later.
The next page allows you to tell the ESXi host how to mount the volume. Resignature or force mount? Or discard the VMFS and format new if you so choose. Let’s choose “Assign a new signature” to resignature the VMFS.
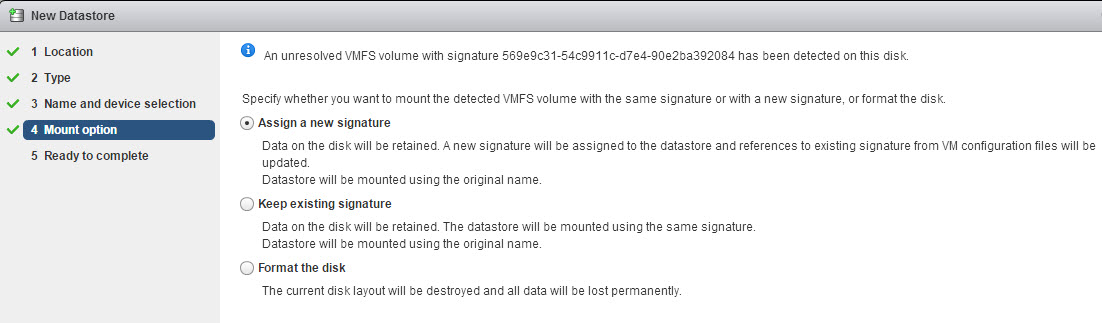
Complete the wizard and let it go. ESXi will resignature the volume and rename it (the rename prevents any naming collisions in case the original volume is still present in some way in the vCenter). The snapshot prefix will be added. So my VMFS name is now “snap-2976bb82-FlashArrayVMFS”. The UUID is now 569ea10e-af3454fa-7236-90e2ba392084.
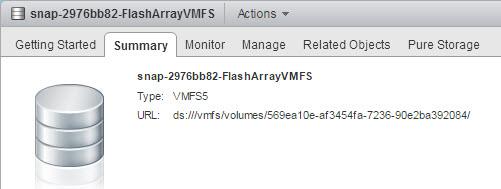
The UUID is similar but not identical:
OLD UUID: 569e9c31-54c9911c-d7e4-90e2ba392084
NEW UUID: 569ea10e-af3454fa-7236-90e2ba392084
Option 2: Resignaturing with the ESXi CLI (esxcli)
This pretty straight forward. Just two commands if you know what you are looking for. So SSH into a ESXi hos that has access to the volume you need. First identify the volume information you want to resignature. There are two ways (well many more actually) to do this:
esxcfg-volume -l
esxcli storage vmfs snapshot list
They both present the same information for the most part, so you can use either. What esxcfg-volume adds though is the NAA. The NAA of the volume is not reported by esxcli, so if you want to verify the volume that might be a better option. Your call.
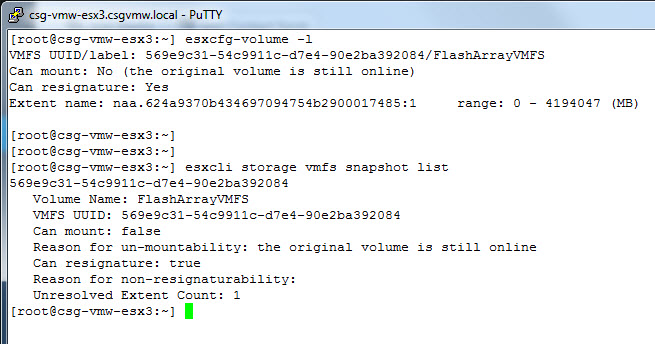
The information that you need is the volume name or the UUID. The command to resignature is also both an esxcli and esxcfg-volume command:
esxcli storage vmfs snapshot resignature -l "<VMFS name>"
esxcli storage vmfs snapshot resignature -u "<UUID>"
esxcfg-volume -r <VMFS name or UUID>
Choose your poison and run it.
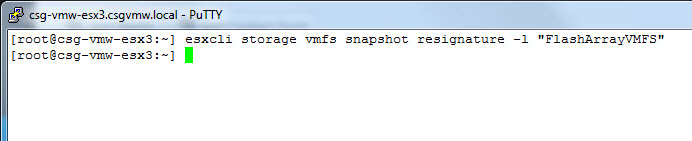
The resignatured volume now has a UUID of 569ec5bf-c2e9f0e8-450c-90e2ba392174 and is named snap-3674f5d0-FlashArrayVMFS.

Option 3: Resignaturing with PowerCLI
This is definitely the most scaleable method to resignature volume en masse. The trick here is to understand how esxcli commands work in PowerCLI. Essentially, you have to define a esxcli object for a particular host and then you execute esxcli commands against that object.
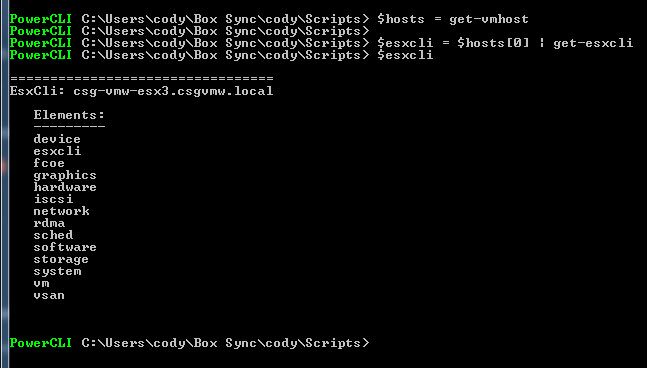
So, if I have a host called csg-vmw-esx4.csgvmw.local and it sees a unresolved VMFS and I want to resignature it this is what I have to do.
First connect to a vCenter that owns that ESXi host:
connect-viserver -Server vegeta-vcenter.csgvmw.local
Then get a list of hosts to see what you have.
get-vmhost
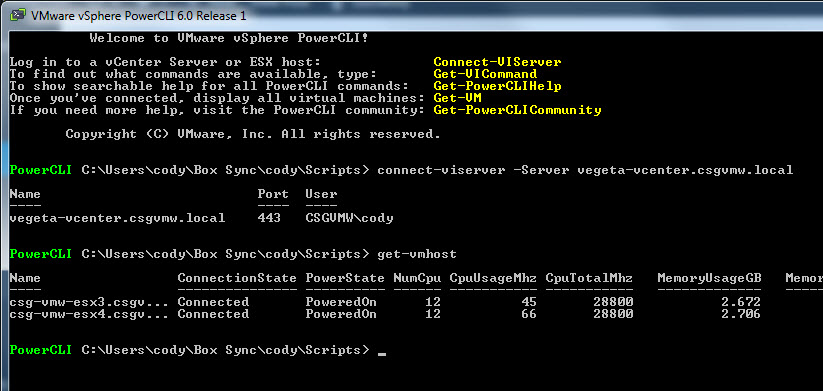
To create an esxcli object, use the cmdlet get-esxcli by piping it one of those hosts. In my case I will store my hosts in an object called $hosts and use the first one in the array of hosts. There are a billion ways to do this with PowerCLI, but this is a simple one.
$hosts = get-vmhost
$esxcli = $hosts[0] | get-esxcli
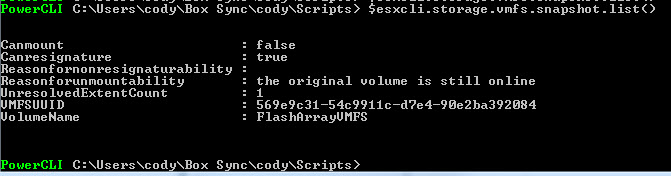
The rest is pretty similar to the previous CLI. To list the available unresolved volumes run:
$esxcli.storage.vmfs.snapshot.list()
If you named your variable something besides $esxcli just swap those out–name it whatever you want.
To resignature is a familar command as well. Just pass in the name or UUID as a string (in double quotes):
$esxcli.storage.vmfs.snapshot.resignature("<name or UUID>")

There ya go!
this is great!! thanks for the info. Very informative and well written !
You’re very welcome! Thank you!
Once again, a Cody Hosterman blog post save my butt.
Glad to hear it helped!
Customer asked if there is any recommended way to protect and restore a single VM as supposed to the whole LUN.
Is one of the Snapshot management series the best place to look?
Well VVols make this very simple. That’s the best way to go. If they are not using VVols, then the full volume has to be restored no matter what. What depends is how you do it. They can use our vSphere plugin to restore a copy of the datastore from snapshot, pull the vm out and then destroy the copied datastore. Or they can use our Powershell module. Or our vRO plugin that automates the whole process. Or manually of course